Tag: Beef

Scottish Bistecca alla Fiorentina

Scottish Bistecca alla Fiorentina

Travelling back from a week away in Scotland we called at a fantastic farm shop.  Kilnford Farm Shop sits on the outskirts of Dumfries, just off the A75.  There was so much we could have chosen, but the 28 day matured T-bone joint seemed to have our name written all over it! In the UK, the T-Bone is also know as a Porterhouse steak but in Italy we would have been thinking Bistecca alla Fiorentina.

Bistecca alla Fiorentina comes from the loin, below the ribcage.  If the cut contains both the sirloin and the fillet then it has been taken from just below the ribs.  As you move closer to the rump the cut just contains the Sirloin.  Outside Tuscany a Bistecca alla Fiorentina normally contains the fillet.  In Tuscany however,  and particularly in Florence you may be offered bistecca nel filetto (with the fillet) or bistecca nella costola (without the fillet) (ref 1).

We asked for a piece around 3cm thick which delivered around 1Kg of the finest Galloway Beef! And our piece was most certainly bistecca nel filetto!

Classically, Bistecca alla Fiorentina comes from the enormous Chianina cattle that have been farmed in the  Chiana Valley in Tuscany for more than 2000 years.  Our beef was reared in Scotland, in Galloway by the owner of the farm shop.  These Belted Galloway cattle are much smaller and really suited to the area in which they are reared.  They are allowed to grow slowly on rough pasture and only receive a limited amount of concentrated cereal feed as they reach maturity to encourage marbling in the meat (2). It is a real privilege to be able to enjoy meat produced in such a low input and environmentally sustainable system here in the UK.

Traditionally, a Bistecca alla Fiorentina is cooked very close to the wood embers from room temperature.  There should be little or no seasoning and it is said that it should only be turned once after 3-5 minutes.  It is then finished standing upright on the bone for between 5-7 minutes.

We have previously cooked our version of Bistecca alla Fiorentina using a reverse sear technique.  This time too we were not completely following the Tuscan tradition to the letter either.  The purpose of cooking closer to the embers is to develop an aromatic crust with the Maillard reaction. We were going to do the same but using our stainless steel plancha.  This encourages an even colour over the whole steak rather than just on the stripped grill marks, as described here. (My personal view is that neat grill marks represents chef vanity rather than cooking excellence!!!! But please feel free to differ!)).

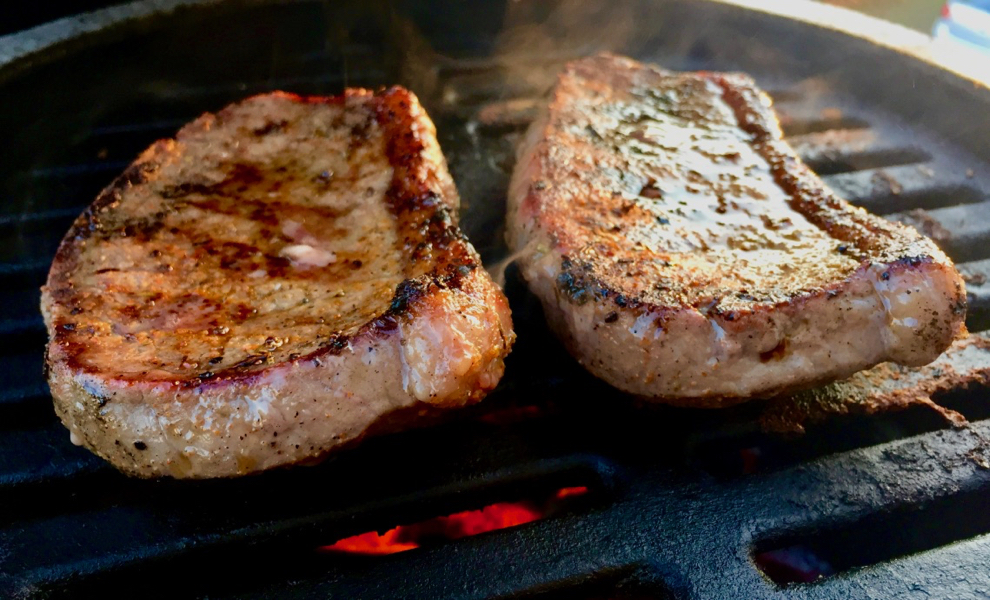
The BGE was set for direct cooking with the Plancha at around 230C dome temperature.  The steak had been warmed to room temperature, dried (to enhance the Maillard reaction) and very lightly salted just before putting onto the heat.  As we were on a plancha rather than using open heat, the sub-dermal fat layer on the edge of the steak was first coloured by direct contact with the hot plancha as in the first picture.  This quickly releases some fat which may ignite.  Be carful not to burn the fat layer.


The flat sides of the steak were then exposed to the heat of the plancha.  Although I tried to resist the temptation to turn the meat more than once, this is much less important when you are not trying to realign  grill marks! We turned this every couple of minutes.

As soon as a good colour has been developed on both sides of the steak the meat was stood vertically on the T-bone itself.  This is said to make sure that any traces of blood (actually myoglobin) have been eliminated from the bone.  In reality though the bone also acts as a thermal shield whilst the rest of the meat roasts for 5-7 mins.  It is worth taking a measure of the core temperature to make sure this is not done for too long.

Traditionally the core of a Bistecca alla Fiorentina is served between blue and rare – and certainly only warm rather than cooked!  Our preference though is to serve it a little warmer and so just rare.

Our core temperature after 5 minutes standing was still only in the high 20s Centigrade.  Whilst the temperature would rise by a few degrees during resting we decided to give it a conventional oven finish.  Our oven of choice here would clearly be the BGE.  Sitting the steak on a bed of Rosemary in a cold handleless pan and putting this back on the BGE would safely allow 5 mins or so more roasting without over cooking.  This was a technique we first came across on a Theo Randall cooking course.

After around 5 mins the core temperature had risen to around 45C and was ready to rest.  It was taken out of the BGE and wrapped in foil and covered with a tea towel to rest and keep warm.  Whilst resting some parboiled potatoes were roasted off in the BGE using the residual heat.

Once fully rested, the meat was a joy to carve.  Carved at right angles to the bone separating the sirloin and the fillet.  This is often just served by itself on a sharing cutting board with some lemon, the fillet and the sirloin surrounding T-bone.

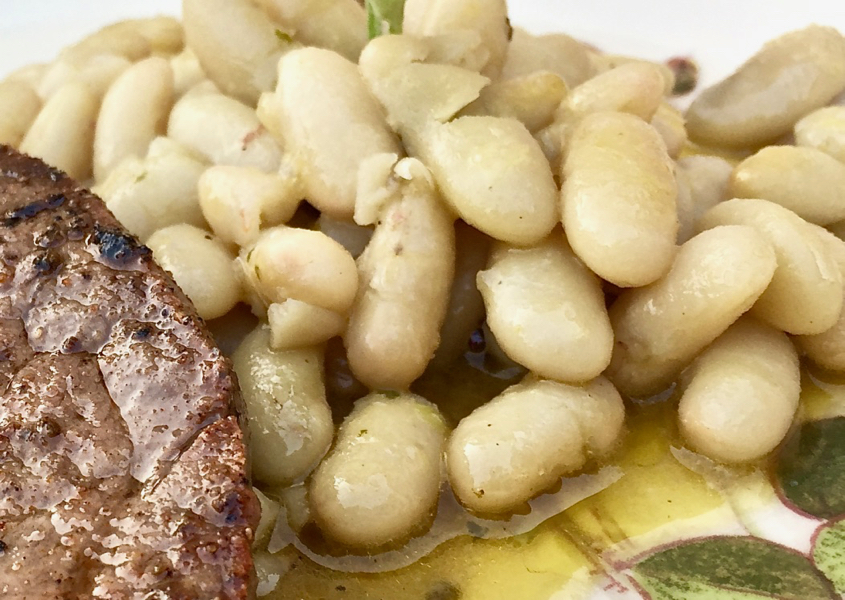
We chose to serve it plated.  Separating the sirloin and the fillet we served with the roasted potatoes and a mix of French beans and semidried tomatoes in oil.

This was a truly fabulous dish using carefully reared and butchered meat from the UK, every bit as good as any we have had in Tuscany.  This beautiful dish was cooked using the principals if not the absolutely identical techniques used for a classical Bistecca alla Fiorentina.  Whether you see this as an homage to the classical Bistecca alla Fiorentina, or as a great way to cook some wonderful Scottish steak really doesn’t matter!  It was a great dish ………………

………………which ever way you see it do give it a go!!

References

1, https://www.theflorentine.net/2016/06/21/exactly-bistecca-alla-fiorentina/

2, https://www.kilnford.co.uk/visit/butchers

Scottish Bistecca alla Fiorentina

July 21, 2023
: 2-3
: 5 min
: Reasonably straightforward

A fine Scottish T bone from a Belted Galloway Heffer given the Bistecca alla Fiorentina treatment

By:

Ingredients
  • A T-bone steak approx 3cm thick (1Kg) Ideally matured for at least 21 days
  • Salt
  • Rosemary
  • Finishing salt
Directions
  • Step 1 Remove the steak from the fridge ideally at least 2 hours before cooking to bring to room temperature. Set up the BGE for plancha cooking either with a dedicated plancha or a cast iron frying pan that will allow the lid to close – allow to stabilise with a dome temp around 230C
  • Step 2 Dry the steak and very lightly salt it. Expose the fatty edge of the steak to the plancha but be carful not to burn the fat layer.
  • Step 3 Turn the steak onto one side and press the steak down to make good contact. Either turn the meat every minute or so until the surface has good colour – or if feeling brave just turn once after 3-5 mins and repeat on the other side. As soon as a good colour has been developed on both sides of the steak stand the steak vertically on the T-bone itself.  Roast in this position for 5-7 mins. If going for a traditional ‘blue’ finish the steak may well be at that stage at this point (check with a thermoprobe)
  • Step 4 If wanting to serve the core rare or medium rare it could be left in this vertical position for longer. Alternatively, as we did here sit the steak on a bed of Rosemary in a cold handleless pan and put this back on the BGE until the core temperature has risen to around 45C
  • Step 5 Remove the steak and wrap in foil then cover with a tea towel to rest and keep warm.  Once rested (at least 10 mins) carve at right angles to the bone separating the sirloin and the fillet.  Serve on a cutting board with some lemon, the fillet and the sirloin surrounding T-bone or plate with vegetables of your choice


Coda alla vaccinara – Braised Oxtail Ragù

Coda alla vaccinara – Braised Oxtail Ragù

This quintessential Roman dish is a perfect example of Roman food history.  This particular recipe dates from 1887 and is an iconic dish, but one probably few people know about, and certainly very few outside Italy.  In Rome, until late in the 20th century, prestigious cuts of meat were reserved for the rich.  The butchers (vaccinari), slaughter house workers and lower classes of Rome ate the off cuts and the offal.  These were referred to as the ‘quinto quarto’ (the fifth quarter) – see below.  It was the inventiveness of (more…)

Beef Shin Ragù with red wine

Beef Shin Ragù with red wine

We are continuing to plan our way through the diversity and breadth of the history of ragù in Italy.  Some time ago we published our first ragù recipe from that master of Italian food;  Theo Randall (you can find that recipe here) – if you have not come across Theo – check him out here.

This dish has a lot of similarities to that recipe of Theo’s in that it is not Bolognese in style (more…)

Wagyu Ragù:- crazy title – great dish!

Wagyu Ragù:- crazy title – great dish!

We have cooked so much ragù on the Big Green Egg but written very little about it.  This is just because I have been overwhelmed by the diversity and breadth of the history of ragù in Italy.  So where do you start?  Well we are starting here – with a master of Italian food, Theo Randall.  Jackie and I have recently been doing some online courses from Banquist, a company based in the UK.  Their pasta course was led by Theo Randall – if you have not come across Theo – check him out here.

This was the second dish we cooked on the course.  It was a beef ragù, with more Neapolitan rather than Bolognese origins in that tomatoes are very well represented in the sauce.  This is not the case with Bolognese cooking (you can feel the complication of Italian cooking history already).  However you chose to classify it though, it is a really great ragù.  This recipe follows Theo’s almost exactly.  It was, however, cooked for longer at a lower temperature and was cooked over charcoal on the Big Green Egg.

The meat used for this first ‘run out’ of this recipe was wagyu shoulder. Beef shoulder is often referred to as Chuck and I would suspect that any chuck would work well in this recipe!  Using substantial chunks of meat when making a ragù has the enormous advantage that they are easy to manage at this stage when trying to get colour onto the meat.  It is that Maillard reaction that brings so much extra flavour to dishes. The chunks of beef were dried and then seasoned generously with salt.  The beef was then fried at a high heat in a pan with a little olive oil, making sure that all sides of the meat were browned.  This could be done on the BGE but on this occasion these first stages were done on a domestic hob in the kitchen.  Whilst the meat was browning a large onion was halved and diced reasonably finely.  The meat was then removed from the pan and set to one side.

The diced onion was then added to the pan with the remaining meat juices, together with a further kiss of olive oil. As the onions started to sauté 2 sticks of celery were finely chopped and added to the pan with a little more olive oil and fried on a medium heat for around 4 minutes.

This is where we came across the first surprise.  A sofrito normally has diced carrot, which would be added at this stage, but the advice was to miss out the carrot (as much for visual reasons as anything else).  A little reluctantly we went along with this (Chef Randall has had a Michelin Star after all!!). So a slightly different looking sofrito in this one!!

As the sofrito was cooking the San Marzano tomatoes were chunked and then very finely blended with a stick blender.  Normally a passata is sieved to remove the seeds and skin.  When it is blitzed in this way though it is not really necessary and there is far less waste.  The blitzed tomato was going to be used with some conventional passata to add some sweet freshness.

The beef was added back to the sofrito and the chopped rosemary.  The red wine was added and stirred through the mix. This was left to simmer for a few minutes to drive off the alcohol before adding the tomato pulp and the passata.  The pan was then brought to a gentle simmer.  If we were going to finish the cooking in a conventional oven this would be the time to add a close fitting lid before putting it in the oven at around 180C for around 90 minutes.  We were, however, going to cook the ragù on the BGE set up for indirect cooking at between 150-160C.

Because we were cooking on the BGE the pan was not lidded for some of the cook as the EGG doesn’t dry out a casserole in the same way a domestic oven does.  As we were cooking at a lower temperature we cooked for around 2.5 hours rather than the 90mins in the original recipe.  If necessary just add a little more liquid if needed.  The great thing is that as long as you don’t let the dish dry out it is difficult to overcook it!

Once the meat is meltingly tender the casserole can be removed from the Big Green Egg for the next stage in the process.  As we started off with large chunks of meat we then needed to break up the  meat into the sauce.  The easiest way to do this is with a whisk.  The whisk is simply used to bash the meat until it breaks down to the required consistency as in the picture.  The ragù can be used straight away or left to mature overnight.  If anything it is a little better on the second day!

We were serving the ragù with home made egg pasta.  Hopefully we will publish this later.  We were going to use a very traditional Tuscan Pappardelle pasta which is usually around 2cm wide and around 25cm long.

The secret of a great pasta ragù is to slightly undercook the pasta so that it is al dente and then to add the pasta and a little of the salted pasta water to the ragù.  The final cooking of the pasta is finished in the ragu.  The pappardelle is gently stirred through the ragù and as that is done it releases some of its starch, adding a silkiness.  Just before it is ready to serve, a handful of chopped herbs can be added and stirred through; on this occasion parsley.

All that is left to do is pop open a good bottle of Italian red, and serve the pasta on the plate or bowl of your choice.  ideally the serving dish for this sort of pasta should have a flat base.  This traditional way of serving the dish has the practical advantage that the pasta can be spread out.

……….so some freshly grated parmesan……..

……………… and away we go!!


Footnote: The dish was delicious and my concern about missing the carrots out of the sofrito on this occasion were unfounded – however as a rule I am still using very finely diced carrots in my sofrito for other dishes!!

Wagyu Ragu - with pappardelle

December 22, 2021
: 4
: 1 hr
: moderate

A sumptuous beef ragù to serve with a pasta of your choice (Though ideally pappardelle!!)

By:

Ingredients
  • 400g Wagyu Chuck
  • Maldon salt
  • Olive oil
  • Half a large onion (or a small onion)
  • 2 sticks of celery
  • 300-400g San Marzano tomatoes
  • 150-200 ml passata
  • One sprig of rosemary
  • 175ml red wine
  • Pasta of your choice
  • Parmesan cheese
Directions
  • Step 1 Pat the beef chunks to dry them and season generously with salt. Fry in a hot pan with a little olive oil. Brown all sides. Set aside
  • Step 2 Chop the onion reasonably finely. Add to the pan with a further dash of olive oil and cook till translucent. Chop the celery and  sauté on medium with the onions with a further drop of olive oil for around 4 minutes.
  • Step 3 reintroduce the beef back to the sofrito pan and add the chopped rosemary.  Stir the red wine through the mix and simmer for a few minutes to drive off the alcohol. Chunk the tomatoes and blitz with a stick blender. Add the tomato pulp and the passata to the pan. Bring to a gentle simmer.
  • Step 4 Set up the BGE for indirect cooking at around 150-160C. Cook for around 2.5 hours until the meat is very tender. Remove from the BGE and break up the meat with a whisk. The ragù is ready to use now but will be even better after 24 hours


Simple Rump Steak

Simple Rump Steak

It is so easy to get carried away with ‘clever recipes’.  At times we should get back to how simple first rate cooking can be.  That goes for the BBQ too!  This is a perfect example of that – a wonderfully cooked rump steak!  What could be simpler?  A good piece of rump and something hot to cook it on.   We found these 2 small rump steaks in the freezer.  They weighed just 360g (together) and had been hung for 28 days before VacPacking.

There are so many ways of cooking steak but in principal, they are all the same.  Apply lots of heat to the outside of the steak so it colours and undergoes the Maillard reaction but keep the inside relatively cool so it doesn’t overcook.

The Maillard reaction is the chemical reaction between amino acids and reduced sugars that gives seared food its distinctive flavour.  It is named after French chemist Louis-Camille Maillard. He first described the reaction in 1912.  It occurs most  rapidly  between 140 to 165C. At higher temperatures caramelisation occurs (a browning of sugars). When cooking steak it is likely that both processes are present.  When the meat touches a surface the surface temperature drops.  If it starts at 250C it may quickly fall (at the surface) to between 140-165C.

So we need a hot surface and one that will contact as much of the meat as possible – we have (largely) moved from using the cast iron grill (which is good) to using a solid cast iron surface (which is better).  And perhaps one of the easiest to use is the flat side of the cast-iron plancha made for the BGE MiniMax.

(This is a really good product in it’s own right and also makes a great lid for the matching skillet).   Simply light the EGG and allow the temperature to get up to around 180C.  Then add the stainless steel grid and place the plancha on top and allow the temperature to increase to around 250C.

The steak was around 2cm thick and had been allowed to come to room temperature for an hour or so.  It was dried before seasoning with salt.  You can wipe with a little oil before seasoning with salt – or simply get straight to it and season with salt.  The steak was dropped onto the plancha and the lid of the EGG closed.  The steak was cooked for probably 90 seconds, then flipped over  for a further 90 seconds.  At this point, we used an instant read thermometer to measure the core temperature of the steak.

We were looking to remove these steaks from the heat when the core temperature reached 51C so that when resting the core temperature would drift towards around 56C and a nice medium finish.
Depending on the temperature at this point, then the rest of the cooking time was estimated.  The remaining cooking time was  divide between the 2 surfaces – on this occasion ours needed a further 60 seconds on each side.  Just before the core temperature reached 50C we stood the steaks on their fatty edge to render the fat and to make it beautifully brown “crozzley”!! – The Maillard reaction on full throttle!

The steaks were removed and wrapped in a double layer of foil and covered with a towel to keep warm whilst they rest for around 10 minutes. We use this time to cook or finish off whatever vegetables we are intending to serve with the steak.


Plating was simple: slice some or all of the steak across the grain and serve on your chosen vegetables.  Add a little olive oil and fresh pepper

……………….. serve and enjoy the fruits of your labours!


Simple Rump Steak

October 2, 2020
: 2 - scalable
: 5 min
: 5 min
: Easy

Rump steak cooked simply on very hot cast-iron - possibly the perfect way to do a steak

By:

Ingredients
  • 1 or 2 good rump steaks - these were 180g each
  • Salt
Directions
  • Step 1 With a steak around 2cm thick bring to room temperature for around 1 hour, dry and season with salt (if you wish pre-wipe with olive oil.
  • Step 2 Light the BGE and when it reaches around 180C add the stainless steel grid and place a cast-iron plancha on top and allow the temperature to increase to around 250C
  • Step 3 Drop the steak onto the plancha and closet the lid of the EGG.  Sear for around 90 seconds then flip over for a further 90 seconds.  At this point, use an instant read thermometer to measure the core temperature of the steak.
  • Step 4 Calculate the rest of the cooking time depending on the temperature with perhaps up to 60 seconds more on each side.  When the core temperature reached 50C stand the steaks on their fatty edge to render the fat and make it crispy
  • Step 5 Remove the steaks and wrap in a double layer of foil and cover with a towel to keep warm whilst it rests for around 10 minutes. Use this time to finish off whatever vegetables you are intending to serve with the steak.
  • Step 6 Plate and serve
La Scottiglia revisited – how close had we got in recreating this dish?

La Scottiglia revisited – how close had we got in recreating this dish?

We were very lucky to be able to go back to the restaurant La Scottiglia in Pescina near Seggiano in Tuscany.  Last year, 2018, we wrote about the wonderful dish La Scottiglia that the restaurant has been named after since 1972.  This year we arrived early for a Saturday lunch and were welcomed like long lost friends by the owner.  He immediately started to talk about the recipe and blog we had written last year when we had tried to recreate La Scottiglia (see here).  He offered his congratulations for our efforts and his apologies for not writing something on the website as it would have been difficult to do so in English!

We were shown down to the terrace so we could eat outside in the dappled early autumn sunshine and were  immediately met with a Prosecco aperitif, clearly we were going to have a good lunch!

The menus were newly printed and now carried English translations which was nice.  More staggering was that on the back page was a new description of the history of the restaurant.  We were pleased that the information that we had managed to piece together from the internet seemed to be largely correct – if only it has been present before it would have saved us hours of searching (but then, where is the fun in that!!).

Jackie ordered  a Tuscan Pâté, and then ricotta filled Tortellini with truffles.  For a main course I had the wild boar – but for my starter there could only be one choice – La Scottiglia.  It was with a degree of ‘bated breath’ I tried it – had we got close with our recipe or had I deluded myself?  I needn’t have worried  (too much)!!  Our interpretation was close, though not  identical!  This was ‘softer’ with a little more liquid.  I think there was just a slight hint of chilli which ours did not have and probably a little less tomato.   Also the bread at the bottom of the dish was thinner – and had soaked up less of the glorious juices. So overall a slightly more ‘gentle’ taste than ours – but I think we can be pleased  as we have only been making it for a year rather than for more than a century!  I think we can be reasonably comfortable that ours was a suitable ‘homage’ to this most regional of dishes!

And our plans for this autumn     ……………….. to get closer still!!

Dirty Steak (caveman or cowboy steak)

Dirty Steak (caveman or cowboy steak)

Dirty cooking?  Cooking the food you are about to eat directly onto the burning charcoal. It gets a whole series of names too: Dirty, Caveman, Cowboy. I have to say I have always been rather sceptical about the idea of this form of cooking.   Perhaps just an unnecessary gimmick, and (more…)

Rump Steak and Tuscan Beans

Rump Steak and Tuscan Beans

The simplest of dishes – individual rump steaks and slow cooked cannellini beans with sage!  It is the simplest of dishes if you have already made the slow cooked cannellini beans that is!  But once cooked will stay happily in the fridge for a few days to be used as needed – they are very simple and the recipe can be found here.

As we were cooking on the mini BGE the already prepared cannellini beans were put in a small cast iron Le Creuset casserole dish that we had picked up for a few pounds on eBay – but they could be warmed through in any small pan that would fit on the BGE.  As ours was a cast iron pot. I put it on the grill as it was heating ready to cook the steak – taking it off when the temperature started to rise above 150C knowing the cast iron would keep the beans hot whilst the steak cooked.  And the steak was simplicity itself.  Seasoned with salt pepper and a little steak rub they were dropped onto the cast iron searing grill of the EGG once it had reached 225C.  I have taken to using the cast iron grill upside down, that is with the wider bars on the top as the larger surface area seems to give better caramelisation whilst still allowing any flames direct access to the steak.  They were not large, and so cooking for around 90 second a side brought their internal temperature to around 52C.
Time to take them off the grill and wrap in foil and allow to rest for around 10 mins.

Whilst resting, just time to check the beans were still warm enough (and if not pop back on the now cooling Egg).  Once rested the steaks were unwrapped and plated along side the warm olive oil and sage rich beans

…………………. on a warm summer evening – a match made in heaven!

Bastille Day Steak and Chips

Bastille Day Steak and Chips

There is no reason to call this Bastille Day Steak other than the fact that we chose to cook it on Bastille Day with part of our French family!!  The only real link with France there than the timing is the fact that the so called Tomahawk Steak we chose is indeed French Trimmed!  The Tomahawk Steak is simply an on-the bone Rib Steak.  It is cut from the Fore-rib but the entire rib bone left attached.  There is a usually a good deal of inter muscular fat  which together with the advantages of ‘bone in’ cooking leads to a great final result.  The Thickness of the steak is based in the thickness of the rib bone but usually approaches 5cm leading to a steak weighing around 1.2Kg.  Ideal therefore for sharing it is usually suggested that this will serve 2 – well in fact it will serve more, especially if it is part of a multiple course meal.  Ours comfortably served 4, and we have never been accused of having poor appetites!

Whilst technically a steak, it is big enough to also be considered as a roasting cut – rather like the Bistecca alla Fiorentina.   We were going to cook it the same way as we did for that  by cooking it as a revers sear.  As we were at home and had the luxury of more than one Big Green Egg to cook on, the Large BGE was set up in indirect mode at around 100C with a little cherry wood added for a gentle smoky flavour.  The steak had been removed from its wrappings and left for the surface to dry at room temperature for a couple of hours.  Just before putting the steak in the BGE it was generously salted and peppered and placed in the BGE with an indwelling temperature probe in place.  I was running the EGG with the CyberCloud controlling the cooking temperature and monitoring the core temperature of the meat.  We were looking for an overall finishing temperature of around 54C (that boarder between rare and medium rare) after the final sear – so that meant cooking at this temperature until the core came to around 48C.  At this stage, the steak does look rather unappetising (see left).

Working on 2 BGEs had the advantage that we were able to hold the partially cooked steak at around 48C by wrapping in foil and tea towels and placing in a cool box until ready to do the final sear, earning me extra ‘Brownie points” for serving the steak bang on time.  The second egg was therefore set up for direct cooking at around 250C dome temperature.  I was doing this on the MiniMax which has the great advantage of coming up to temperature very quickly – but as you will see from the pictures the disadvantage of being a little small for the Tomahawk steak!  Fortunately the searing only takes a very short time until that lovely golden colour is achieved and although the handle of the Tomahawk extended outside the EGG, it was possible to ‘nearly close’ the EGG!!


The Steak was taken off the grill once the outside was took on the appropriate beautifully flame grilled colour and finish as above – at this point the core temperature measured with a Thermopen was around 52C.  The Steak was again wrapped in foil and covered to rest for around 10 mins whilst the chips and the beans were cooked.  The chips were decidedly British rather than French fries but served with mayonnaise as a mark of the Entente Cordial.  They were triple fried, the first 2 fries being done whilst the steak was cooking and then just finished at this last moment – Just before serving the steak lightly salt and then slice across the grain.  The steak had a lovely gentle smoky taste and the classical ‘smoke ring’ on the edge of the steak as can be seen in the picture on the right.

This was a lovely dish with which to share Bastille Day with our French Family – but this is a perfect dish to do any time you want something a bit special.

………….do have a go!


Bastille Day Steak and Chips

July 14, 2018
: 4
: 15 min
: 45 min
: 1 hr
: Easy

Reverse seared steak

By:

Ingredients
  • Tomahawk steak - approx 1.2KG
  • Salt and Pepper
Directions
  • Step 1 Remove the steak from the fridge, remove any wrappings and leave the surface to dry out at room temperature for a couple of hours.
  • Step 2 Set up the BGE in indirect mode at 100C and add a little cherry wood for a gentle smoky flavour.  
  • Step 3 Just before putting the steak in the BGE season generously with salt and pepper and site an indwelling probe in the steak
  • Step 4 to cook to a final rare/medium rare at 54C cook to a core temp of no more than 48C at this stage
  • Step 5 Hold the partially cooked steak at around 48C by wrapping in foil and tea towels and placing in a cool box until ready to do the final sear
  • Step 6 Heat up the EGG to around 250C dome temperature.
  • Step 7 When ready for the steak, flash grill for around 1 min per side until the outside takes on that beautifully flame grilled colour and finish
  • Step 8 Wrap the Steak in foil and covered to rest for around 10 mins whilst cooking the chips
  • Step 9 Just before serving the steak, lightly salt, and then slice across the grain.  
Beef Short Rib – braised and roasted

Beef Short Rib – braised and roasted

Jackie and I were driving home after a weekend away and found a lovely Kilnford farm shop in Dumfriesshire.  Specialising in grass fed Galloway beef, and farmed by the owners – it seemed churlish not to take some meat home with us.   (more…)

Daube de boeuf – Big Green Egg style

Daube de boeuf – Big Green Egg style

It seems that in the UK that as we are about to move from winter into spring that winter intends to have a last fling with cold coming in from the east across continental Europe.  So how about a suitably warming winter dish?  Travelling around France we have often eaten Daube of beef, and at the moment of eating wondered what daube meant, only to forget to look it up before discovering it on the menu again.  Well it is quite simple really, daube refers to the earthenware cooking vessel – the daubière in which the dish is cooked.  Traditionally shaped to inhibit the escape of the cooking liquid, (more…)

Bistecca alla Fiorentina – the remake!

Bistecca alla Fiorentina – the remake!


Having tried our hand with the local beef (click to see previous post) we thought it time to be a little more authentic and go for a larger piece for this Bistecca alla Fiorentina.  As there were going to be 4 of us a 1.4KG steak did not seem too greedy!!  Bought from the same butcher as the previous steak this was again the cut from the loin near the leg of the Scottona and was just a little more than 1.5 inches thick.

We were going to reverse sear again and so the Egg was set up for indirect cooking at 100C with the platesetter in place.

The steak was simply salted and dusted with a little pepper and placed on the grill.  The internal temperature probe was put in place and it was left to cook to a temperature of 48C.  At this stage it does not look very appetising as although cooked to rare all the way through there is no delicious crispy outside!

The steak was removed from the grill, double wrapped in foil and covered with a tea towel to slow down any cooling.  The platesetter was removed and the temperature of the BGE brought up to around 250-280C.  As this was a thicker piece of meat than the last one it was grilled this time for just less than 2 mins per side to form a nice golden crust.

Once completed the steak was removed from the grill, rewrapped in foil and left to rest for around 10 minutes whilst we prepared the Borlotti beans that we were going to serve with it.  The steak was unwrapped, further salted and then carved across the grain.  Crisp on the outside and warm in the centre ; the meat was delicious.


Taking the bone to chew as well as her portion of carved steak our youngest granddaughter paid the finest of compliments……..

…………… “Thank you, this is the best steak I have ever had”

What more could you ask for!……………..


For the full recipe see:- http://smokedfinefood.co.uk/beef/bistecca-alla-fiorentina/

Bistecca alla Fiorentina

Bistecca alla Fiorentina

Steak is perhaps not the first thing you think of when you consider Italian cooking but if you are in Tuscany then think again!

Bistecca alla Fiorentina, the Florentine Steak is famous throughout the world.   Traditionally it is cut from the loin near the leg of the Scottona (a young female cow that has never been pregnant). Traditionally from the huge Chianina cattle from Tuscany’s  Val di Chiana valley, near Arezzo.  So large are these cattle that the T-bone steak that goes to make the Bistecca alla Fiorentina may way up to 3kgs.  In different parts of the world it is described as a Porterhouse Steak – but that is nowhere near as romantic!   The meat should be well marbled and hung for between 15 and 21 days before cutting.

As you would expect there is a strong “folklore” associated with cutting the Florentine steak in the first place!  It is said that the minimum thickness should be 1.5 inch but better still if 2 to 2.5 inches and they range in weight from 1.5 to around 4 lbs but can be more!

Our version of dish was a little more modest and cooked a little differently from the classic Florentina!

The cut of meat was correct, loin from near the leg of the Scottona – from the butchers counter of the local supermarket in the village we were staying.  I would normally not buy steak from a supermarket in the UK but I have to say that here in Tuscany the meat is excellent.  This piece by Florentine standards was 650gms (1lb 4oz) but still generous for two!  Being thinner than a traditional Florentina, just 3/4 inch (traditional Bistecca alla Fiorentina can be up to 3 inches thick!) a different cooking method was used; the Reverse Sear.

Traditionally the Fiorentina is cooked over a very high heat for between 5-10 mins per side and then stood on the T-bone on the grill for a further 5-10 mins to give a very crusty outside and a rare middle.  With a thinner steak such as this the chances of over cooking was high – hence the reverse sear!

The steak was seasoned with salt and pepper with internal temperature probe in place ready to go on to the grill.

The Big Green Egg was heated to 110°C with the platesetter in the legs up position and the cast iron grill on top.  Once the Big Green Egg was up to temperature the steak was added and cooked to an internal temperature of 47-50°C (you could even be a little less if you like very rare steak).

Pop the steak onto the grill and allow it to warm up to around 47-50°C – at this stage the meat will be rare all the way through – but with no delicious crispy outside!

Wrap in tin foil and set to one side.

Remove the plate setter and replace the cast iron grill – heat the egg up to 250°C.  Once there, pop the steak back on for approximately one min per side (certainly no more than two!).

Then remove from the grill and re-rap in the foil and let rest for 10 minutes at least.

Slice across the grain from either side of the T-bone and serve with a salad or some roasted peppers – or just by itself with a squeeze of lemon!

Simply delicious!


Bistecca alla Fiorentina

July 23, 2017
: 2
: 10 min
: 15 min
: 25 min
: Easy

By:

Ingredients
  • T-bone steak - The meat should be well marbled and hung for between 15 and 21 days before cutting. May weigh upto 3Kg In different parts of the world it is described as a Porterhouse Steak – but that is nowhere near as romantic!
  • Salt
  • Pepper
Directions
  • Step 1  Classically it is said that the minimum thickness should be 1.5 inch but better still if 2 to 2.5 inches and they range in weight from 1.5 to around 4 lbs but can be more! Timings here for are for a more modest 650gms (1lb 4oz).  With a thinner steak such as this the chances of over cooking was high – hence the reverse sear!
  • Step 2 Season with salt and pepper and with internal temperature probe in place it is ready to pop onto the grill.
  • Step 3 Heat The Big Green Egg to 110°C with the platesetter in the legs up position and the cast iron grill on top. 
  • Step 4 Added steak and cook to an internal temperature of 47-50°C (you could even be a little less if you like very rare steak).
  • Step 5 Wrap in tin foil and set to one side.
  • Step 6 Remove the plate setter and replace the cast iron grill. Heat the egg up to 250°C.  Pop the steak back on for approximately one min per side (certainly no more than two!).
  • Step 7 Remove from the grill and re-rap in the foil and let rest for 10 minutes at least.  Slice across the grain from either side of the T-bone and serve with a salad or some roasted peppers – or just by itself with a squeeze of lemon