Tag: Chicken

Rethinking what we eat – Spicy chicken revisited

Rethinking what we eat – Spicy chicken revisited

There can be a real joy in revisiting recipes – and this one is a case in point.  It is a few years since we first cooked this dish but it really is worth coming back to!  You can find the original cook here – or you can jump straight to the recipe below.

Coming back to this particular cook made us realise that our relationship with food has subtly changed over the last few years.  I noticed as (more…)

Chicken/Turkey, chestnut, leek and pasta ‘al forno’

Chicken/Turkey, chestnut, leek and pasta ‘al forno’

We have had fantastic fun this year cooking new dishes with some great products.  We have also spent a lot of time trying to reduce our food waste by making sure that we have some plans (at least some idea) what we might do with any left overs from a cook.  Taking this one stage further we have used one of the food ideas that the Italians are famed for.  They often simply cook some extra food to make sure they have leftovers to use for another dish.  They call these ‘Avanzi’ – which although it translates as ‘leftover’ sounds so much more affirmative!!

Here is the perfect example of a dish which you can really only make with ‘Avanzi’ – in this case cooked turkey breast (though chicken or other white meats would work just as well) with chestnuts.  They just require the planning to make sure plenty is cooking in advance to make sure there is enough ready for this second dish!

This particular recipe is a reworking of a Jamie Oliver recipe for leftover leek and turkey pie.  We have kept the leek and turkey elements but substituted pasta and a sumptuous crispy cheesy topping for the pastry.  This therefore gives you a silky rich leek sauce with generous chunks of turkey and chestnuts with go to form the basis of a ‘pasta bake’.  Rather than doing the pasta in layers as in a lasagna, it is just stirred through the sauce before topping the dish off with cheese and breadcrumbs.  Other than cooking the pasta (which is best done on a conventional hob) this dish can be cooked in the BGE or a domestic oven.  I favour the BGE for the hint of smoke it offers the dish.  The BGE also retains the moisture so much more than a domestic oven which I think works well for this dish.

The first thing to do was to cook and chill around 130g of pasta, the recipe works well with penne or fusilli, but any short pasta will work.  The pasta is cooked ‘al dente’ then chilled as the final part of the cooking will occur in the sauce.

Traditionally the leek sauce would be started off by frying some pancetta/lardons in a pan and then adding the leeks.  In the spirit of ‘Avanzi’ we used some sausage meat we had in the fridge after making stuffing balls to have with the turkey the day before – but equally some of those stuffing balls broken up would have done just as well.  The first stage was cooked over direct heat.  Once in the pan and coloured, 500g of chopped leeks were added with some thyme leaves (fresh or dried will work) and some olive oil. These were sautéed at a medium heat for a few minutes.  The heat was then turned down by adding the platesetter and converting to indirect cooking.  The leek mix was seasoned and covered to cook for around 30 minutes.  We checked and stirred the dish every  5-10 mins to make sure nothing was sticking or taking on too much colour.

This whole process reduces the bulk of the leeks by about two thirds.  At this point we added the turkey torn into chunks, and some cooked chestnuts left over from the roast turkey dish the night before (fresh vac-pac chestnuts would be fine too if you have no left overs).  As the turkey and chestnuts were warmed through in the sauté pan, a tablespoon of cornflour was stirred into some cold turkey stock. (This was made from the bones of the turkey on this occasion but a stock cube or a ‘stock pot’ would work).  The stock/cornflour mix was then stirred into the pan and was kept gently moving until it began to thicken at which point the nearly cooked chilled pasta was added to the mix.
It is important to make sure it is all well covered in the sauce.  You may need to add a little more stock if there is not enough sauce to go round all the pasta.  Everything should be coated coated with the sauce, but it is just as important that everything it is not immersed by the sauce!

And now the work is nearly done!  The temperature of the BGE was brought up to around 170C.  The mix was put into an ovenproof roasting dish. Some breadcrumbs were added, followed immediately by the torn or sliced mozzarella.  Then for a crispy top, more breadcrumbs and the parmesan.
Finishing took around 30mins until the core temp came to around 85-90C and the top was nicely coloured.  Sometimes getting a nicely coloured top in the EGG  is a little difficult.  If this is the case don’t despair!  Two minutes under a domestic grill (or in a pizza oven if you have one to hand) will sort that out very easily!!

Allow to cool for 10 mins ……………..

……………perfect with a fresh salad!!


Chicken, chestnut, leek, and pasta 'al forno'

April 6, 2022
: 2

By:

Ingredients
  • 130g pasta eg penne or fusilli
  • Pancetta or sausage meat - around 50-150g
  • 500g of chopped leeks
  • Thyme leaves (fresh or dried will work)
  • Olive oil
  • Cooked chestnuts 100-150g (or what ever you have to hand
  • 1 tsp cornflour
  • Chicken/turkey stock 150-300ml
  • Some chopped cooked chicken or turkey meat (a couple of handfuls 150-175g)
  • Breadcrumbs
  • 100-125g torn or sliced mozzarella
  • Parmesan for top
  • Thyme
  • Salt and pepper to taste
Directions
  • Step 1 Cook then immediatly chill in cold water around 130g of pasta.  The pasta should be cooked ‘al dente’. The final part of the cooking will occur in the sauce.
  • Step 2 Fry off the panceta/lardons or sausage meat in a pan.  This should be done over direct heat – a shallow casserole or the Tefal Ingenio sauté pans work really well as you can keep the lid closed except when stiring.  Once in the pan and coloured, add 500g of chopped leeks with some thyme leaves and some olive oil. Sauté at a medium heat for a few minutes.  Add the platesetter to convert to indirect heat and drop the temperature (to around 120C). Season and cook for around 30 minutes.  We checked and stirred the dish every  5-10 mins to make sure nothing was sticking or taking on too much colour. If colouring reduce the temp a little more and cover with aluminium foil.
  • Step 3 Once the bulk of the leeks is reduced to around 2/3rds add the
  • Step 4 chicken/turkey, torn into chunks and the cooked chestnuts and warm through in the sauté pan.
  • Step 5 Add a tablespoon of cornflour to some of the cold stock. then stir into the pan until it begins to thicken
  • Step 6 At this point add the chilled pasta and stir  into the mix. Make sure the pasta is well covered in the sauce.  If necessary add a little more stock.  It is important that everything is coated with the sauce, but not immersed by it.
  • Step 7 Bring the BGE up to around 170C.  Add the mix to an ovenproof roasting dish. Sprinkle the surface with some breadcrumbs, followed immediately by the mozzarella.  For a crispy top, add more breadcrumbs and the parmesan.
  • Step 8 Finish by baking in the EGG for around 30mins until the core temp is in the region of 85-90C and the top nicely coloured.  Sometimes getting a nicely coloured top in the EGG  is a little difficult.  If this is the case finish under a domestic grill (or in a pizza oven) – don’t let the top burn!
  • Step 9 Allow to cool for 10 mins and serve
Pollo alla Cacciatora, Chicken Cacciatora or Hunter’s chicken

Pollo alla Cacciatora, Chicken Cacciatora or Hunter’s chicken

What is in a name? I often think it funny how we accept both the name of dishes and their presentation as though they are ‘original dishes’. I mean original in the sense of – always made this way.  In reality the dishes we have today represent the journey the dish has taken both through history, and from its geographical origin.  “Pollo alla Cacciatora”, “Chicken Cacciatora” or “Hunter’s Chicken” is just one of those examples.  Clearly from the name its origins are Italian.  There are, however, also versions from France where it is called chasseur, and Spain where it is called cazadores.  These dishes are stalwarts of restaurants from each of these countries but if we go back in time would any self respecting hunter ever gone out hunting and come back with a chicken …………. I think not!

Jamie Oliver in his recipe on which this particular cook is based suggested that it would be the type of food a hunter’s wife would cook for her hunter husband when he returned from a day of hunting.  Even if we put the stereotype to oneside here I suspect that the notion is fanciful.  More likely that this is a dish cooked using the products of a day’s hunting.  I suspect it will have been originally made with rabbit or what we now think of as game birds.  The gentle cooking that these recipes have in common would be perfectly suited to these tasty, but potentially dry and often stringy sources of meat

Having said all that, this particular recipe uses chicken as we are yet to try other options ……….. but hopefully we will, and will report back!  Cooking with chicken would mean that the time for cooking could easily be reduced as the chicken will cook quickly – often too quickly!  But to reduce the time I feel is to miss the point.  This is a slow cook dish that develops its taste through slow cooking.  Because of this though, rather than use the whole chicken, I would reserve the breasts for other dishes.  The drum, thigh and even the wings respond well to slower, longer cooks.  For this particular cook we used just thighs and drumsticks!

We had decided to take the leisurely approach to this dish which therefore started out with an overnight marinade (though a couple of hours would probably be fine too!). The chicken pieces were kept with the skin on and were seasoned with salt and freshly ground black pepper.  They were put into a container and bay leaves, rosemary and a crushed clove of garlic were added.  The container was topped up with the red wine and it was popped into the fridge to work its magic overnight.

Taking it out of the fridge in the morning the chicken had taken on that rather dusky colour that you get when marinating in red wine. That brought into contrast the deeper yellow colour you get with slower grown corn fed birds.  This is a dish that I firmly believe should be cooked with the skin on the chicken.  Like most people though I hate ‘floppy’, ‘soggy’ chicken skin!

The answer is to brown off the chicken really well, and render down the fat in the skin which adds enormously to the taste of the dish.  And then to cook at least some of the chicken ‘breaking the surface’ of the casserole – so that it is exposed to the heat of the cooking directly.  This is a perfect opportunity therefore to cook in the Big Green Egg.  Cook at a low temperature, for a longer time.  No lid is needed on the casserole, the surface of the skin exposed to heat but in an oven which will not dry out the meat.

The BGE was set up for direct cooking at around 180C.  The chicken was drained and the marinade reserved.  After removing the chicken it was dried and  very lightly dusted with seasoned flour, the excess shaken off.  The pans were heated on the BGE and a little oil was added.  The chicken was then browned off making sure the fat was well rendered from the skin. This can be done in a shallow casserole or a handleless frying pan such as the Tefal Ingenio pans.  We were using the MiniMax which easily accommodates the pans we were using.  Once beautifully coloured, the meat can be set aside.

We could have finished this off in the shallow casserole but opted for a slightly deeper one as we were cooking 12 chicken pieces.  This was put onto the heat and the sliced garlic was gently coloured.  The anchovies, olives, tomatoes (broken up with a wooden spoon) and the chicken pieces with their reserved marinade were then added. The pot was brought to a very gentle boil then the platesetter was put into place to move from direct to indirect cooking. The temperature of the EGG was dropped to around 130C and the casserole left to very gently bubble.  As we were cooking in the BGE there was no need to put the lid on the Dutch oven allowing a gentle smokiness to add to the flavour of the dish.

We left it all to cook for more than the 1½ hours suggested in the original recipe We checked a couple of times that more water was not needed and gave it the occasional gentle stir, but nothing else.

Once the chicken was obviously ‘butter tender’ and the sauce had formed a lovely ‘jammy’ finish on the chicken all the vents were closed.  All that was left to do was to skim off any oil that’s collected on top of the sauce, taste and add a little salt and pepper if necessary.

Bay leaves and rosemary sprigs were removed and we were ready to serve (and portion some for later too).

We served one drum and one thigh per person.  It works well with a salad. as the sauce is not wet and runny.  It also works really well with cannellini beans or chickpeas.  Try rice or gnocchi or as here, with spiced red cabbage and root vegetables …………………

………..oh yes …………….and plenty of Italian red!!

Pollo alla Cacciatora

November 11, 2021
: 6
: 1 hr
: 2 hr
: 3 hr
: Straightforward

Pan roasted chicken pieces in a rich tomato, olive and anchovy sauce

By:

Ingredients
  • 6 Chicken thighs and 6 drumsticks
  • Sea salt
  • Freshly ground black pepper
  • 8 bay leaves
  • 2 sprigs fresh rosemary
  • 3 cloves garlic peeled (1 crushed, 2 sliced)
  • ½ bottle Chianti or similar red wine
  • A little flour, for dusting
  • Olive oil
  • 6 anchovy fillets (more if small)
  • 1 handful green or black olives, stoned
  • 2 x 400 g good-quality tinned plum tomatoes
Directions
  • Step 1 Add the chicken pieces (skin on) to a bowl, season with salt and pepper. Add the Bay leaves, rosemary and the crushed clove of garlic.  Top up the bowl with the red wine and leave in the fridge – ideally overnight.
  • Step 2 Set up the BGE for direct cooking at around 180C. Remove the chicken from the fridge, and the chicken from the marinade (reserve). Dry the chicken then lightly dust with seasoned flour
  • Step 3 Heat a handleless pan on the BGE and add a little oil.  Brown the chicken making sure the fat is well rendered. Once coloured set aside.
  • Step 4 Heat a casserole of a suitable size for the 12 chicken pieces on the BGE. Quickly colour the sliced garlic, then add the anchovies, olives, tomatoes (broken up with a wooden spoon) and the chicken pieces with their reserved marinade. Bring the casserole to a very gentle boil then introduce the platesetter and cook indirectly at a lower temperature of around 130C so that there is just a very gentle bubble.  Cook without the lid to allow a gentle smokiness
  • Step 5 Cook for around 1½ hours checking occasionally to see if a little more water is needed. Once the chicken is ‘butter tender’ and the the sauce has a ‘jammy’ finish close all the vents and allow to finish cooking.
  • Step 6 Skim off any oil that’s collected on top of the sauce, season to taste and remove the bay leaves and rosemary sprigs.
  • Step 7 Serve one drum and thigh per person perhaps with cannellini beans or chickpeas, rice or gnocchi or as here with spiced red cabbage and root vegetables
Coq au Riesling – Rick Stein style

Coq au Riesling – Rick Stein style

During the 2020-21 pandemic lockdown we had a number of meals from the Rick Stein restaurant as part of their “Stein at Home” series.  One of these dishes was their Coq au Riesling based on the Alsace take on Coq au Vin using a local Riesling rather than a hearty red wine.  It is a very rich but subtle dish, traditionally cooked as a one pot dish.  The Stein version was clever though in that there was a very rich pre-made sauce, to which you added some quickly sautéd chicken for a main course in 20 minutes from a standing start.   At some point I look forward to playing with that traditional version which is outlined beautifully in Stein’s recipe (see here).  In the short term though I wanted to ‘pre-make’ the sauce and see how well it would freeze and then construct the meal ‘at the last moment’ as with the Stein at Home dish.
We bought 3 small chickens and butchered these and set the prime pieces to oneside. The 3 carcasses and the wing tips were used to make the sauce (rather than the prime pieces as in the original recipe).
The shallots, garlic and lardon were sautéed until they began to take on a little colour.  At this point the mushrooms were added and fried for a few minutes longer. Everything was then transferred to a separate bowl.The chicken carcasses were cut into smaller pieces and dusted with seasoned flour.  The remaining oil was transferred to the pan and the chicken was browned.
The wine, stock, herbs and the cooked shallots, lardons and mushrooms were added back to the pan and seasoned with salt and black pepper.   The pan was brought to a simmer and cooked for around 20 minutes without a lid. The liquid was separated off by passing through a colander set over a bowl.  The chicken carcasses were discarded and the lardon and vegetables were kept warm. The strained liquid was returned to the pan and reduced a little. The pan was then removed from the heat.  The cream, egg yolk and a ladle of the reduced cooking liquid was mixed together and then poured back into the pan with the stock. The pan was then gently heated without boiling and stirred constantly until the sauce thickened.  This may take 15 minutes, don’t rush it!  The sauce needs to thicken to the point, so that when hot it just coats the back of a spoon.  All the other ingredients (except the chicken) were added back into the sauce. The sauce was then portioned into 3 double portions and vac-packed for later.

When re assembling the dishes we have vacilated on how much chicken to use.  The original Rick Stein dish included a whole chicken.  Nice though it was this was too much meat!  So on the 2 occasions we have done it, we have done it in 2 ways based on this recipe.  Firstly we have shared a single breast between us and had a thigh each with a little extra vegetables.  On the second occasion we had a breast and a thigh each (which was rather generous!!).  But which ever way, the 3 chickens gave  the carcasses to make the stock and then 6 breasts (as supremes), 6 thighs and 6 drum sticks.  At the very least this would leave 3 thighs and 6 drum sticks – very economical which ever way you look at it!!

So to the assembly. If cooking the chicken inside I would suggest tossing the chicken pieces in seasoned flour first when cooking in a butter and oil mix, until the pieces take on some colour then pop in a hot oven for around 10 minutes to reach a core temperature of around 70C. At this point they should be added to the warmed sauce (temperature around 85C) and left to hold the temperature for 2-3 mins or so.  My favourite way however is to sauté the chicken pieces in a cast iron or heavy pan/plancha on the Big Green Egg (using this basic technique).
And when they are approaching 70C add them to the sauce to let them finish in the same way

All that is left to do is to plate.  This dish works so well with simple boiled potatoes and perhaps one vegetable.  Here it is also served with Piperade you can fine the recipe for that here.
Add the potatoes to the plate.  Remove the chicken from the sauce then spoon the sauce around the potatoes.  Place the chicken pieces back into the pool of sauce.

Garnish and serve!

Footnote:  the one precautionary issue is the reheating of the sauce.  Take time over this and heat it slowly and keep it well stirred.  I suspect that if you heat it too much or too quickly the sauce may split – so proceed with a little caution!!

Coq au Riesling - Rick Stein Style

July 2, 2021
: 6
: 45 min
: 1 hr 15 min
: 2 hr
: Moderate

A classic creamy Riesling sauce - which can be frozen and used when needed with sautéed chicken

By:

Ingredients
  • Carcasses of 3 chickens (or some chicken wings etc)
  • 3 chicken breasts and 6 chicken thighs
  • 12 shallots, peeled and left whole
  • 3 cloves garlic, finely chopped
  • 160g smoked lardon
  • 250g mushrooms, halved if large
  • seasoned flour
  • 2 tbsp oil
  • 70g butter
  • 500ml medium-dry Riesling
  • 350ml chicken stock
  • 1 bay leaf
  • 2 thyme sprigs
  • salt and black pepper
  • 100ml single cream
  • 1 egg yolk
  • butter and oil
  • Parsley to garnish
Directions
  • Step 1 If using whole chickens butcher these and put the prime pieces to one side (or get your butcher to do it) – reserve the carcass.
  • Step 2 Sauté the shallots, garlic and lardon in half the oil and butter until they begin to take on a little colour.  Add the mushrooms and cook for a few minutes longer. Transfer the mix to a separate bowl.
  • Step 3 Cut the chicken carcasses into smaller pieces and dust with seasoned flour.  Brown in the pan with a little more oil and butter. Add the wine, stock, herbs and the cooked shallots, lardons and mushrooms back to the pan and season with salt and black pepper.   Simmer for around 20 minutes without a lid.
  • Step 4 Separate off the liquid through a colander set over a bowl. Discard the chicken carcasses. Keep the lardon and vegetables warm. Return the strained liquid to the pan and reduced a little.
  • Step 5 Remove the pan from the heat.  Add a ladle of the reduced cooking liquid to the cream and egg yolk, mix together and then pour back into the pan with the stock. Gently heat without boiling and stir constantly until the sauce thickened.  This may take 15 minutes!  The sauce needs to thicken to the point, so that when hot it just coats the back of a spoon.  
  • Step 6 Add all the other ingredients (except the chicken) back into the sauce. If making portions for 2 divide into 3 double portions and vac-pack for later.
  • Step 7 When reassembling the dish we now use half a chicken breast and a chicken thigh per person. If cooking the chicken inside toss the chicken pieces in seasoned flour first when cooking in a butter and oil mix, until the pieces take on some colour Put into a hot oven for around 10 minutes to reach a core temperature of around 70C. At this point they should be added to the warmed sauce (temperature around 85C) and left to hold the temperature for 2-3 mins or so. If cooking on the BGE sauté the chicken pieces in a cast iron or heavy pan/plancha. When they are approaching 70C add them to the sauce to let them finish in the same way
  • Step 8 All that is left to do is to plate.  This dish works well with simple boiled potatoes.  Add the potatoes to the plate. Remove the chicken from the sauce then spoon the sauce around the potatoes.  Place the chicken pieces back into the pool of sauce. Garnish and serve
It is more economical to buy the whole chicken – Chicken Shawarma

It is more economical to buy the whole chicken – Chicken Shawarma

In this current health crisis we have been trying to make better use of our food and make fewer calls on our food suppliers.  One area that this has worked well with is chicken.  So often an ‘also ran’ meat – but from well reared chicken, a fantastic source of healthy meat protein.  We would normally always buy free range chicken – but at times in this crisis that has not been easy, but I don’t think this is the time to take the moral high ground, but rather be grateful for what is available.

Which ever sort of chicken you get, there is so much you can do with it.  Clearly you can roast a chicken whole, but often you don’t want that much at a single sitting especially if there are just 2 of you.  Routinely, if we were to buy portions we would buy chicken thighs or breast as neither Jackie or I are that fond of the drumstick or wing.   However, from a cost point of view, if you want 2 chicken thighs and 2 chicken breast it is cheaper to buy a whole chicken and get the wings, drumsticks and carcass thrown in free!  There are other advantages too.  When you butcher down the carcass you can chose to leave the skin on, (it is easy to take off later if you change your mind) or you can butcher the breasts to leave the first wing joint attached (the so called chicken supreme) often difficult to get hold of or an expensive cut.   Butchering a chicken is very easy and there are loads of YouTube videos to show you how – we are yet to make ours!!!

So with a standard break up of the chicken you will get: 2 breasts, 2 thighs, 2 drumsticks, 2 wings and the carcass for stock!  We have been getting large free range chickens for as little as £6.00.  If corn fed, and organic you can double this price but if you think what can be done with that it is still really economical!  We have already published a couple of dishes combining a pan roasted breast with either boned and stuffed wings or drumsticks.

The carcass is always used to make homemade stock for soups and other cooks – and this is a truly valuable and versatile product (more of this later).  So from our basic chicken the only part we haven’t used are the chicken thighs – which I have to say is the most adaptable of cuts.  Great uses for chicken thighs include Mediterranean or Root Vegetable tray bakes, Coq au Vin and of course a Chicken Shawarma

As we had just butchered our 3rd chicken since lock down we now had 6 chicken thighs. We had also bought a new Shawarma Spike which we wanted to tryout – more details below.  On this occasion therefore we chose to make the Chicken Shawarma using the recipe we have published previously The details for this can be found by clicking this link and the recipe can be found below.

The Shawarma Spike is short enough to use in the Minimax as can be seen here, but can also be extended and then you would need to use it in the Large.  You may get away with it in the Medium but we have not been able to verify that.  The base is a flat mirror finish stainless steel.  As there is no rim to the base this needs to be sat on a baking tray or other cooking surface with a raised edge to contain the cooking juices.

The chicken was left to cook at around 160-70C for around one and a half to 2 hours.  The internal and the oven temperature were monitored with a Meater+.

When nearly cooked with a core temperature at 74C the vents were closed on the Egg and the chicken left until we were ready to eat – whilst this is not quite ‘resting’ in the true sense it worked very well and is really convenient.  The

Chicken was being served with Pitta bread, a green salad and a coleslaw.
The chicken was staggeringly tender and moist and rather than carve it straight off the spike the chicken was removed and sliced on a cutting board, then placed on a serving platter on a bed of salad.

The results were vary moreish!  the 6 large chicken thighs comfortably fed 2 of us with enough left over for a generous cold lunch the following day.  Packed into a small Pitta bread with the salad and coleslaw – just fabulous!


……………………….do give it a go!


Footnote:  We have been trying to trace a supplier for a Shawarma spike in the UK and we found one a few weeks ago.  This was it’s first outing.  It is really well made and the spike comes in two sections so could be used on the large or the MiniMax (and if you are carful I am sure on the Mini).  They refer to it as a Gyrospike.  I have to say it is very good – you need to sit it in a pan or on a tray, but I am delighted we have bought it.  Money well spent –  I did add a link but that failed a few times so you will need to Google gyrospike

Shawarma Chicken

May 28, 2020
: 2-3
: 1 hr
: 2 hr
: Straightforward

Roasted stacked chicken thighs in spicy yogurt

By:

Ingredients
  • 6 large boneless skinless chicken thighs
  • Half an onion
  • 3 tbsp extra virgin olive oil
  • 3 tbsp wine vinegar
  • Juice of a lemon
  • 125g of greek yogurt
  • 1 tsp cumin
  • 1 tsp paprika
  • 1/2 tsp allspice
  • 1/2 tsp turmeric
  • 1/4 tsp garlic powder
  • 1/4 tsp cinnamon
  • 1 pinch cayenne
  • 4 cardamon pods ground (husks removed)
  • Salt and black pepper
Directions
  • Step 1 Mix the spices with the yogurt, vinegar, olive oil and lemon juice.  
  • Step 2 Into this mix stir in the boneless chicken thighs.  Cover the dish and allow to marinate for around 14 hours in the fridge
  • Step 3 When ready to cook, add half an onion to the spike then assemble the meat on top. Top off with half a lemon (optional)
  • Step 4 Set up the BGE for indirect cooking with the platesetter in the ‘feet up position’.  Once at 200C add the chicken tower. Allow the temperature to fall over the first hour to around  170C. Cook until the core temperature approaches 74C. Hold for at least 10 mins
  • Step 5 Remove the shawarma from the EGG and wrap loosely with foil and leave to rest for 5-10 mins or so.  
  • Step 6 Slice the chicken and serve with a green salad, coleslaw and Pitta breads
Roast Chicken Breast and Stuffed Drumsticks

Roast Chicken Breast and Stuffed Drumsticks

We This is a short followup on the recipe for Roast Chicken Breast and Mushroom Stuffed Wings (here).  We had divided a large chicken as there are just 2 of us and we are trying to make our food go a little further to reduce the pressure on our food suppliers.  Having used one of the breasts we still had the other and 2 drumsticks (as well as 2 chicken thighs we will use later).  The recipe is unsurprisingly similar but this time we boned out the drumsticks completely and stuffed them with a mix of chopped mushrooms and dried tomatoes, but we could have used a little sausage, or perhaps even a little haggis or black pudding.  We were planning to serve these with some sautéed Mayan Gold potatoes from Carroll’s Heritage Potatoes which we have been waiting to try. In the current climate the Carrolls cannot sell to restraurants as they normally would and are available by mail-order for those self isolating.  Their USP is that they are the first potato in the UK from the indigenous Phureja potatoes of Peru.  It is supposed to have a rich golden coloured flesh, and a moreish flavour – fingers crossed!

The first thing to do was to bone out the drumstick (a first for me), which was surprisingly easy.  This was stuffed with a chopped mushroom and dried tomato, and the chicken envelop closed with a cocktail stick.

We were cooking in a pan in the EGG set up for direct cooking at 160-170C.  The drumstick takes more cooking than the breast and these were started about 15 mins before the breast.  They were cooked with the Mayan Gold potatoes for the first 15 mins and this way we managed to get some good colour onto the skin.

Once we had reached this stage it was time to cook the breast.  We were cooking the chicken and the potatoes on a single MiniMax BGE.  This meant we could only have one pan in the MiniMax at a time.
The chicken drumsticks were therefore put into the second pan with the chicken breast, skin side down, and the cooking continued.  We did this as a little challenge as clearly we could have done this more easily on the large BGE.  Using the large BGE we would have had plenty of room for both pans at once.  Doing this in the MiniMax means it is necessary to ‘swap over’ the 2 pans.  This is why we were cooking directly, unlike on the previous occasion when we cooked the previous chicken breast and wing dish.

This meant that the pans could be brought back to temperature more quickly and the residual heat in the pan allowed continued cooking when taken out of the MiniMax.  We just needed to swap the pans over a couple of times.

When around 70% cooked, the breast was turned over to finish off the cooking.  We were again aiming for a core temperature of 70C (the recommended safe temperature UK Food Standards Agency, holding it there for 2 minutes)

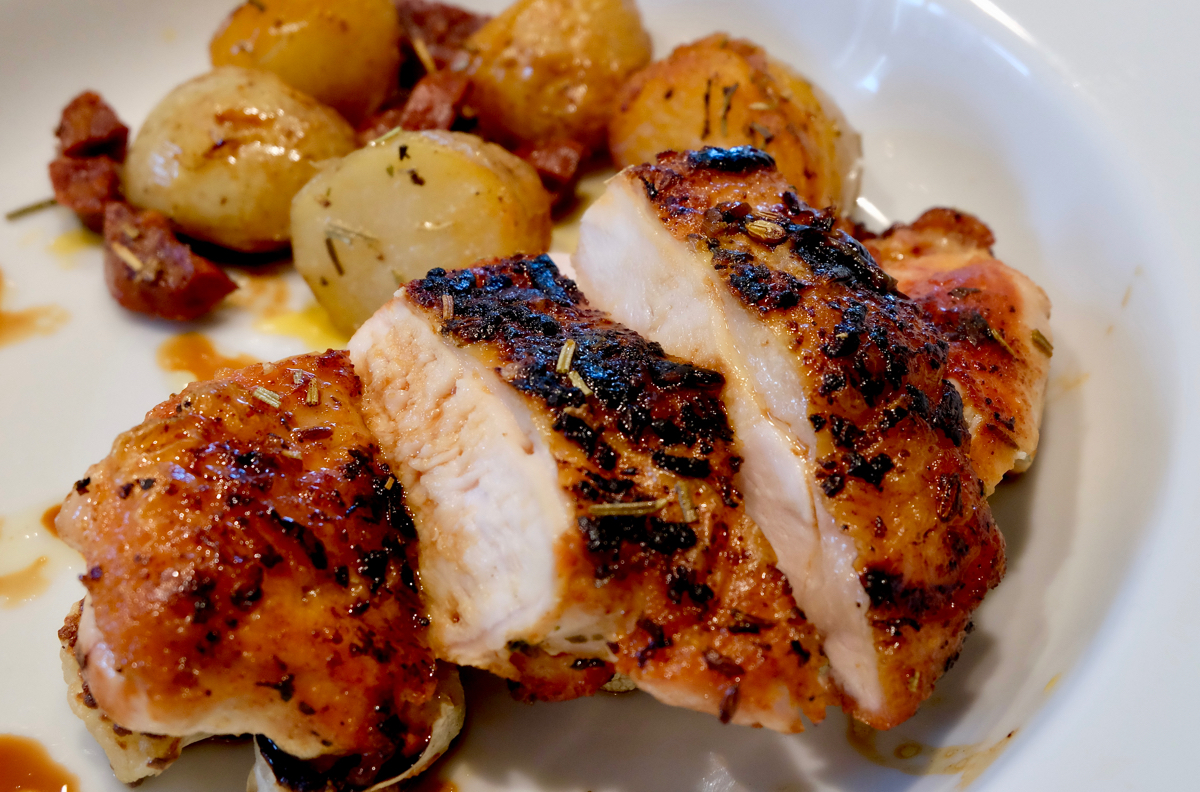
Once at temperature the chicken was wrapped in foil and covered with a clean tea towel to rest.  The potatoes had some fresh rosemary and sea salt sprinkled over the top and were finished off on the EGG.

We were serving the chicken and potatoes with some slow cooked haricot beans and broccoli.  The chicken breast was cut lengthways and half served on each plate with the stuffed drumsticks together with the haricot and broccoli.

The chicken was as good as it was previously and the drumsticks excellent!   The potatoes too were something of a revelation: creamy and nutty!  We will certainly be using these again!!

This chicken has so far provided 4 very generous portions (and stock for soup)!

There are still 2 large chicken thighs to go ……………… watch this space!!

Roasted chicken breast and stuffed drumsticks

April 24, 2020
: 2
: 25 min
: 30 min
: 55 min
: moderately easy

Chicken drumsticks stuffed with mushrooms and sun dried tomato served with roast chicken breast

By:

Ingredients
  • 2 Chicken Drumsticks
  • 2 large mushrooms
  • 3 sun-dried tomatoes
  • Salt and pepper
  • Olive oil
Directions
  • Step 1 The first thing is to bone out the chicken drumstick by sliding a filleting knife along and around the bone and then turning the drumstick inside out so the bone can be cut out. This is the only difficult step. The bone should be removed by cutting through the joint. Turn the drumstick back so the skin is on the outside again. This leaves a pocket for the mushroom stuffing.
  • Step 2 Chop 2 mushrooms and the dried tomatoes and then stuff into the pockets created in the drumsticks where the bone was removed. Close the pocket using a cocktail stick.
  • Step 3 Colour the drumstick in a pan or on a plancha in the EGG which should be set up for direct cooking at 160-170C.  Start the wings about 15 mins before the breast. (If doing the sautéed potatoes start these at the same time). Turn to get good colour on the skin
  • Step 4 Once the drumsticks have some good colour add the chicken breast skin side down to colour the skin and render any fat. When the skin is well coloured turn over to finish cooking the breast – cook to a core temperature of 70C
  • Step 5 If cooking on a large BGE cook the potatoes at the same time, if in a MiniMax alternate the cooking of the chicken and the potatoes and finish the potatoes as the chicken rests at the end of the cook).  
  • Step 6 Serve the chicken drumstick and half the chicken breast with the sautéed potatoes and your choice of vegetables.  


Roast Chicken Breast and Mushroom Stuffed Wings

Roast Chicken Breast and Mushroom Stuffed Wings

What is the best way to manage a large chicken when there are just 2 of you and you are trying to make your food go a little further to reduce the pressure on our food suppliers?  Well whilst it was very tempting to roast it whole on the Big Green Egg and then use the left overs in other dishes – we decided to portion the chicken and then make the most of each of the portions.  A chicken is really easy to butcher, and whilst we have still not done a video of that yet, there are lots available on the internet.

One advantage of portioning your own chicken (other than the economy of doing it) is that you can keep the skin on the portions – and for many dishes this greatly adds to the taste!   I have to say I normally just use the wings to make stock (sorry all you BBQ wing lovers!).  But in the spirit of making our food go further we decided to bone out the first section of the wing and then stuff the space with some chopped mushrooms and a little chorizo that we had in the fridge.  These bulging pockets were closed off with a couple of cocktail sticks.

The wings were then coloured in a pan in the EGG which had been set up for indirect cooking at 160-170C.  As wings and legs take more cooking than the breast these were started about 15 mins before the breast – and this way we managed to get some good colour onto the skin.  Once we had reached this stage it was the time to cook the breast.

As the breasts were quite substantial (and as we had the stuffed wings too) we decided to just do one of the breasts.  This was added to the pan, skin down to colour the skin and render any fat from below the skin. Probably around 70% of the cooking should be done with the skin in contact with the pan.  Partly through the cooking of the breast, the excess mushrooms and chorizo that we weren’t able to pack into the wings was dropped into the pan to fry off in the rendered chicken fat.  These would be sprinkled over the salad that we were intending to serve with the chicken.

The Chicken breast was then turned over to finish the cooking.  Our aim was for a core temperature of 70C (the recommended safe temperature UK Food Standards Agency – 65C and hold for 10 minutes, 70C and hold for 2 minutes, 75C and hold for 30 seconds) – although this can lead to dry chicken when cooked conventionally, cooked in the EGG it will be very moist!

The chicken wing and half the chicken breast was served on a tossed salad with a citrus dressing for each of us.  The fried mushroom and chorizo were simply scattered over the top.  The dish would have been finished with some parmesan shavings but as we didn’t have parmesan we used cheddar which worked nearly as well!

It was a great dish and whilst the breast was lovely and moist with a lovely crisp skin, the revelation was the chicken wings.  It took a little time to bone out the first part of the wing but once stuffed it was really worth the effort!  And from the whole chicken there will be so much more to come too as you can see (to say nothing of the stock made from the carcass too!)

………………………………….hopefully more of that in future posts (here)!

Roasted chicken breast and mushroom stuffed wings

April 2, 2020
: 2
: 25 min
: 30 min
: 55 min
: moderately easy

Chicken wings stuffed with mushrooms and chorizo served with roast chicken breast

By:

Ingredients
  • 2 Chicken wings
  • 5 mushrooms
  • A little left over chorizo
  • Salt and pepper
  • Olive oil
Directions
  • Step 1 The first thing is to bone out the chicken wings to the first joint by sliding a filleting knife along and around the bone. This is the only difficult step. The bone should be removed by cutting through the joint. This leaves a pocket for the mushroom stuffing.
  • Step 2 Chop 5 mushrooms and a little chorizo and stuff into the pockets created in the wings where the bone was removed. Close the pocket using a cocktail stick sewn through the chicken wing.
  • Step 3 Colour the wings in a pan or on a plancha in the EGG which should be set up for indirect cooking at 160-170C.  Start the wings about 15 mins before the breast. Turn to get good colour on the skin
  • Step 4 Once the wings have some good colour add the chicken breast skin side down to colour the skin and render any fat. When the skin is well coloured turn over to finish cooking the breast – cook to a core temperature of 70C
  • Step 5 Part way through cooking the breast add the mushrooms and chorizo that you weren’t able to pack into the wings and fry off in the rendered chicken fat.  These can be sprinkled over the salad when plating.  
  • Step 6 Serve the chicken wing and half the chicken breast on a tossed salad.  Sprinkle the fried mushroom and chorizo over the top and finish with some parmesan (or other hard cheese) shavings


Italian Pork, Chicken and Chestnut Terrine – variations on an Autumn theme!

Italian Pork, Chicken and Chestnut Terrine – variations on an Autumn theme!

This is a very short follow up on the Autumn Pork and Chestnut Terrine blog from a few weeks ago which you can find here.  This was largely the same recipe and so we will not repeat that here.  The differences were simple and largely for visual appeal.  Instead of confining the pancetta lardons to a layer in the middle of the terrine, these were mixed into the terrine mixture.  Their place was taken by a thin layer of chicken breast.  This had been cut off some chicken we were going to eat that evening.  On top of the chicken layer we added a more substantial layer of the boiled chestnuts.

The final difference was that we bought enough pancetta slices this time to cover the whole terrine!  In the UK if I buy pancetta it is usually cut a little thicker than we find in Italy.  We therefore tend to stretch it and thin it a little by running the back of a knife along its length. There was no need to do that with the thinner pancetta.

We have also been asked what we would use instead of the Tuscan sausages when we cook this in the UK.  The answer is quite simple in that these Tuscan sausages are just minced pork (a mixture of shoulder and belly usually) with a generous dose of salt and pepper.  So in the UK minced pork bought from a butcher or pork minced at home.  The only point to watch is that Italian pork tends to be more fatty than the pork we have become used to in the UK.  It is this that gives it its special taste.   So if you are trying to recreate this don’t stint on the pork fat.  Indeed, if you get the chance (in the UK) add a little more!

As the sausages in Tuscany are already seasoned we have needed to add less salt and pepper to the overall mix. If using minced pork you will need to add more.  If in doubt – fry a little of the mix off, let it cool well and taste and adjust the seasoning as necessary.  Alter the overall amounts of the ingredients to suit the size of your terrine.  If you keep the proportions similar to this you won’t go far wrong.


For the Original recipe: – Click here


Fried liver duo with black olives

Fried liver duo with black olives

Having been pleased at the outcome of our fried and grilled calves liver recipe, I wanted to go back and try the more conventional approach.  We had reverted to grilling the meat after initial frying as the temperature of our plancha/pan had really not been hot enough when we added the liver. The situation had been made worse because (more…)

Rosemary infused roasted chicken supreme

Rosemary infused roasted chicken supreme

It was lovely to be able to roast 2 beautiful slow grown chicken breasts – butchered as supremes, with the first part of the wing bone and the skin included.  Even better when roasted on a bed of rosemary with just a hint of wood smoke! (more…)

La Scottiglia revisited – how close had we got in recreating this dish?

La Scottiglia revisited – how close had we got in recreating this dish?

We were very lucky to be able to go back to the restaurant La Scottiglia in Pescina near Seggiano in Tuscany.  Last year, 2018, we wrote about the wonderful dish La Scottiglia that the restaurant has been named after since 1972.  This year we arrived early for a Saturday lunch and were welcomed like long lost friends by the owner.  He immediately started to talk about the recipe and blog we had written last year when we had tried to recreate La Scottiglia (see here).  He offered his congratulations for our efforts and his apologies for not writing something on the website as it would have been difficult to do so in English!

We were shown down to the terrace so we could eat outside in the dappled early autumn sunshine and were  immediately met with a Prosecco aperitif, clearly we were going to have a good lunch!

The menus were newly printed and now carried English translations which was nice.  More staggering was that on the back page was a new description of the history of the restaurant.  We were pleased that the information that we had managed to piece together from the internet seemed to be largely correct – if only it has been present before it would have saved us hours of searching (but then, where is the fun in that!!).

Jackie ordered  a Tuscan Pâté, and then ricotta filled Tortellini with truffles.  For a main course I had the wild boar – but for my starter there could only be one choice – La Scottiglia.  It was with a degree of ‘bated breath’ I tried it – had we got close with our recipe or had I deluded myself?  I needn’t have worried  (too much)!!  Our interpretation was close, though not  identical!  This was ‘softer’ with a little more liquid.  I think there was just a slight hint of chilli which ours did not have and probably a little less tomato.   Also the bread at the bottom of the dish was thinner – and had soaked up less of the glorious juices. So overall a slightly more ‘gentle’ taste than ours – but I think we can be pleased  as we have only been making it for a year rather than for more than a century!  I think we can be reasonably comfortable that ours was a suitable ‘homage’ to this most regional of dishes!

And our plans for this autumn     ……………….. to get closer still!!

Spicy charred chicken breast with chorizo potatoes

Spicy charred chicken breast with chorizo potatoes

Whilst chicken can be bland it really doesn’t need to be!  This is a really simple recipe and almost a one pan dish too.  We had taken 2 chicken breasts from a large free range organic chicken.  The skin was left on the chicken and the breasts were lightly dusted with a Shawarma seasoning from Angus and Oink.  They were set aside for an hour or so.  We paired this with chorizo sautéed potatoes, based on our earlier recipe with asparagus, so whilst the chicken was marinating the new potatoes were halved and parboiled and also set aside.

The BGE was set up for direct cooking at around 180C.  A handleless sauté pan was brought up to temperature and the chorizo was fried in rapeseed oil added to the pan.  This both cooks the chorizo and in turn spices the oil.  The chorizo was removed from the pan and replaced with the breasts of chicken, skin side down.  The idea is to do around 80-90% of the chicken cooking with the skin side down with the skin protecting the chicken from the heat.  The chicken was flipped over to finish off the cook.  The parboiled potatoes were added to the pan to sauté the potatoes in the chorizo infused oil.  The chicken was removed from the pan when the core temperature hit just above 70C.  They were wrapped in foil and allowed to rest whilst the core temperature rose to 74C.  The cooked chorizo was added back to the potatoes as they finished being sautéd.

The chicken was sliced and served on roasted cauliflower together with the spicy chorizo potatoes.  The level of spicing will depend on the type of chorizo you choose!

…………………………a great way to spice up your chicken!!


Footnote: Also see reflections here


Spicy Charred Chicken Breast with Chorizo Potatoes

July 15, 2019
: 2-3
: 15 min
: 20 min
: 35 min
: Easy

Spicy Chicken breast roasted with chorizo sautéed potatoes

By:

Ingredients
  • 2 chicken breasts skin on
  • Shawarma seasoning from Angus and Oink
  • New potatoes
  • Chorizo 3 inch piece
  • Rapeseed oil
Directions
  • Step 1 Leave the skin on the chicken and dust lightly with Shawarma seasoning. Set aside for an hour or so.  Meanwhile halve the new potatoes and parboil then set aside.
  • Step 2 Set up the BGE for direct cooking at around 180C.  Use a handleless sauté pan and bring to temperature. Fry the chorizo in rapeseed oil. Remove the chorizo and replace with the breasts of chicken, skin side down.  Cook without moving until around 80-90% cooked.  Turn the chicken and finish off the cook. Add the parboiled potatoes and sauté.
  • Step 3 Remove the chicken from the pan when the core temperature hits 70C.  Wrap in foil and allow to rest to allow the core temperature to reach 74C.  Add the cooked chorizo to the potatoes as they finish being sautéd
  • Step 4  Slice the chicken and serve with the spicy chorizo potatoes

Our Christmas Terrine

Our Christmas Terrine

Having finally come to the conclusion what we were going to include in the Christmas Terrine it was time to put it all together!!  The one thing we have learned this year making terrines is that (more…)

Chicken Breast with Blue Cheese wrapped in Prosciutto Crudo

Chicken Breast with Blue Cheese wrapped in Prosciutto Crudo

This is a ‘super simple’ dish to do on the Big Green Egg or indeed most BBQs that have a lid you can close.  It is an ideal dish for mid week when you want to cook something fresh, ideal for eating outside in the summer, but you want it quickly!  First set up the (more…)

Italian Smoked Turkey Breast

Italian Smoked Turkey Breast

On our wanderings we came across a butcher selling ‘home reared’ turkey and turkey breasts.  Well for 2 of us even a 1kg turkey breast seemed quite a lot of meat and even that was going to be a bit of a ‘tight squeeze’ on the Mini BGE.  But the challenge was set!  The question was how to cook it? Well we were (more…)

Spatchcock in the Beechwood

Spatchcock in the Beechwood

Wandering around the local market here in Tuscany we spied a Spatchcocked chicken…  and so our plans for today’s food was sorted!

The term spatchcock refers to poultry prepared for roasting or grilling by removing the backbone and sometimes the sternum and flattening it out ready for cooking – for obvious reasons it is sometimes also called butterflying.  It is said to have two real advantages: firstly it cooks quicker, and as more skin is exposed – you have more delicious crispy skin!

We packed a picnic, some water, and a little local wine and set off up to an open Beech Wood clearing on the side of Mount Amiata close to where we are staying. Transporting the Egg between our holiday baggage driving to Tuscany had proved to be very straightforward – but driving up a winding mountain road with a largely empty boot could have left the BGE a little vulnerable.  So we simply held it in place with a stretched cargo net normally used to stop small items running around the boot.


We found a wonderfully quiet spot in the high Beech woods on the mountain. There were a series of wooden picnic tables and even some communal stone built BBQs available. I could imagine that at weekends this could be a very popular space but today, in the middle of the week, just one other couple enjoying the quiet, the dappled sunlight and a glass of wine!

The BGE was set up at the base of a Beech tree and brought up to temperature.  Once it had reached around 170C we added some snapped Beech twigs from the forest floor, and added these to the charcoal to create some Beech smoke and placed the platesetter feet up with the cast-iron grill in place.

We found a little wild rosemary which was placed on the grill and the chicken was sat on top.  There was just enough room on the Mini for a couple of potatoes too. The chicken had previously been rubbed with a little olive oil all over and then seasoned with a mix of sea salt, pepper and some mixed dried herbs.


The Egg was closed and left to work it’s magic!

After around 15 mins the chicken was cooking well but probably a little quicker on the underside than the skin side – and that would never do!  So the chicken was flipped over and just to make sure we didn’t end up overcooking it we put the in-dwelling temperature probe from the iGrill mini into the thickest part of the chicken.

This is a very neat inexpensive little battery powered bluetooth temperature probe.  It is safe to use with the platesetter in place – running the heat resistant cable over one of the legs of the platesetter to protect it from any flames.  Best of all it sends the core temperatu

re of the cooking meat to your bluetooth enabled phone, meaning you don’t even have to stand up to check – this is what being on holiday is all about!

Wanting a final core temperature of 74C once the probe indicated we were near 70C the vents of the BGE were closed and the Metal cap replaced with the snuffer cap. The final part of the cooking would be completed using the residual heat of the egg (so we burn less charcoal and the egg cools down quicker for later transport!).

Once 74C was reached the chicken was taken off the grill leaving just the potatoes to finish off.  The chicken was wrapped in foil and allowed to rest for 10 minutes.

The chicken was simply divided into 2, and served with the potatoes a green salad and local tomatoes, and of course a glass or two of the local red wine!  The skin was crispy all over and beautifully flavoured, but the big discover” was cooking the chicken simply sitting on the bed of rosemary – now that is something we will do again …Salute!


Spatchcock Chicken

July 23, 2017
: 2
: 5 min
: 30 min
: 35 min
: Easy

Spatchcock Chicken and Potatoes cooked over charcoal served with a green salad

By:

Ingredients
  • Small Spatchcock Chicken
  • Potatoes
  • Green salad
  • Olive Oil
  • Salt
  • Pepper
Directions
  • Step 1 Set up the BGE with the platesetter and bring the temperature up to around 170C. Beechwood twigs can be added for a little smoke.
  • Step 2 Rub the chicken with a little olive oil all over and then season with a mix of sea salt, pepper and some mixed dried herbs.
  • Step 3 Place a little wild rosemary on the cast-iron grill and sit the chicken on the top. Add a couple of small potatoes on to the grill.
  • Step 4 After around 15-20 mins the chicken will be largely cooked You may want to flip over the chicken just to make sure the skin is crispy
  • Step 5 Once the core temperature is 70C close the vents of the BGE and replace the Metal cap with the snuffer cap. The final part of the cooking would be completed using the residual heat of the egg .
  • Step 6 Once 74C reached take the chicken off the grill and leave the potatoes to finish off. Wrap the chicken in foil and allowed to rest for 10 minutes.
  • Step 7 Divide the chicken into 2 and served with the potatoes a green salad (and a glass or two of the local red wine!)