Tag: Fish

Mussels, linguine and samphire (Cozze, linguine e salicornia)

Mussels, linguine and samphire (Cozze, linguine e salicornia)

Seafood and pasta are just made for each other, but having developed allergies to shrimp, prawn and crab in 2020, I am having to revisit what I can eat and therefore some of our standby recipes too.  Getting that ‘seafood’ taste is relatively easy if you utilise the shells and heads of prawns etc but sadly I can no longer do that.  This recipe however lacks nothing on the taste format at all and must be one of the simplest seafood past recipes I know.

The original recipe comes for Jamie Oliver’s  “Jamie’s Italy” which has many delightful recipes (1).  We have adapted it slightly in terms of supporting ingredients and quantities. Linguine seems to work beautifully with seafood and we have made this successfully with both fresh and dried pasta.  The cooking is so simple that ingredients should all be prepared in advanced and be ready to ‘pop in the pan’.  The dish cooks equally well in the Big Green Egg or on a domestic hob. The pasta can be cooked on the BGE but I would almost always cook this on a hob when available.

After setting up the Big Green Egg for direct cooking, we put a pan of salted water on the hob to boil so it would be ready for the pasta.  On the Egg we used our handless Tefal Ingenio Sautée pan and added a drizzle of extra virgin olive oil. The garlic, chilli and anchovy was added and cooked for a couple of minutes until the anchovies softened into the oil making the base for the sauce.  It is important to make sure the garlic doesn’t take on any colour. At this point the halved tomatoes were added.  The juice of the tomatoes combines with the anchovy and oil to make a lovely simple sauce.  This can now be taken off the heat.

Whilst the dish works well with fresh or dried linguine, using dried gives a little more time flexibility.  Cook the pasta for 1-2 mins less than the suggested cooking time so it’s  al dente.  When we were 3 mins from this point we popped the sautée pan back onto the BGE and then add a good handful of washed and debearded mussels to the tomato sauce. The pan was tossed, then the lid placed on top and cooked until all the mussels opened. (As usual with mussels, if any remain closed after cooking, throw them away). On the BGE you can get away without putting the lid on the pan.  In addition to the chopped parsley in the original recipe, we also added a handful of samphire which works really well. Shut down the BGE

The linguine and just a little pasta water was added to the mussels and sauce and it was popped  back on the heat.  It was stirred and tossed together so the pasta could taker all the sauce flavours, which brings everything together beautifully. The top was closed on the BGE for a final minute or so to finish the cooking of the pasta perfectly. This allows the pasta to suck up all the lovely tomato and mussel juices. We had previously made some tarragon crouton so finished off the dish with these and a good glug of olive oil.   This is a dish to serve immediately.

Crouton footnote

Making the crouton is so simple. Cube some stale bread (remove the crusts first) add to a clean sauté or frying pan with some olive oil and salt.  Fry gently until starting to crisp and then add some chopped tarragon and stir all together for a minute or two. Take off the heat and use when ready.

References

(1) Jamie Oliver: Jamie’s Italy ISBN-10 ‏ : ‎ 0718147707

Mussels, linguine and samphire

April 15, 2024
: 2
: 10 min
: 15 min
: 25 min
: Easy

A great combination of mussels and linguine in a simple anchovy, garlic and tomato sauce

By:

Ingredients
  • extra virgin olive oil
  • 2 large cloves of garlic, sliced
  • 1-2 pinches of crumbled dried chilli
  • 2 anchovy fillet
  • 12 ripe cherry tomatoes, halved
  • 250 g fresh linguine or 200g dried
  • 400g mussels, washed and debearded
  • a small bunch of fresh parsley, chopped
  • small handful of samphire
  • sea salt
  • freshly ground black pepper
Directions
  • Step 1 Pre boil the salted water for the pasta and set up the Big Green Egg for direct cooking.
  • Step 2 Add a generous drizzle of extra virgin olive oil to a fry/sautée pan. Add the garlic, chilli and anchovy and cook for a couple of minutes until the anchovies softened into the oil. Make sure the garlic doesn’t take on any colour. Add the halved tomatoes, cook through for 2 mins and remove from the heat, then take off the heat.
  • Step 3 Cook the pasta for 1-2 mins less than the suggested cooking time so it is al dente.  Three mins before this point put the sautée pan back onto the BGE and add a good handful of washed and debearded mussels to the tomato sauce. Toss then place the lid on top and cook until all the mussels are open. Add the chopped parsley and samphire and shut down the BGE
  • Step 4 Add the linguine to the mussels and sauce on the heat and stir and toss it altogether. Leave on the heat for a final minute or so to finish the cooking of the pasta perfectly.
  • Step 5 Serve with a good glug of olive oil, and if using them, the tarragon crouton
Breakfast kippers!

Breakfast kippers!

Kippers are a speciality of the North East of England though other areas of the UK (rightly) claim them as their own regional food too!  A cured gutted herring is split ‘butterfly fashion’ and then cold smoked, usually over oak.  Traditionally eaten in the UK as a breakfast dish – they were also eaten for ‘high tea’ or as a supper dish in Britain largely before WW2.

We are yet to cold smoke our own herrings to make kippers – but one day!  These kippers were smoked at the Galloway Smokehouse in South Western Scotland and were just first class!

A really simple breakfast cook.  We set up our MiniMax BGE for direct cooking for these.  The BGE was left to stabilise at around 180C.  The kippers were popped into one of our handleless Tefal Ingenio pans with a little butter and gently cooked over the direct heat for around 5 minutes until the backbone started to lift.

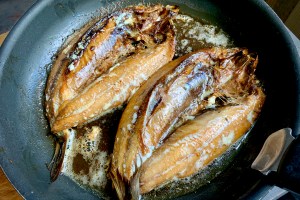
They could have simply been left for a further minute or so to finish on the BGE – but we had our Gozney Roccbox pizza oven set up next to us.  We simply used it as a salamander to finish them off with some top heat for a minute or so.

Which ever way this is a dish everyone should have a go at!  It cooks so well on the BGE – the other advantage in my case is that it is Wife Friendly in that it doesn’t leave kippers smells around the house all day!

As a beautiful product …………….

……….it   partners well with a little lemon, oregano and some brown bread and butter!


Breakfast kippers

August 4, 2023
: 2
: 10 min
: 10 min
: Easy

Freshly smoked Galloway kippers pan grilled fried and then grilled with top heat

By:

Ingredients
  • 2 pairs of kippers (2 fish)
  • Butter
  • Lemon
  • Herbs
Directions
  • Step 1 Set up the BGE for direct cooking.  Stabilise at around 180C. Add the kippers to an handleless Tefal Ingenio pans with a little butter and gently cooked over the direct heat for around 5 minutes until the backbone started to lift.
  • Step 2 Either shut down the BGE and cook for around a further minute or remove and pop under direct heat from a preheated pizza oven used as a salamander for a minute or so.
  • Step 3 Serve with a little lemon, oregano and some brown bread and butter!
Cassarecci with courgette capers and smoked halibut

Cassarecci with courgette capers and smoked halibut

A very quick post!  This dish is based on an original dish by Theo Randall, we modified it to make Fettuchini with courgettes and salmon. That recipe can be found here

We had been cold smoking different white fish and for this dish we used some smoked halibut. It is an absolutly perfect way of using some of the trimmings – For this we used the thin tail sections.  There doesn’t seem to be a large tradition of cooking with smoked fish in Italy. In this dish, the subtlety of the smoked halibut makes it a perfect dish.  We combined it with cassarecci pasta ……………………

……………………..it works so well, do give its a go!

Footnote – this should work well with smoked haddock too!

Cassarecci with courgette capers and smoked halibut

August 1, 2023
: 2
: 10 min
: 15 min
: 25 min
: Straight forward

A perfect blend of smoked halibut, courgette and pasta

By:

Ingredients
  • 150g courgettes/zucchini
  • Olive oil
  • 1 garlic clove finely sliced
  • 100-150g smoked halibut - skin removed and sliced into strips (0.75cm)
  • A few chopped basil leaves
  • 1 tbsp of drained capers
  • Around 150-250g dried Cassarecci
  • Sea salt and freshly ground pepper
Directions
  • Step 1 Cut the courgettes into 1cm rounds and then cut into batons – usually three to a disc.  
  • Step 2 Set up the BGE for direct cooking at around 180C.  Heat the olive oil in a handleless pan such as the Tefal Ingenio. Add the sliced garlic and cook for1 minute.  Add the courgettes and cook for around 5 minutes, tossing them a few times until they are a light golden colour.  
  • Step 3 Add the sliced halibut followed by the basil and capers and a little seasoning. Cook for 2-3 minutes then remove the pan from the heat.
  • Step 4 The pasta should be cooked until (quite) ‘al dente’ – probably 1-2 mins less than the stated cooking time. Add the pasta to the courgettes and salmon and place back on the heat so the pasta cooks in the sauce for the last few minutes. Add a little pasta water and evaporate off as necessary to add silkiness to the sauce.  Add more pasta water if the sauce needs to be loosened slightly.  If cooking on the BGE this last stage needs to be done with the lid open.
  • Step 5 Serve on warmed plates
Tuna with Sicilian lemon zested beans in tomato sauce

Tuna with Sicilian lemon zested beans in tomato sauce

This week we had too many French beans to cope with and so we needed to be a little inventive!  We therefore combined some of the dishes we have tried over the last couple of decades travelling over Europe and were delighted with the outcome.  I doubt its absolute authenticity but am convinced by its principal ingredients.  More importantly – it just works!!!

Basically this is a bean dish designed to ‘showcase’ a piece of meat or fish.   We lit the BGE and set it up for indirect cooking.  As it was heating up we put into the BGE a small pan of trimmed French beans which had been halved (as they were long).  As the BGE came up to temperature we let the beans boil for around 3 minutes to begin to cook.  The water was then poured away and the beans were put to one side.  In a sauté pan we then cooked a finely chopped shallot in some olive oil and part way through cooking added a coarsely chopped garlic clove.

Once these had taken on a little colour a can of chopped tomatoes joined the mixture to cook for around 10 minutes with some freshly chopped herbs (on this occasion thyme, oregano and rosemary).    We were almost there !  A small handful of chopped green olives, lemon zest, capers, salt and pepper was added to the pan.

All that was left to do was to add the almost cooked French beans, and let the whole dish come together.  This makes a fine side dish, or indeed a light supper dish in it’s own right.  Today however we were using oil to underpin some freshly grilled Tuna with a little grilled lemon – this worked perfectly!

Once the beans were cooked, the platesetter was removed and the Tuna was grilled on the BGE – this time direct – at 250C for about 1 minute a side. The tuna was then served on the beans and the grilled lemon squeezed over the top

Delicious!

………… give it a go – it is so easy!!

Tuna with Sicilian lemon tested beans in a tomato sauce

September 25, 2020
: 2
: 15 min
: 15 min
: 30 min
: Easy

A simple sauce using tomatoes and shallots, enhanced with lemon zest, and olives with green beans - the perfect foil for grilled Tuna.

By:

Ingredients
  • French beans - around 300g
  • 1-2 Shallots finely chopped
  • Garlic clove coarsely chopped
  • Olive oil
  • Can of chopped tomatoes 400g
  • Freshly chopped herbs (e.g. thyme, oregano and rosemary). Handful of chopped green olives
  • 1 lemon
  • 3 tbsp capers
  • Salt and pepper.
  • 2 Tuna steaks
Directions
  • Step 1 Set up the BGE for indirect cooking aiming for around 180C. If the beans are long cut in half put on the BGE in a small pan of water – allow to partially cook as the EGG warms up. Once partially cooked pour the water away and set the beans to one side
  • Step 2 In a sauté pan sauté the finely chopped shallot in some olive oil and part way through cooking add a coarsely chopped garlic clove. Once these have taken on a little colour add a can of chopped tomatoes and allow the mixture to cook for around 10 minutes with some freshly chopped herbs
  • Step 3 Add a small handful of chopped green olives, the zest of the lemon and the capers. Season with salt and pepper.
  • Step 4 Finally add the partially cooked French beans, and let the dish come together.  
  • Step 5 As the beans are finishing – open up the vents on the BGE to allow the temperature to begin to rise. After a couple of minutes , remove the beans and the platesetter. Put the platesetter flat on a heat proof surface and put the pan of beans on this to keep warm. Once the BGE gets to around 225-250C grill the Tuna for around 1 min on each side. at the same time cut the lemon into 4 lengthways and add to the grill to warm and colour
  • Step 6 Serve the tuna on top of the beans with the hot lemon ready to squeeze over the top


Smoked Mackerel Dauphinois reinvented!

Smoked Mackerel Dauphinois reinvented!

Just after we thought we had perfected the smoked mackerel dauphinois dish we decided to try yet another different potato!  Classically, dauphinois potatoes is made using a floury potato – but we had found the waxy potato Linda 1974 made a great tasting dish – see here. Now I would still stand by that, it is a great dish!!  However, we had the opportunity to try the dish  with a different potato, this time Red King Edward 1916 – again from Carroll’s Heritage Potatoes. This is a relatively rare version of the King Edward – first appeared as ‘Fellside Hero’ in Northumberland.  From my limited experience they are less flavoursome than Linda 1974 – but their texture is especially suited for this dish.  As an added bonus they cook beautifully in their skins and the skins stay red after cooking – so an added aesthetic bonus!

The advantage of the floury potatoes is that they add their own creaminess to the overall dish.  And if I am right that they are not quite as tasty as the waxy Linda 1974 potatoes, the deep rich smoky taste of the mackerel in this dish adequately cover any of those potential weaknesses!

The method of preparation is absolutely identical to our previously published recipe except that this time we did not peel the potatoes first as we wanted to retain their red skins.  They were cooked on the MiniMax set up indirectly in a cast iron roasting dish and cooked at around 170C for about an hour.

If the top doesn’t brown as much as you would like simply place under a hot grill for 2 minutes.  This was not a problem we had here though!  And just to make sure you don’t eat too much fill a third of your plate with a fresh green salad before serving!  It goes beautifully with the green salad.

Do give the dish a go in this or the previous version

– you will not be disappointed!!


Smoked Mackerel Dauphinoise Potatoes

May 21, 2020
: 2-3
: 15 min
: 1 hr
: 1 hr 15 min
: Really easy

A beautifully smoky Dauphinoise potato dish enhanced with smoked mackerel and mustard

By:

Ingredients
  • 250g Smoked mackerel
  • 400g floury potato (we used Red King Edward 1916)
  • Medium sized onion 1
  • 250ml of milk
  • 100ml of cream
  • 2 tablespoons of grain mustard
  • Salt and pepper
  • Mustard seeds (optional)
Directions
  • Step 1 Do not peel the potatoes, just parboil for around 6-8 minutes. Cool so can be handled and slice around 5-7mm thick.
  • Step 2 Finely slice the onion into rings and place as the first layer in a greased medium sized roasting dish.  Add the potatoes as the second layer lightly salting as you go. Then add the chunks of skinned mackerel. Repeat until the roasting dish is full then top with a layer of potatoes.
  • Step 3 Press down the layers to remove any large air spaces.  
  • Step 4 Mix the milk cream and mustard and and add to the dish to flow between the layers.  Finally add some extra mustard seeds over the top.
  • Step 5 Put into the Big Green Egg set for indirect cooking at around 170-180C or into a domestic oven. Leave until the potatoes are cooked through and the top is a golden brown.
  • Step 6 Serve by itself or with a green salad
Smoked Mackerel Dauphinoise Potatoes

Smoked Mackerel Dauphinoise Potatoes

The 2020 health crisis has given us time to think as well as having frightening implications on our lives.  In that thinking time we have been reconsidering amongst other things what we eat and how we prepare it.  We are trying to reduce our food waste to an absolute minimum, but we are also wanting to eat really great food.

Dauphinoise potatoes is a classic French dish.  Smoked mackerel dauphinoise is a very special twist on this classic – and it is so so simple!!  You can cook this in a domestic oven and it is very good – in the Big Green Egg it is stunning!  For best results I would recommend a waxy potato and we are delighted to have found Linda 1974 – this is an older variety of potato that was originally from Germany and was saved from extinction and re-instated simply because they taste so good!!  Other potatoes will of course work, but we got these beauties from the lovely people at Carroll’s Heritage Potatoes. Perfect!!

The dish itself is simple to make but so rewarding to serve!  We are just cooking for 2 at the moment and so this dish is based on that.  Four or 5 medium sized potatoes, one medium sized onion and a 250g pack of smoked mackerel are the main solid ingredients.  The potatoes were peeled and parboiled for around 6-8 minutes and then left to cool so they could be handled.  The onion was finely sliced into rings and placed as the first layer in a greased medium sized roasting dish.  The potatoes were sliced length ways around half a centimetre thick. These made up the second layer.  These layers were each lightly salted.  The third layer was the smoked mackerel, skin removed and torn into decent size chunks.  This was then repeated until the roasting dish was full and finished off with a layer of potatoes.

The layers were gently pressed down into place to remove any large air spaces between layers.  The final step was to add the creamy, mustard milk in which the dish would cook.  The mix was made up of around 250ml of milk, 100ml of cream and 2 tablespoons of grain mustard.  This was poured into the roasting tin and allowed to flow between the layers.  Finally some extra mustard seeds were sprinkled over the top.

This is all there was to it, all that was left to do was to add it to the Big Green Egg set up for indirect cooking at 170-180C (this can also be cooked in a domestic oven at the same temperature!).


 Leave this for around an hour until the top browns and the potatoes are beautifully softened.

Once cooked the roasting dish was removed from the BGE and allowed to stand for 5 mins or so which also allows the dish to cool just a little too.  Simply plated the layers were served with some chopped chives and freshly ground salt and pepper – it would work really well with a green salad – but we never got that far!!

Footnote:  we have also made this with the floury potato Red King Edward 1916 – it is a very interesting variation and worth a try – see here

Smoked Mackerel Dauphinoise Potatoes

April 27, 2020
: 2-3
: 15 min
: 1 hr
: 1 hr 15 min
: Really easy

A beautifully smoky Dauphinoise potato dish enhanced with smoked mackerel and mustard

By:

Ingredients
  • 250g Smoked mackerel
  • 400g Waxy potato (we used Linda 1974)
  • Medium sized onion 1
  • 250ml of milk
  • 100ml of cream
  • 2 tablespoons of grain mustard
  • Salt and pepper
  • Mustard seeds (optional)
Directions
  • Step 1 Peel the potatoes and parboiled for around 6-8 minutes. Cool so can be handled and slice around 5-7mm thick.
  • Step 2 Finely slice the onion into rings and placed as the first layer in a greased medium sized roasting dish.  Add the potatoes as the second layer lightly salting as you go. Then add the chunks of skinned mackerel. Repeat until the roasting dish is full then top with a layer of potatoes.
  • Step 3 Press down the layers to remove any large air spaces.  
  • Step 4 Mix the milk cream and mustard and and add to the dish to flow between the layers.  Finally add some extra mustard seeds over the top.
  • Step 5 Put into the Big Green Egg set for indirect cooking at around 170-180C or into a domestic oven. leave until the potatoes are cooked through and the top is a golden brown.
  • Step 6 Serve by itself or with a green salad
Smoked sea trout and seafood pâté

Smoked sea trout and seafood pâté

This recipe is based on an idea for a seafood pâté that we first saw on Jamie Oliver Christmas Cooking programme in 2019. It is a very simple recipe. It can be made from ingredients normally easily available in your local supermarket but we had been raiding the fridge and store cupboard (#RaidtheFridge not the supermarket) which meant that with a little bit of fiddling of ingredients we could get close to the original recipe.   Our twist to that approach is that this was made with cold smoked sea trout which we had cold smoked in the Big Green Egg and large frozen prawns (large shrimps for our American friends) which were first grilled on the Big Green Egg.  The sea trout was cured and smoked in exactly the same way as for cold smoked salmon (see here).

The prawns were defrosted and put on a bamboo skewer for ease of handling.  They were cooked over a direct flame until they just became pink and were slightly singed on their edges then put to oneside to cool.

From this point making the pâté really just becomes a matter of assembly.  All this could be done in a food processor but we wanted a coarse chunky pâté and so all the components were hand chopped with a chef’s knife. The smoked trout was first sliced then added to the shelled prawns and they were both roughly chopped.  The white crab meat was then added together with the zest of half a lemon. (The dish would be fine without the crab – just slightly different.) This was all put in a glass bowl together with the cream cheese, the juice of a lemon and a little black pepper and cayenne pepper.  There was no need to add salt.  This was mixed thoroughly and then spooned into a pâté dish and decorated with some crab claw meat – and the only green that we had to hand – a small basil rosette.

As a variation add 2 tablespoons of cod egg ‘caviar’ to the mix if you have some in the cupboard and you are wondering what to do with it!

NB when initially tasting the pâté it seems slightly dominated by the lemon, but his softens over a few hours when left in the fridge.  VacPacked in the fridge this should keep for 3 days.

…………………………. it is very easy, give it a go!

Smoked Sea Trout and seafood pâté

April 20, 2020
: 12
: 20 min
: 20 min
: 40 min
: Easy

A course seafood pâté of home smoked sea trout, prawns and crab

By:

Ingredients
  • 150g of large frozen or fresh prawns
  • 150g of home smoked sea trout or salmon
  • 150g white crab meat
  • 250g cream cheese
  • Zest of half a lemon
  • Juice of 1 lemon
  • Pinch of black pepper
  • A little cayenne pepper
Directions
  • Step 1 Grill 150 g prawns on the BGE in direct mode – allow to cool.
  • Step 2 Take around 150 g of home smoked salmon or sea trout and slice.
  • Step 3 Roughly chop the sea trout and the prawns, then add the white crab meat and mix with the zest of half a lemon.
  • Step 4 Place in a bowl and add the cream cheese, lemon juice and pepper and mix thoroughly
  • Step 5 Spoon into pâté dishes, decorate and place in the fridge for at least 3 hours or overnight
  • Step 6 Serve with toasted sourdough
The Big Green Egg – Does Sea Bass and Bream Again!

The Big Green Egg – Does Sea Bass and Bream Again!

It is 2 years now since we did the Sea Bream and Sea Bass cook when on holiday in Italy.  I remember it as a delightful evening as we sat out overlooking the local valley with a herby smoky aroma wafting towards us as we had an early evening Prosecco! So when we were back in Tuscany it seemed a perfect opportunity to (more…)

Herring fillets sautéed in butter

Herring fillets sautéed in butter

Whilst it is often great fun cooking complex meals, there are times when very simple food just can’t be beaten.  I think this is one of those recipes.  Sautéed herring fillets!  We were doing some non food shopping in our local supermarket and the fish counter was closing.  They had 2 fresh herring which they were pricing up at half price so that was just £1 per fish.  The fish were actually very fresh, with bright eyes and red gills always a good sign!  Simply too good to miss.

Herring used to be a staple food of the North East coast of England, but overfishing led to their decline .  For a while there was a moratorium on fishing for them in the 1970s.  Through good stewardship they are at times becoming plentiful again as a sustainable resource.  They are also the basic ingredient of that world class product, the ‘Craster Kipper’, but that is a story for another day!

Herring is a very easy fish to prepare.  After gutting and washing, the head, fins and the tail are cut off, this can be done with a pair of kitchen scissors.  The belly of the fish is placed onto the work surface, opening up the body cavity so that it supports the fish.  Then simply press down hard on the back of the fish where the dorsal fin was and flatten out.  Then turn the flattened fish over, grab hold of the loosened back bone and pull it out gently.  With it comes the majority of the fish bones. Trim round the 2 fillets and divide them with a single cut down the centre of the back forming 2 individual trimmed fillets.  Now that is the preparation completed and all that is left it to sauté the individual fillets.  There are hundreds of things one could add to the fillets at this stage, but I would suggest that at least once you try them simply cooked in oil and butter as we have here.  Herring also works really well on the EGG as it keeps all those fish cooking smells, that are not universally loved, out of the house!

Set up the Big Green Egg for direct cooking and heat a handleless, heavy bottomed pan.  Add some olive or rapeseed oil and when this is hot drop in a knob of butter.  This will immediately foam if the pan is hot enough.  Let the foam die down, and then add the herring fillets, skin side down, one at a time.  As the skin hits the hot pan there is a natural tendency for the fillets to curl. just press them down with your fingers or a wooden spoon until they relax to prevent this. Leave them untouched in the pan until the skin is a nutty brown (3-4 mins) and then flip them over for a further minute or so until the flesh is coloured.

Remove from the pan and serve 2 filets per person on a bed of rocket leaves.  Pour over a little of the cooking juices and serve with a squeeze of lemon.  I think this makes a great supper dish or a light lunch.  Best of all though I think it makes a good alternative to those wonderful Craster Kippers for breakfast, especially when that glorious taste of kippers is not loved by all the members of the household!!

This dish worked out at about £1.00 a serving, and even at full price it would have only been £2.00.

…………………………….. give them a go!!

Herring fillets sautéed in butter

September 17, 2019
: 2
: 10 min
: 10 min
: 20 min
: Easy

Fresh herring fillets sautéed in butter

By:

Ingredients
  • 4 herring fillets
  • Olive or Rapeseed oil
  • Butter
  • Lemon Juice
Directions
  • Step 1 Set up the Big Green Egg for direct cooking and heat a handleless, heavy bottomed pan.
  • Step 2 Add olive or rapeseed oil to the pan and when this is hot add a knob of butter.
  • Step 3 Once the butter has stopped foaming add the herring fillets, skin side down, one at a time. Press each fillet to the pan until the fish relaxes and then leave untouched until the skin is a nutty brown (3-4 mins).
  • Step 4 Flip the fillets over to colour the other side for a further minute or so.
  • Step 5 Remove from the pan and serve 2 filets per person on a bed of rocket leaves. Pour over a little of the cooking juices and serve with a squeeze of lemon.

Simple Seafood Stir fry – with video

Simple Seafood Stir fry – with video

This is the first video we have included in our blogs but it seemed the easiest way to show the BGE Wok in action!  We have had the BGE Expander system for some time and have warmed to its versatility.  It certainly brings some further flexibility to cooking opportunities in our large BGE.  One of the possibilities is to (more…)

Hot Smoked Salmon – Cedar and Beech Smoked

Hot Smoked Salmon – Cedar and Beech Smoked

In the UK if you refer to smoked salmon, then we are usually talking about ‘cold smoked’ salmon.  This is very much the traditional way of smoking salmon – and is often referred to as the ‘Scottish or Nordic method’ in countries where ‘hot smoking’ is the norm.  We have covered cold smoking salmon elsewhere.  Briefly, the salmon is cured for up to 24 hours and then smoked ideally below 20C for around 6 to 12 hours.  Cold smoking doesn’t actually cook the fish, so it’s left with an almost raw-like texture.  This is the most common form of smoking in Northern Europe and on the East coast of America.

Before going any further I need to say that both methods of smoking salmon are great, but the end products are very different.  Hot smoking salmon is a specialty of the Pacific Northwest of the US.  The salmon is cured or just brined and then smoked at 50-80C for around 4-8 hours to get the core temperature of the fish to around 70C.  The salmon is therefore both smoked and cooked giving it its flaky texture.

We have got into the habit this summer of hot smoking the tail end of sides of salmon – partly as it is a great way to use this less than prime portion of the fish. The night before wanting to cook all you need to do is mix together the sugar, salt, garlic and pepper and cover the salmon with a generous coating on both sides.  This should ideally be done in a nonmetallic dish that will allow the salmon to sit flat in the base.  The dish is then covered and put in the fridge overnight.

In the morning a lot of the salt and sugar will have gone into solution as it has drawn out liquid from the salmon. This is now simply washed off well (or will retain too much salt) and the salmon dried and placed on a trivet and put back into the fridge for a few hours to let the surface dry further and produce an outer pellicle.   It is this pellicle that takes up the smoke when cooking.  At his stage the salmon will feel stiffer and have a richer and darker colour.  Some suggest wrapping the salmon in a clean cloth for the first hour (e.g. the BGE UK website) but this is not something we have seen the need for.

It is now a good time to soak your cedar plank, and if using wood chips as opposed to chunks, to soak them too.  From now on everything is really easy, especially if you have a digital controller to manage the temperature of the Egg and monitor the core temperature of the fish.  You can of course cook this dish without a digital controller – simply set the BGE up for indirect cooking at 80C with the beech chunks in place.  Place the salmon on a cedar plank in the EGG and away you go.  Keep the EGG temperature at 80C and after around 4 hours you will have hot smoked salmon.

It is even easier if you have a digital controller like the DigiQ DX2 BBQ Guru or the CyberQ Cloud or similar. If cooking in a Large BGE it is also well worth cooking more than one piece of salmon.  It is really only necessary to put the food temperature probe in one of the pieces.  But if you have something like a CyberQ Cloud with multiple probes, take the opportunity to use multiple probes.  Which ever you use set up the Pit Fan and plug the wire with the crocodile clip into the ‘Pit Temperature’ port and the wire with the probe into the ‘Food Temperature’ port.  Insert the temperature probe into the thickest part of the salmon, and attach the clip to the stainless steel grid. Set the controller to a pit temperature of 80C and a food temperature of 70C.  Run the wires over the the legs of the plate setter to protect from any flare-up. Close the lid of the EGG and leave for around 4 hours until the controller tells you the core temperature is 70C.  And that is all that needs to be done!

Serve hot in portions or flaked into a salad.  There are so many things that you can do with it cold too – more of these later – but in the meantime “give it a Google”.

What ever you use it for, I am sure you will love the salmon cooked this way!

Hot Smoked Salmon - Cedar and Beech Smoked

July 22, 2019
: 4 - scaleable
: 16 hr
: 4 hr
: 20 hr
: Easy

Cured Salmon side or part side smoked on a cedar plank over beech smoke

By:

Ingredients
  • 1 side of salmon (scale quantities up or down dependent on the amount of salmon used)
  • 200g dark muscovado sugar
  • 100g salt
  • 4 cloves of garlic, crushed and finely chopped
  • 1 tsp cracked black pepper
  • 2 chunks of beech wood for smoking (or smoking chips)
  • 1 Cedar smoking plank
Directions
  • Step 1 Mix together the sugar, salt garlic and pepper and cover the salmon with a generous coating on both sides in a nonmetallic container. Place in the fridge overnight.
  • Step 2 In the morning, wash the curing mix off the salmon and pat dry. Place on a trivet and put back into the fridge for a few hours to let the surface dry further and produce an outer pellicle.  
  • Step 3 Soak the cedar plank, and if using wood chips as opposed to chunks, soak them too.  
  • Step 4 Set the BGE up for indirect cooking at 80C with the beech chunks in place.  Place the salmon on a cedar plank in the EGG (and if using a temperature controller set the Pit temperature to 80C and the Cook core temperature to 70C.
  • Step 5 Close the lid of the EGG and leave for around 4 hours until the controller tells you the core temperature is 70C.  
  • Step 6 Serve hot or cold
Basic smoked Salmon

Basic smoked Salmon

One of the triggers for me first buying a Big Green Egg was the possibility of using it for cold smoking as well as all the other things the Big Green Egg excels at. It was also something that, at the time at least, very few if anyone talked about, and something that has never been pushed by the company. The BGE is, however, fabulous for home smoking – and it is so easy! Smoked Salmon is probably the most rewarding place to start. We are talking here of the European style of smoked salmon – cold smoked. Many of the American sites I have seen with recipes for smoked salmon are for ‘hot smoked salmon’ equally delicious, but quite different! (more of that later).

(more…)

Acciughe alla griglia – grilled anchovy

Acciughe alla griglia – grilled anchovy

When is a sardine not a sardine………..?

Out shopping I saw what I thought were some lovely looking fresh sardines – only later when I checked the spelling of Acciughe (also often called Alici) did I realise that the sardines were in fact anchovy!!   I think you have to go a long way to beat simply grilling sardines and adding a little lemon and salt to compliment the oil rich “silver darlings” – so in my ignorance these anchovy were handled in the same way (which is just what the Italians do too!)

The BGE was set up for direct cooking with the cast iron grill in with the wider sided bars uppermost and heated to around 180C.  As we are a little limited for space on the Mini BGE the anchovy had the heads removed to allow a little more space.   They were then simply gutted and then rubbed with salt and olive oil and then tossed on the grill.

The anchovy were grilled for around 4-5 minutes a side until the skins started to blister and the fish took on some colour.  I find it easier to do this without overcooking the fish at around a  temperature of 180C combining grilling and oven cooking that the BGE does so well rather than being tempted to cook at over 200C.  After a few minutes we added a couple of slices of bread to toast to have with the fish.


Once ready the anchovy were plated on top of a green salad with herby crouton and finished with a simple drizzle of fresh lemon.

These are very “moreish” – hope you enjoy!

(it works just as well with sardines!)


Not quite Grilled Sardines!

August 27, 2017
: 2
: 10 min
: 10 min
: 20 min
: Easy

Grilled Sardines

By:

Ingredients
  • Fresh sardines or anchovy
  • Olive oil
  • Salt
  • Lemon
Directions
  • Step 1 Set up direct cooking – with the BGE the cast iron grill is best used with the wider bars uppermost – heat to around 180C
  • Step 2 If limited for space remove the heads from the fish then simply gut them and rubbed with salt and olive oil
  • Step 3 Place on the Grill for around 4-5 minutes a side until the skin starts to blister and the fish took on some colour.  
  • Step 4 Once ready serve with a green salad and freshly squeezed lemon
Grilled Octopus – Polpo alla griglia

Grilled Octopus – Polpo alla griglia

Grilled Octopus is not something commonly found in the restaurants of Northumberland!  As yet I have only come across it on one occasion in restaurants in Tuscany but perhaps we need to get out more!!  Anyway, octopus has the reputation of being tough and chewy unless it is treated correctly.

Tradition has it that Greek fishermen “thrash” the octopus over the rocks 40 times before cooking it to tenderise it – I have certainly seen them doing that, though I didn’t count the number of times.  I have also read of a women in the United States who “double bagged” an octopus and put it in the tumble dryer to tenderise it – but the less said of that the better!  The most usual way however appears to be to simmer in a pan for an hour – and then get down to the grilling!!


Being on holiday we took the easy route as soon as we found a ready “simmered” Octopus in the supermarket (not something you regularly “fall across” in the Co-op, or Waitrose for that matter, in the UK!!)   So no simmering for us – merely open the pack and prepare for the grill!!


……….delicious!


Update link 2017

Update link 2018


Grilled Octopus

August 20, 2017
: 2
: 10 min
: 10 min
: 20 min
: Easy

Grilled octopus

By:

Ingredients
  • Fresh or precooked prepared octopus
  • Olive oil
  • Salt
  • Lemon
Directions
  • Step 1 If using freshly prepared octopus this will need to be precooked by simmering in salted water for about 1 hour and allowed to cool. This recipe used precooked octopus
  • Step 2 Divide the cooled octopus into individual tentacles and slices the head into bitesized pieces
  • Step 3 Drizzle with love oil and salt
  • Step 4 Put onto a hot grill (dome temp around 180-200C) for around 10 minutes until they started to char a little.  
  • Step 5 Remove and allow to rest for 5 mins
  • Step 6 Serve simply with lemon, more salt and a little more olive oil on a green salad
Big Green Egg – Does fish!

Big Green Egg – Does fish!

Wandering around the village on Friday we found that Friday here too was fish day – at the end of the car park there was a man selling fresh fish from his van.  Well this was too good to miss!  So amongst other things we bought a lovely Sea Bass and a Sea Bream – only when on the way home did we suddenly think they might be just a bit too big for the Mini BGE!!   Now this is where the MiniMax. would have been perfect!  – But on this occasion necessity is this mother of invention and so a little” fishy modification”  was finally undertaken before cooking – it reduced the aesthetic impact a little – but the taste was still wonderful! – but more of that later!


So how to cook – lets keep it simple.  We were going to cook indirectly – so the BGE was set up with the platesetter in the feet up position with the Cast iron grill on top but inverted so the widest part of the bars were uppermost.  We brought the temperature up to about 140C and then a handful of soaked Oak wood chips were added as a circle just outside the burning charcoal area before putting the platesetter and grill back in place.


Both fish were gutted and lightly descaled, washed and then patted dry.  The head was removed from the Sea Bass and the body cavities of both fish were salted and then stuffed with sliced tomatoes, a little thinly sliced fennel and sliced lemon.  The skin was salted and peppered and dusted with a mixture of dried herbs and allowed to rest as the BGE came up to temperature.

But then we needed to modify the fish a little bit more!  Some trimming was needed for both fish to allow the top of the BGE to be closed properly!  I have to say it did impact on the aesthetics a little – but when needs must!.  As there was fresh rosemary to hand a stem was added for the cooking period – wetting it before hand allowed it to smoulder for that little bit longer enhancing the slightly smoky aroma!


We decided not to tempt fate and so we did not turn the fish over whilst cooking – but that is the great thing about the BGE – it is so forgiving!!   The fish were served simply with a little wild rice, lemon and olive oil and just a little bread to mop the plate at the end.


The tomatoes and the fennel added a delightful sweetnes to the fish and the gentle smokiness set the whole plate off beautifully.  The only difficulty was deciding who had which plate – if only all of life’s problems were so easilly resolved!!


Footnote. We revisited this recipe 2 years later in the same part of Tuscany and yes it was every bit as good – but we had crispy fish skin too!! – see here


Sea Bass and Sea Bream Duo

August 11, 2017
: 2
: 15 min
: 30 min
: 30 min
: Easy

Oven Grilled Fish stuffed with tomatoes, fennel and lemon

By:

Ingredients
  • Sea Bass
  • Sea Bream
  • Tomato
  • Fennel
  • Lemon
  • Mixed dried herbs
  • Salt and Pepper
  • Rosemary (optional)
Directions
  • Step 1 Set up the BGE for indirect cooking
  • Step 2 Bring temperature to about 140C and then add a handful of “soaked Oak wood chips
  • Step 3 Put the plate setter back with the Cast iron grill on top but inverted so the widest part of the bars were uppermost. 
  • Step 4 Whilst the BGE comes up to temperature gut the fish and lightly descale, washed and then pat dry. 
  • Step 5 Salt the body cavities of both fish and then stuff with sliced tomatoes, a little thinly sliced fennel and sliced lemon. 
  • Step 6 Salt and pepper the skinned dust with a mixture of dried herbs
  • Step 7 Soak the rosemary to encourage it to smoulder
  • Step 8 Place the fish and the rosemary on the grill – do not turn!
  • Step 9 When the fish is cooked (internal temperature reached 52C) remove from the grill [the USDA recommends 62.8C]
  • Step 10 Serve the fish with a little wild rice lemon and olive oil and just a little bread to mop the plate at the end.