
Cold Smoked Salmon – first of the Autumn 2019
One of the real delights of the Big Green Egg is that it makes a really good ‘cold smoker’. Clearly this was not the original intention but (more…)
Smokedfinefood.co.uk - the home of fine food cooked over charcoal and wood
One of the real delights of the Big Green Egg is that it makes a really good ‘cold smoker’. Clearly this was not the original intention but (more…)


Osso bucco is a classic Italian dish which, as long as you don’t translate it into English (bones with holes), has lovely romantic overtones and memories of Italian holidays. The dish is based on slow braised veal, but the bones, or more importantly the marrow from those bones, adds a delicious something else to this dish – whatever you do – make sure that the bones do go back to the kitchen ‘hollow’ with anything that still resides in their centres after cooking eaten and relished. The dish can also (more…)


 The idea of eating liver seems to divide people in the same way that Marmite does – you love it or loath it! Well both Jackie and I are in the ‘love it’ camp. This is the quickest of quick dishes – I make no claim to its originality or authenticity and the only things that makes it Tuscan (more…)


I know it shouldn’t, but it always comes as a bit of a surprise to see the wealth of available seafood when travelling around mainland Europe. I suppose a lot of this surprise is because there is so much seafood caught in the UK and then shipped to mainland Europe meaning that we see so little in the UK! The Octopus is, however, a species more commonly found in warmer waters, and whilst the number found round costal Britain is probably rising due to global warming and the effect on sea temperatures – the octopus is (more…)


This is a ‘super simple’ dish to do on the Big Green Egg or indeed most BBQs that have a lid you can close. It is an ideal dish for mid week when you want to cook something fresh, ideal for eating outside in the summer, but you want it quickly! First set up the (more…)


This is a very simple dish that we have done a few time now as a way to use the remaining heat in the Big Green Egg once it has been shut down. This is one of the endearing qualities of the EGG and we are beginning to put together a number of ideas to use this heat at the end of a cook. This particular one works with and without the pancetta. (more…)


This is a very short blog (and modified recipe) about our second attempt at the Tuscan Terrine (see the first version here).
 The recipe remains largely the same. In an attempt to have a slightly drier mix, only the gin was used as a liquid addition, forgoing the red wine and orange juice, which meant we could limit the amount of the bread used for the bread crumbs. (more…)


 Perhaps it was all too inevitable – if it works well for cannellini beans it would probably work well for borlotti beans too! (more…)


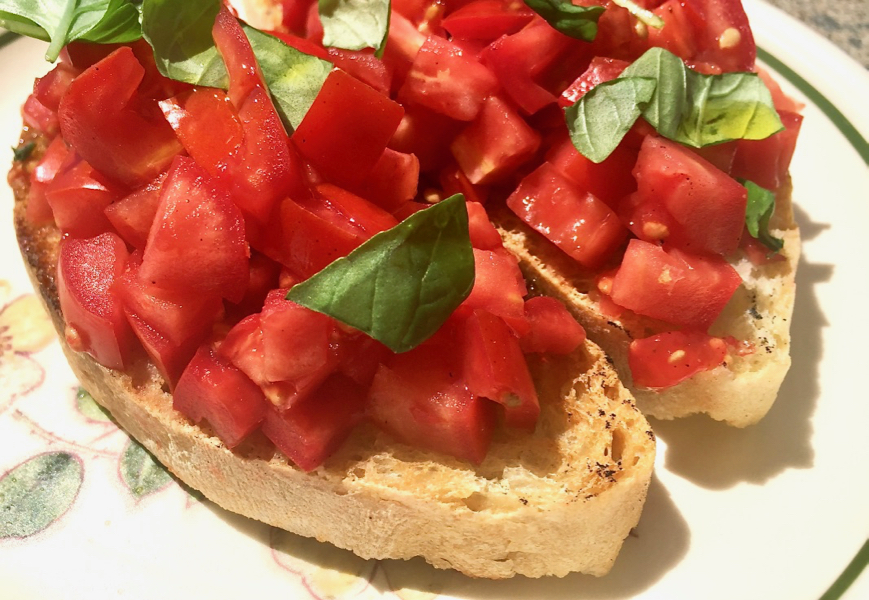
Whilst visiting the local supermarket in Tuscany we spied a box of plumb tomatoes ostensibly for preserving. They looked lovely, and at €3.80 for 8Kg clearly too good to resist. Inevitably, therefore, we are eating a lot of tomato based meals – and what easier or more appealing than Bruschetta al pomodoro!!

 This was very quickly cooked on the BGE – we were going to cook a small joint for our meal in the evening and so the EGG was already warming. Four pieces of slightly stale bread (better if stale) were toasted on one side on the EGG whilst the tomatoes were chopped and piled on a pad of kitchen paper to soak up any excess liquid. The toasted side was gently rubbed with a clove of garlic which was quickly abraded by the rough toast surface – no need to peel it.

 The chopped tomatoes were then piled on the toasted side and the Bruschetta placed back on the BGE to both toast the other side of the bread and warm the tomatoes slightly. Salted and peppered, all that was left to add was a few torn basal leaved and some good olive oil.
………………………. simple and delicious!!
Recipe and further details can be found here!


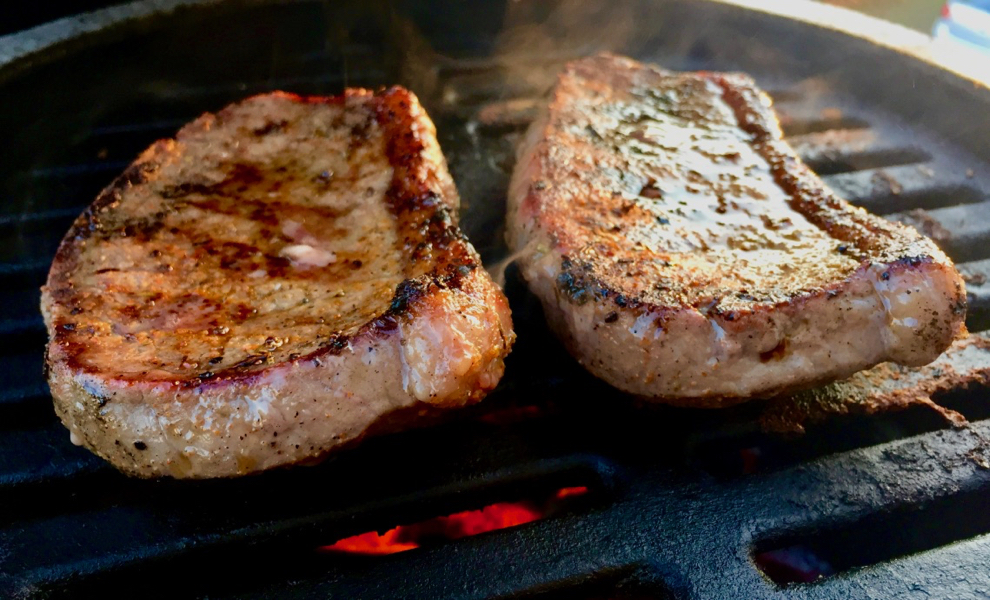
The simplest of dishes – individual rump steaks and slow cooked cannellini beans with sage! It is the simplest of dishes if you have already made the slow cooked cannellini beans that is! But once cooked will stay happily in the fridge for a few days to be used as needed – they are very simple and the recipe can be found here.
As we were cooking on the mini BGE the already prepared cannellini beans were put in a small cast iron Le Creuset casserole dish that we had picked up for a few pounds on eBay – but they could be warmed through in any small pan that would fit on the BGE. As ours was a cast iron pot. I put it on the grill as it was heating ready to cook the steak – taking it off when the temperature started to rise above 150C knowing the cast iron would keep the beans hot whilst the steak cooked.  And the steak was simplicity itself. Seasoned with salt pepper and a little steak rub they were dropped onto the cast iron searing grill of the EGG once it had reached 225C. I have taken to using the cast iron grill upside down, that is with the wider bars on the top as the larger surface area seems to give better caramelisation whilst still allowing any flames direct access to the steak. They were not large, and so cooking for around 90 second a side brought their internal temperature to around 52C.
Time to take them off the grill and wrap in foil and allow to rest for around 10 mins.
Whilst resting, just time to check the beans were still warm enough (and if not pop back on the now cooling Egg). Once rested the steaks were unwrapped and plated along side the warm olive oil and sage rich beans


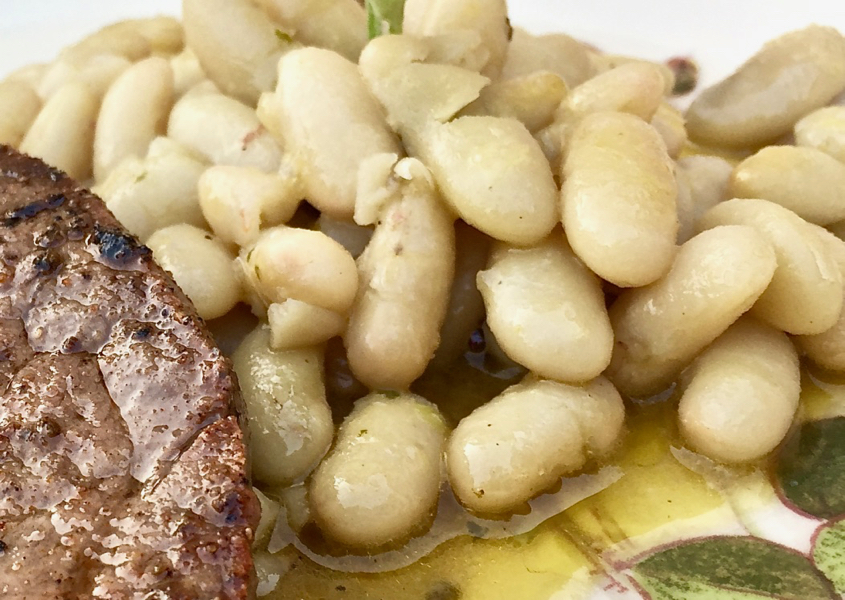
The simplest of simple Tuscan dishes. Slow cooked Cannellini beans infused with sage.  Two hundred and fifty grams of dried beans were soaked for about 12 hours overnight and then put into the our small cast iron Le Creuset casserole dish.
  This will just fit onto the Mini BGE and allow the lid to close. Into the dish was poured a few generous slugs of olive oil and 15-20 torn sage leaves together with some salt and pepper. The dish was then topped up with water so the top of the water almost covered the beans – but not quite!
  The pot was then put into the BGE at the end of a cook and the residual heat from the Egg used to slow cook the beans – in truth the first time we did this we just let the BGE continue cooking for around 45 mins and then closed off the vents – on other occasions we have closed off the vents straight away – but this sometimes results in partially cooked beans – no problem if you don’t need them immediately – just put them in the fridge and put them back on the BGE during the cooling cycle during tomorrows cook!
These are a great store cupboard/fridge ready dish – served by themselves, warm or cold, with some crusty bread, warmed with a steak or cold with a terrine – a great choice!
Tuscan style beans - slow cooked
Variation
I managed to find an original recipe for fresh beans in Le Ricette Regionali Italian by Anna Gosetti della Salda- It roughly translates as:
STUFFED BEANS Ingredients: for 4 people, fresh cannellini beans 1kg, some sage leaves “virgin” olive oil a lemon – salt – pepper. Pod the beans and put in a terracotta ‘vase’; cover them with cold water (for four times its volume – not sure of this part of the translation), add a few leaves of sage, salt and pepper. Place it on a very low heat, allowing the beans to cook for about 4 hours (ideally they should be “piped” in a corner of the old wood-fueled kitchen). When they are ready, sprinkle with good olive oil, a little lemon juice, salt and pepper, mix carefully and serve hot. Variation: sometimes pieces of tuna or ventresca(?) are combined, or better still thin slices of onion and fillet herring preserved in oil


Making terrines is something of a lost art in the UK and we are venturing into this area quite tentatively. I have to say most of our experience has been in the indoor kitchen and not in the BGE. As I have found a very inexpensive small Le Creuset oval casserole, on eBay, that just fitted the mini BGE – I was going to see what opportunities it opens up when traveling with the mini BGE. – Was a terrine a possibility?
The plan was to use our standard home recipe – but clearly modified for the products around us. The basis of our standard recipe is minced pork shoulder, diced bacon (more…)


Salmon is such a versatile fish. This is a very simple hot smoked dish but one that looks rather impressive and can also be served on the wooden planks on which they were smoked for a slightly different ‘twist’.
 Using a cedar-wood plank is a great way to smoke fish, such as salmon fillet, to perfection on the Big Green Egg. The plank will impart a subtle smoky flavour itself and so whilst it is perfect for the Big Green Egg – this would work in any BBQ, ideally where you can cook largely indirect, and would also work in a domestic oven.
In this recipe the salmon is first brined – if anything making the salmon more tender as well as adding a little flavour from the orange pepper and herbs. Adding the mixture of fennel and tarragon (or in this case fennel and bronze fennel) adds some additional flavour and texture and also adds visual appeal. The original recipe (https://www.biggreenegg.eu) suggested flaking the salmon and serving on grilled brioche buns, but we decided to serve whole with green vegetables as they looked so appetising!
The whole thing is really straightforward you just need to think ahead as the brining takes around 2hrs but can be left for longer.
The brine is prepared with warm water as described below and left to cool in the fridge. Once cool the salmon fillets are added and left in the fridge for at least 2 hours. On this occasion they were left for 4 hours. Around 2 hours before you want to start cooking soak the cedar plank(s) in water and weight it down so they are completely covered. Light the Big Green Egg or other BBQ or oven at suitable time to bring the cooking temperature up to 150C when you need to start the cooking. On the BGE the configuration is a simple indirect setup with the grill placed onto the Platesetter.
T he fennel was sliced thinly with a mandolin grater and the finely chopped tarragon or bronze fennel was mixed in with it together with the zest of a lime. The original recipe suggests putting the salmon on the plank and then adding the topping. I prefer to warm the plank in the EGG and assemble to topping separately. When ready, the hot plank is taken out of the EGG and turned over (so hottest surface is on top) and the salmon and its topping was placed on the plank and put back in the Egg. An indwelling temperature probe was put in place just to make life simple – we were looking for an internal temperature of 62C. It took about 20 mins for the salmon to cook through (to a temperature of 62C). When cooking this way the salmon usually ‘oozes’ some clear or white protein rich liquid. This is perfectly fine – but I prefer to remove this before serving
 Whilst the salmon was cooking we steamed some green beans and asparagus. Once the salmon was removed from the EGG it was left to stand on the plank for a few minutes and ‘tidied up’. Then it was simply plated and served with the steamed vegetables.
The salmon had a delightful almost ‘creamy’ texture and a light flavouring of smoke and orange – a real simple delight!
…………………….. do give it a try!
Brined Salmon Filets lightly smoked on Cedar-wood with a Fennel crust


There is no reason to call this Bastille Day Steak other than the fact that we chose to cook it on Bastille Day with part of our French family!! The only real link with France there than the timing is the fact that the so called Tomahawk Steak we chose is indeed French Trimmed! The Tomahawk Steak is simply an on-the bone Rib Steak. It is cut from the Fore-rib but the entire rib bone left attached. There is a usually a good deal of inter muscular fat which together with the advantages of ‘bone in’ cooking leads to a great final result. The Thickness of the steak is based in the thickness of the rib bone but usually approaches 5cm leading to a steak weighing around 1.2Kg. Ideal therefore for sharing it is usually suggested that this will serve 2 – well in fact it will serve more, especially if it is part of a multiple course meal. Ours comfortably served 4, and we have never been accused of having poor appetites!
Whilst technically a steak, it is big enough to also be considered as a roasting cut – rather like the Bistecca alla Fiorentina. We were going to cook it the same way as we did for that by cooking it as a revers sear. As we were at home and had the luxury of more than one Big Green Egg to cook on, the Large BGE was set up in indirect mode at around 100C with a little cherry wood added for a gentle smoky flavour.  The steak had been removed from its wrappings and left for the surface to dry at room temperature for a couple of hours. Just before putting the steak in the BGE it was generously salted and peppered and placed in the BGE with an indwelling temperature probe in place. I was running the EGG with the CyberCloud controlling the cooking temperature and monitoring the core temperature of the meat. We were looking for an overall finishing temperature of around 54C (that boarder between rare and medium rare) after the final sear – so that meant cooking at this temperature until the core came to around 48C. At this stage, the steak does look rather unappetising (see left).
 Working on 2 BGEs had the advantage that we were able to hold the partially cooked steak at around 48C by wrapping in foil and tea towels and placing in a cool box until ready to do the final sear, earning me extra ‘Brownie points” for serving the steak bang on time. The second egg was therefore set up for direct cooking at around 250C dome temperature. I was doing this on the MiniMax which has the great advantage of coming up to temperature very quickly – but as you will see from the pictures the disadvantage of being a little small for the Tomahawk steak! Fortunately the searing only takes a very short time until that lovely golden colour is achieved and although the handle of the Tomahawk extended outside the EGG, it was possible to ‘nearly close’ the EGG!!

The Steak was taken off the grill once the outside was took on the appropriate beautifully flame grilled colour and finish as above – at this point the core temperature measured with a Thermopen was around 52C. The Steak was again wrapped in foil and covered to rest for around 10 mins whilst the chips and the beans were cooked. The chips were decidedly British rather than French fries but served with mayonnaise as a mark of the Entente Cordial. They were triple fried, the first 2 fries being done whilst the steak was cooking and then just finished at this last moment – Just before serving the steak lightly salt and then slice across the grain. The steak had a lovely gentle smoky taste and the classical ‘smoke ring’ on the edge of the steak as can be seen in the picture on the right.
This was a lovely dish with which to share Bastille Day with our French Family – but this is a perfect dish to do any time you want something a bit special.
………….do have a go!
Reverse seared steak


What a delightful way to spend a day! Well the first weekend of July was interesting – England were in the quarter finals of the football world cup, it was the first day of the 2018 Tour de France and I was booked on a bread making course at the delightful Blackfriars Restaurant in Newcastle.  The course started at 9.30 and went on till 4.30 and was run by Adrian (and his family) from @breadandgardens. Adrian was a great host for this sort of event and I hope to get to share some cooking time with him again in the future. The one disadvantage of that first Saturday in July (other than the sporting clashes) was the weather – I wonderfully hot day with glorious sunshine would normally be very welcome but not when cooking in a restored 13th Century Monastery with non opening windows above a restaurant kitchen pass! Thank goodness for the jugs of iced water!! (more…)


Having been out with friends to a Lebanese restaurant one of our favourite dishes there was the Shawarma Chicken. So the quest quickly came about to try and replicate the tastes from that evening. Typically the Shawarma chicken is made from the thigh meat, unrolled from the bone and often pounded to thin it out further. It is traditionally marinated in a mix of Mediterranean spice mix, sometimes with yogurt added. The restaurant recipe was an “house secret” (more…)


Jackie and I were driving home after a weekend away and found a lovely Kilnford farm shop in Dumfriesshire. Specialising in grass fed Galloway beef, and farmed by the owners – it seemed churlish not to take some meat home with us. (more…)


In 1975, the writer Shirley Conran published the book Superwoman, targeted at busy women, and with it, coined the phrase ‘Life is too short to stuff a mushroom’. Well yes I am taking that out of context but here is an opportunity to stand that idea on its head! Here is a stuffed mushroom recipe that could not be quicker or easier to prepare, and in addition, it is rich, rewarding and indulgent (which translates as – not a low calorie dish!!)
This dish was devised by Jackie as a starter for 3 when we were debating what to have on an indulgent Sunday evening before a main course of slow cooked pork breast ribs following Adam’s recipe (here). We had brought 3 lovely large field mushrooms from our local Saturday market and a raid on the fridge revealed a small portion of home cured pancetta and a piece of blue stilton no longer in its first flush of youth! Together with a small handful of pine nuts and a spoonful of cream the ingredient list was complete!
 The mushroom was sprayed on the outside with a little olive oil (from a commercial one cal spray) and the stem of each mushroom was removed and chopped into a frying pan. The pancetta pieces were added to the pan and fried off with a touch of olive oil. The fried mix was then distributed between the 3 mushrooms and a little blue cheese and some pine nuts sprinkled on each. Finally the mix was topped off with half a tablespoon of cream in each mushroom. As we were slow cooking on the EGG we added the mushrooms to the grill and left well alone for 30 mins or so. The mushrooms were brought inside and popped under a hot grill for 2-3 mins to caramelise the surface (though this could have also been done with a blow torch). A ‘word to the wise’; do let it cool for a few minutes after grilling before eating as the taste improves (to say nothing of reducing the risk of burning the roof of your mouth!!)
The opportunities for playing with different fillings depending on what you have in the fridge are numerous – if you have a favourite – do share it with us on the site!
Large field mushrooms stuffed with pancetta, cheese and pine nuts


Whilst almost all the posts on this blog are of our own cooks, at time it is delightful to sit back and enjoy the work of friends! This is one of those cases and with one of my favourite cuts of beef – ribeye, but ribeye writ large. Ribeye is
such a versatile cut of beef as there is a wealth of intra muscular fats with result in a wonderfully moist, tender and tasty piece of meat on the plate. Most usually cooked as a single ribeye steak, but also found as a Tomahawk steak, a ribeye roast, or as we see here an off the bone ribeye, looking like a roast but being managed as a steak. (more…)


It seems that in the UK that as we are about to move from winter into spring that winter intends to have a last fling with cold coming in from the east across continental Europe. So how about a suitably warming winter dish? Travelling around France we have often eaten Daube of beef, and at the moment of eating wondered what daube meant, only to forget to look it up before discovering it on the menu again. Well it is quite simple really, daube refers to the earthenware cooking vessel – the daubière in which the dish is cooked. Traditionally shaped to inhibit the escape of the cooking liquid, (more…)


 The aubergines were first cut lengthways into 5mm slices, sprinkled with salt and left in a colander to drain for half an hour. This was done traditionally to remove the bitterness from the aubergine which I believe has now been bred out of them – it does however season them well for the next stage and dehydrates them a little which seems to help the grilling.
 Meanwhile a little olive oil was heated in the 8 inch BGE drip pan which we had with us – really too large for the Mini BGE it was all we had that was large enough to make the dish and allow closure of the lid – just! The chopped shallots were added to the pan and softened, then the sliced garlic cloves were added and cooked a little before the tomatoes were added the halved baby tomatoes first to lightly fry off then the tinned tomatoes and red wine.
 This was then all allowed to simmer until the volume was reduced by about a third. The tomatoes were mashed until reasonably smooth, seasoned and had a little basil and sugar added then left to simmer for a further 10 mins.
The tomato sauce was decanted into a bowl to allow access to our one pan. This was washed and then lightly greased and spread with a thin layer of tomato sauce, followed by a layer of aubergines packed tightly, mozzarella, parmesan and seasoning. This was then repeated until all the ingredients were used finishing with the tomato sauce. I had certainly miscalculated the shrinkage that would occurred in the aubergines and this was going to be a very light supper!
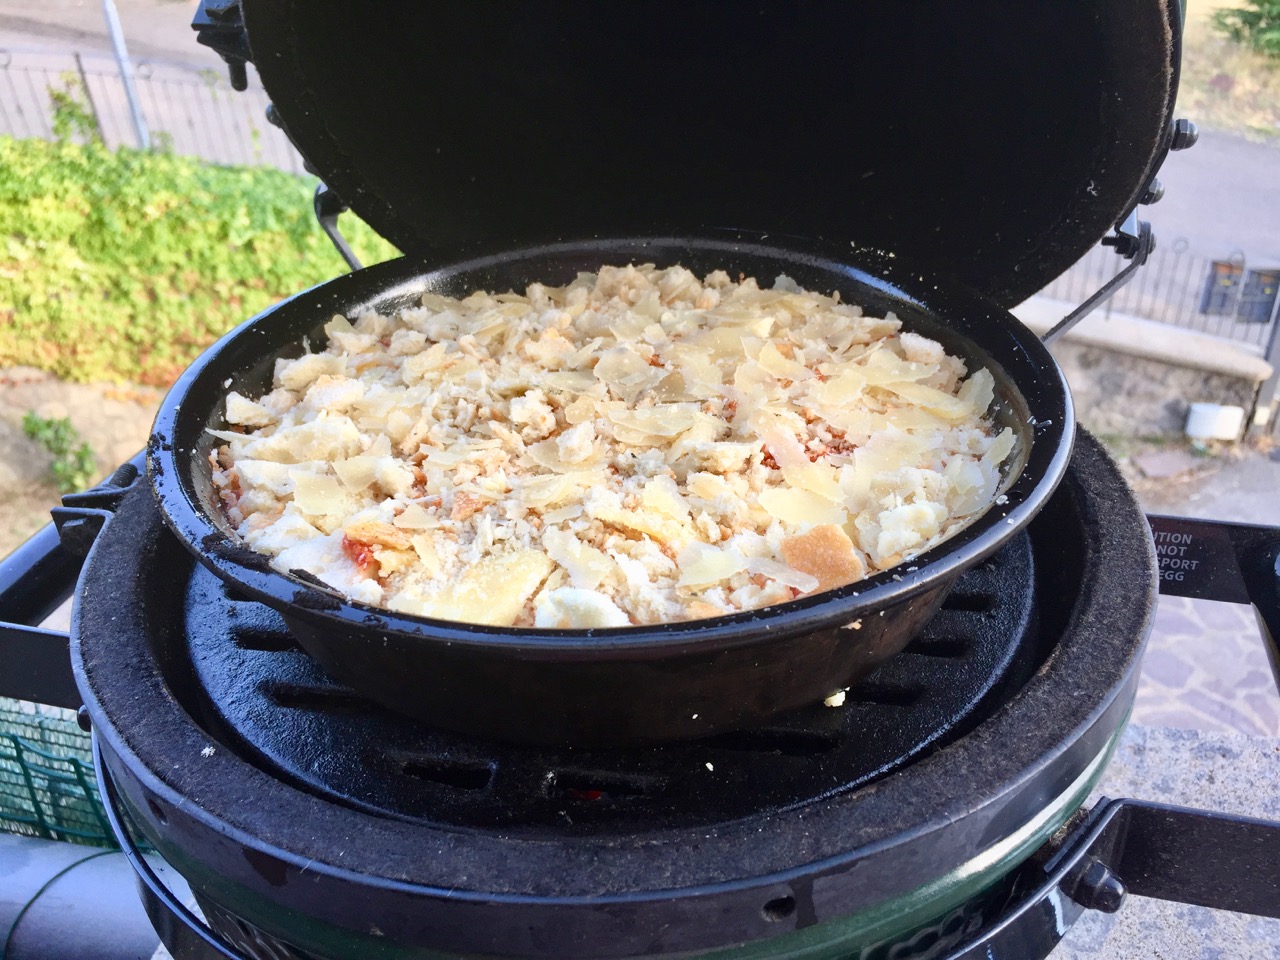
 One of the recipes I found suggested adding a layer of stale breadcrumbs at the end and then topping this with the remains of the cheese.Italian bread goes stale so quickly we had a ready supply! The breadcrumbs were tossed with a little olive oil and Parmesan and sprinkled on top. Put back in the EGG it was baked for about 40 minutes. I was hoping for a lovely bubbling crispy top but that was not to be.
 As I had suggested the 8 inch drip pan was really a little too big preventing good circulation of heat into the dome. As a result the top looked a little bland and the sides rather than the top a little crispy. The pan was removed and the dish allowed to cool slightly and then it was served warm with some basil and freshly ground pepper.
 This first attempt was an imperfect dish to be sure, but one that captured a lot of the essence of the one that inspired it. Rich, sumptuous and surprisingly meaty with a real umami essence. It was also good enough to know that over the months we would modify this a little and cook on a more appropriately sized EGG. Whilst very pleased with the development of the dish it still doesn’t quite match my holiday memory of that first mouthful in the Dolomites. When it does we will post the next installment – watch this space!
If you have a favourite recipe for this dish do please share it in the comments section


On a wet winter’s day it is good to remember some of our summer cooking which has inspired one of the upcoming recipes. The summer dish was based on veal, earlier in the week we had cooked two delightful “Veal Minute Steaks” – (see here) – the rest of the veal was used for this truly fabulous dish. (more…)


Turkey gets such a bad press, and yet it is the “go to” meat in the UK for Christmas in particular but also and other holiday periods too. This year we delayed our ‘Christmas season’ Turkey cooking until New Year’s Day, and I have to say it really was worth the wait! At times of the year when the indoor oven/s are ‘under pressure’ is an ideal time to take the centre piece of the meal and cook it lovingly over wood and charcoal! (more…)


by Heston Blumenthal.
According to talk in the media recently, up to 70% of our Christmas turkeys will carry salmonella and/or campylobacter, so there’ll be a lot of upset tummies around unless we cook the bird properly. And I don’t mean roasting it until all the juices and flavour have disappeared; the poor old turkey deserves better than that.
I’ve written about this before, but it seems worth repeating. All pathogens (those nasty bugs of which salmonella and campylobacter are just two) are killed if you hold the internal temperature of the turkey at 60C for a minimum of 12 minutes. You can achieve the same effect at a lower temperature, though you’d need to maintain the internal temperature for longer. (By the same token, at a higher internal temperature, it takes less time.)
What is essential is that the whole turkey is brought to that temperature and held there for at least 12 minutes. To make sure of this, you’ll need a meat thermometer to test the temperature at certain critical spots. I know I keep wittering on about meat thermometers, but I really believe them to be important. Many people rely on the gauges on their ovens, but these are unreliable; even if they are accurate, they don’t tell you what’s really important – the internal temperature.
So here are five rules to make sure you have a bug-free Christmas:
1. If your turkey has been frozen, it must be defrosted all the way through before you start cooking.
2. Invest in a meat thermometer.
3. Check your turkey at the points where the heat takes longest to penetrate (ie, the breast at the bone; where the leg meets the thigh; and the carcass covered by the thigh, where the leg is tied in against the body).
4. Make sure the internal temperature reaches 60C.
5. Hold it at 60C for at least 12 minutes.


 Whist idly browsing the Internet I came across this little digital thermometer on Amazon. It advertised it as an ETI made thermometer so I searched for more details on the ETI site – nothing!! This triggered my curiosity (more…)


Porcini are really fabulous and I still find it very exciting to walk into a little shop here in Tuscany and see a basket of newly picked Porcini. This is something I am yet to see in the UK – but although (more…)


This is a title that will polarise people – some will rush to what is actually a lovely winter recipe, and I can already see others “screwing up their faces”! If you like ‘pulled pork’ and you like slow cooked winter casseroles you will love this, trust me!! (more…)


Pulled pork is a BBQ classic with its origins in the US. There is lots of “folklore” attached but in essence it is a very simple dish to cook. It needs to be cooked slowly, ideally over charcoal with a little dry wood to add some smokiness. It needs to be given plenty of time to cook (more…)


Recent Comments