What's Cooking?

Italian Sausages in France

Italian Sausages in France


After a lovely break in Tuscany we had driven into France, to the Rhône-Alpes to meet part of our “French family”.   (more…)

Veal Minute Steak

Veal Minute Steak

Well one thing is certain, Italians like veal!  It is so much easier to buy veal in Italy than we have found at home.  This is a real shame as the UK Rose Veal probably has the highest welfare standards  (more…)

Update on Octopus

Update on Octopus

Having said that we had only come across grilled octopus once in Tuscany, the very next time we went out to eat – there it was on the menu. (more…)

Acciughe alla griglia – grilled anchovy

Acciughe alla griglia – grilled anchovy

When is a sardine not a sardine………..?

Out shopping I saw what I thought were some lovely looking fresh sardines – only later when I checked the spelling of Acciughe (also often called Alici) did I realise that the sardines were in fact anchovy!!   I think you have to go a long way to beat simply grilling sardines and adding a little lemon and salt to compliment the oil rich “silver darlings” – so in my ignorance these anchovy were handled in the same way (which is just what the Italians do too!)

The BGE was set up for direct cooking with the cast iron grill in with the wider sided bars uppermost and heated to around 180C.  As we are a little limited for space on the Mini BGE the anchovy had the heads removed to allow a little more space.   They were then simply gutted and then rubbed with salt and olive oil and then tossed on the grill.

The anchovy were grilled for around 4-5 minutes a side until the skins started to blister and the fish took on some colour.  I find it easier to do this without overcooking the fish at around a  temperature of 180C combining grilling and oven cooking that the BGE does so well rather than being tempted to cook at over 200C.  After a few minutes we added a couple of slices of bread to toast to have with the fish.


Once ready the anchovy were plated on top of a green salad with herby crouton and finished with a simple drizzle of fresh lemon.

These are very “moreish” – hope you enjoy!

(it works just as well with sardines!)


Not quite Grilled Sardines!

August 27, 2017
: 2
: 10 min
: 10 min
: 20 min
: Easy

Grilled Sardines

By:

Ingredients
  • Fresh sardines or anchovy
  • Olive oil
  • Salt
  • Lemon
Directions
  • Step 1 Set up direct cooking – with the BGE the cast iron grill is best used with the wider bars uppermost – heat to around 180C
  • Step 2 If limited for space remove the heads from the fish then simply gut them and rubbed with salt and olive oil
  • Step 3 Place on the Grill for around 4-5 minutes a side until the skin starts to blister and the fish took on some colour.  
  • Step 4 Once ready serve with a green salad and freshly squeezed lemon
Italian Smoked Turkey Breast

Italian Smoked Turkey Breast

On our wanderings we came across a butcher selling ‘home reared’ turkey and turkey breasts.  Well for 2 of us even a 1kg turkey breast seemed quite a lot of meat and even that was going to be a bit of a ‘tight squeeze’ on the Mini BGE.  But the challenge was set!  The question was how to cook it? Well we were (more…)

Grilled Octopus – Polpo alla griglia

Grilled Octopus – Polpo alla griglia

Grilled Octopus is not something commonly found in the restaurants of Northumberland!  As yet I have only come across it on one occasion in restaurants in Tuscany but perhaps we need to get out more!!  Anyway, octopus has the reputation of being tough and chewy unless it is treated correctly.

Tradition has it that Greek fishermen “thrash” the octopus over the rocks 40 times before cooking it to tenderise it – I have certainly seen them doing that, though I didn’t count the number of times.  I have also read of a women in the United States who “double bagged” an octopus and put it in the tumble dryer to tenderise it – but the less said of that the better!  The most usual way however appears to be to simmer in a pan for an hour – and then get down to the grilling!!


Being on holiday we took the easy route as soon as we found a ready “simmered” Octopus in the supermarket (not something you regularly “fall across” in the Co-op, or Waitrose for that matter, in the UK!!)   So no simmering for us – merely open the pack and prepare for the grill!!


……….delicious!


Update link 2017

Update link 2018


Grilled Octopus

August 20, 2017
: 2
: 10 min
: 10 min
: 20 min
: Easy

Grilled octopus

By:

Ingredients
  • Fresh or precooked prepared octopus
  • Olive oil
  • Salt
  • Lemon
Directions
  • Step 1 If using freshly prepared octopus this will need to be precooked by simmering in salted water for about 1 hour and allowed to cool. This recipe used precooked octopus
  • Step 2 Divide the cooled octopus into individual tentacles and slices the head into bitesized pieces
  • Step 3 Drizzle with love oil and salt
  • Step 4 Put onto a hot grill (dome temp around 180-200C) for around 10 minutes until they started to char a little.  
  • Step 5 Remove and allow to rest for 5 mins
  • Step 6 Serve simply with lemon, more salt and a little more olive oil on a green salad
Focaccia and Fougasse on the Mini BGE

Focaccia and Fougasse on the Mini BGE

Although I don’t do a great deal, I do like bread cooked in the Big Green Egg – and bread cooking in the Large BGE is a real pleasure (more of that in future posts).  I had always been told that bread cooking in the MiniMax was something of a compromise – though I know Adam from The Cook’s Digest has had some really great results with the MiniMax.  Nevertheless, I have not heard of anyone cooking bread in the Mini BGE and I am sure for good reason!!  However, we were away on holiday, we only had the Mini BGE with us and so there was the challenge!!

The real problem with bread cooking in the Mini and MiniMax BGE is getting the bread as far away from the charcoal heat source and into the “dome” so that the heat differential between the bottom and top of the bread is minimised.  Otherwise, it is burnt bottoms and undercooked tops!  Making it worse we only had the platesetter with us and no sort of pizza stone to further separate the bread from the direct heat!!  Our plan therefore was to use the platesetter in the feet up position with the cast iron grill in place.  On top of this we put a couple of 3 inch cast iron frying pans that we just happened to have with us in place of the pizza stone.  This lifted the bread a little further from the heat source and a little further into the dome.  The bread would be initially cooked in a heavy round 7 inch pan and once “firm enough” flipped over – to cook the top a little more and the base a little less!!

Focaccia is probably one of the easiest of all breads to make and cook and as we were in Italy and had enough challenges with the BGE set-up, that was where we were going to start!  Getting the flour was easy enough, but hunt the local supermarket as much as I could, I couldn’t find any yeast – but then I was looking for dried yeast as I use at home.  This is Italy, and so every supermarket – no matter how small clearly sells fresh yeast – you just need to know where to look or how to ask!

The Recipe was a simple one which is shown below and has very few ingredients.  Focaccia flour (also suitable for pizza bases), fresh yeast, olive oil, water, sugar or honey, salt and rosemary.  The basic ingredients were mixed by hand in a bowl and kneaded for 5 mins.  As the BGE is small – the quantities were kept small so around 250gm of flour, to 150 ml of warm water and about 7gm of fresh yeast (these were all guessed as we had no scales or measures to hand).  This was then left to rise in a bowl covered with oiled clingfilm for around an hour and then knocked back.  Taking less than half the bread dough, this was flattened into the base of the 7 inch pan.  Olive oil was poured liberally over the dough and then it was “prodded all over with fingers” to flatten further and introduce the oil into the dough.  Finally the top was salted with large grains of sea salt and sprinkled with fresh rosemary from the garden.  The dough was left to rise again for about 20 mins.

Meanwhile the BGE was set up and a little home cured pork was fried off in a small pan on the Egg, to which was added some finely chopped onion and some garlic – for use later.


The BGE was then set as described above and when the temperature reached 180C the 7 inch pan, with the focaccia, was put in the Egg and left for around 20 mins to bake.

Once the base was clearly browning the focaccia was flipped out and put back in upside down and cooked for a further 4-5 mins to brown off the top.  All that was left was to remove it, allow to cool a little and sprinkle with some more oil and serve

– fresh bread cooked in the Mini BGE!!


But why the frying pan and the onions and garlic?  –  well Focaccia’s close cousin is the French “Fougasse” the same dough as Focaccia but often made into a leaf shape with slashes in the leaf like those falling off the trees in autumn.

Sometimes their shapes are a lot more “rustic” and often they have meat, onions, cheese …..  running through them.  So that was our plan.  Cook off a little cured pork with some onion and garlic, flatten out the dough and add the fried mixture and some crumbled cheese – roll the whole thing up into a ball and pop it in the 7inch pan dish to rise a little.

Then into the Egg to cook and when firm enough, flip out of the dish and cook ‘free standing”, flipping it over so the base didn’t cook too much.   Then it was taken out of the Egg and allowed to cool a little, ideally on a wire rack or something similar.  


……………served with a ‘bold red wine’ – beautifully simple!


Rustic Focaccia and Fougasse

August 18, 2017
: 4
: 20 min
: 2 hr
: Moderately easy - but a bit of a fiddle!

Simple focaccia recipe used for focaccia and fougasse

By:

Ingredients
  • 250g Focaccia flour
  • 7gm fresh yeast
  • 150ml warm water
  • Glugs of Olive oil
  • Teaspoon of salt
  • Teaspoon of Honey
  • Salt
  • Rosemary
  • For the fougasse filling, cooked onion, garlic, cured pork, cheese
Directions
  • Step 1 Set up BGE with the platesetter feet up, the cast iron grill in place and something to raise the bread further into the dome
  • Step 2 Suspend the yeast in 150ml of warm water and add the honey.
  • Step 3 Put the focaccia flour in a bowl and pour the ‘yeast water’ into the centre and mix to bring it together
  • Step 4 Part way through sprinkle in the salt and about 2 tablespoons of olive oil
  • Step 5 Once the dough is in a ball – kneed into a smooth dough for about 5 mins
  • Step 6 Leave to rise in an oiled bowl covered with some oiled clingfilm for about an hour
  • Step 7 Knock back the dough and split into two
  • Step 8 Flatten half the bread into the base of the 7inch pan, pour olive oil liberally over it and “prod” all over with fingers to flatten and introduce the oil into the dough.  
  • Step 9 Salt the top of the bread with large grains of sea salt and sprinkle with fresh rosemary.  
  • Step 10 Leave to rise for about 20 mins.
  • Step 11 When the BGE reaches 180C add the pan with the dough and cook for around 20 mins – Once the base is browning flip out and put back in upside down and cook for a further 4-5 mins to brown off the top.
  • Step 12 For the Fougasse – fry some small pieces of cured pork a little onion and garlic.  
  • Step 13 Flatten out the dough and add the fried mixture and some crumbled cheese – roll the whole thing up into a ball and pop into a 7 inch pan to rise a little.
  • Step 14 Cook in the Egg and when firm enough flip out of the dish and cook ‘free standing”
  • Step 15 Take it out of the Egg and allow to cool a little
  • Step 16 Serve perhaps with a ‘bold red wine’
Bistecca alla Fiorentina – the remake!

Bistecca alla Fiorentina – the remake!


Having tried our hand with the local beef (click to see previous post) we thought it time to be a little more authentic and go for a larger piece for this Bistecca alla Fiorentina.  As there were going to be 4 of us a 1.4KG steak did not seem too greedy!!  Bought from the same butcher as the previous steak this was again the cut from the loin near the leg of the Scottona and was just a little more than 1.5 inches thick.

We were going to reverse sear again and so the Egg was set up for indirect cooking at 100C with the platesetter in place.

The steak was simply salted and dusted with a little pepper and placed on the grill.  The internal temperature probe was put in place and it was left to cook to a temperature of 48C.  At this stage it does not look very appetising as although cooked to rare all the way through there is no delicious crispy outside!

The steak was removed from the grill, double wrapped in foil and covered with a tea towel to slow down any cooling.  The platesetter was removed and the temperature of the BGE brought up to around 250-280C.  As this was a thicker piece of meat than the last one it was grilled this time for just less than 2 mins per side to form a nice golden crust.

Once completed the steak was removed from the grill, rewrapped in foil and left to rest for around 10 minutes whilst we prepared the Borlotti beans that we were going to serve with it.  The steak was unwrapped, further salted and then carved across the grain.  Crisp on the outside and warm in the centre ; the meat was delicious.


Taking the bone to chew as well as her portion of carved steak our youngest granddaughter paid the finest of compliments……..

…………… “Thank you, this is the best steak I have ever had”

What more could you ask for!……………..


For the full recipe see:- http://smokedfinefood.co.uk/beef/bistecca-alla-fiorentina/

Focaccia rinascere   –   Reborn Focaccia!!

Focaccia rinascere – Reborn Focaccia!!

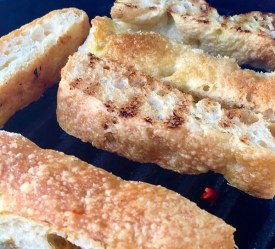
The bread we have found in Italy certainly goes hard quickly!  Partly the weather and partially the absence of additives in the bread.  You quickly realise why there are so many Italian recipes that include the use of “stale bread”!!


Well here is ours ……….


Focaccia rinascere (Focaccia Reborn!!).  

Focaccia rinascere

August 12, 2017
: 2-4
: 1 min
: 5 min
: 6 min
: Easy

Toasted focaccia with olive oil

By:

Ingredients
  • Stale focaccia
  • Olive oil
  • Salt
Directions
  • Step 1 Take some slightly stale focaccia and cut into strips.  
  • Step 2 Place on the grill of the BGE as it warms up to cook later in the evening
  • Step 3 Toast for up to 5 mins, turning as necessary
  • Step 4 Take off the grill and drizzle a good olive oil or better still some truffle oil over the focaccia and garnish with salt
  • Step 5 Serve with chilled Prosecco!


Big Green Egg – Does fish!

Big Green Egg – Does fish!

Wandering around the village on Friday we found that Friday here too was fish day – at the end of the car park there was a man selling fresh fish from his van.  Well this was too good to miss!  So amongst other things we bought a lovely Sea Bass and a Sea Bream – only when on the way home did we suddenly think they might be just a bit too big for the Mini BGE!!   Now this is where the MiniMax. would have been perfect!  – But on this occasion necessity is this mother of invention and so a little” fishy modification”  was finally undertaken before cooking – it reduced the aesthetic impact a little – but the taste was still wonderful! – but more of that later!


So how to cook – lets keep it simple.  We were going to cook indirectly – so the BGE was set up with the platesetter in the feet up position with the Cast iron grill on top but inverted so the widest part of the bars were uppermost.  We brought the temperature up to about 140C and then a handful of soaked Oak wood chips were added as a circle just outside the burning charcoal area before putting the platesetter and grill back in place.


Both fish were gutted and lightly descaled, washed and then patted dry.  The head was removed from the Sea Bass and the body cavities of both fish were salted and then stuffed with sliced tomatoes, a little thinly sliced fennel and sliced lemon.  The skin was salted and peppered and dusted with a mixture of dried herbs and allowed to rest as the BGE came up to temperature.

But then we needed to modify the fish a little bit more!  Some trimming was needed for both fish to allow the top of the BGE to be closed properly!  I have to say it did impact on the aesthetics a little – but when needs must!.  As there was fresh rosemary to hand a stem was added for the cooking period – wetting it before hand allowed it to smoulder for that little bit longer enhancing the slightly smoky aroma!


We decided not to tempt fate and so we did not turn the fish over whilst cooking – but that is the great thing about the BGE – it is so forgiving!!   The fish were served simply with a little wild rice, lemon and olive oil and just a little bread to mop the plate at the end.


The tomatoes and the fennel added a delightful sweetnes to the fish and the gentle smokiness set the whole plate off beautifully.  The only difficulty was deciding who had which plate – if only all of life’s problems were so easilly resolved!!


Footnote. We revisited this recipe 2 years later in the same part of Tuscany and yes it was every bit as good – but we had crispy fish skin too!! – see here


Sea Bass and Sea Bream Duo

August 11, 2017
: 2
: 15 min
: 30 min
: 30 min
: Easy

Oven Grilled Fish stuffed with tomatoes, fennel and lemon

By:

Ingredients
  • Sea Bass
  • Sea Bream
  • Tomato
  • Fennel
  • Lemon
  • Mixed dried herbs
  • Salt and Pepper
  • Rosemary (optional)
Directions
  • Step 1 Set up the BGE for indirect cooking
  • Step 2 Bring temperature to about 140C and then add a handful of “soaked Oak wood chips
  • Step 3 Put the plate setter back with the Cast iron grill on top but inverted so the widest part of the bars were uppermost. 
  • Step 4 Whilst the BGE comes up to temperature gut the fish and lightly descale, washed and then pat dry. 
  • Step 5 Salt the body cavities of both fish and then stuff with sliced tomatoes, a little thinly sliced fennel and sliced lemon. 
  • Step 6 Salt and pepper the skinned dust with a mixture of dried herbs
  • Step 7 Soak the rosemary to encourage it to smoulder
  • Step 8 Place the fish and the rosemary on the grill – do not turn!
  • Step 9 When the fish is cooked (internal temperature reached 52C) remove from the grill [the USDA recommends 62.8C]
  • Step 10 Serve the fish with a little wild rice lemon and olive oil and just a little bread to mop the plate at the end.
More experiments with Italian veal  – Vitello Tonnato

More experiments with Italian veal – Vitello Tonnato

So our first experiment with the Italian Veal had worked well and so on to the  Vitello Tonnato – As this dish is served cold it can easily be produced 24-48 hours in advance and I think will have some real “mileage” not just here on holiday but back home – in the summer but also in those lovely autumn evenings before the real “cold weather” sets in.

For this dish we were using the bigger portion of veal silverside.  We would cook it whole let it cool and then slice thinly as the basis of the dish

The first thing to do was remove the “silverskin”.  There is often a layer of connective tissue on meat like silverside which when cooked adds nothing to the quality or taste of the meat and can often just leave an unpleasant “chewy finish”.  It is a bit of a fiddle and requires getting a sharp knife under the silverskin and then working it between the silverskin and the meat itself – rather like when skinning fish.  This silverskin can then just be discarded.

Lightly dust the veal all over with a rub – ours was from necessity very simple. Salt. pepper, sweet paprika and some mixed herbs.  The meat was put to one side whilst the Big Green Egg was lit and came up to a temperature of 100C.  The set up was for an indirect cook with the platesetter feet upwards and with a handful of  Hickory wood chips which had been soaking sprinkled just outside the burning charcoal centre.

We were using the cast-iron grill as this was the only one we had brought with us though at home I would probably have used the stainless steel grill.

The veal took around an hour to reach an internal temperature of  52C. I would normally test this with a ETI Thermapen but as we were ‘traveling light’ we relied on the rather neat “iGrill” mini” – a relatively inexpensive bluetooth indwelling temperature probe. see http://smokedfinefood.co.uk/chicken/spatchcock-in-the-beechwood/


Whilst the veal was cooking it was time to make the the tuna sauce. A 160g can of tuna and one tablespoon of capers were drained. The capers roughly chopped (classically the whole mix would have been blended – but we were on holiday and therefore we went for the “rustic approach”!)  The tuna and chopped capers, were mixed with 3-4 tablespoons of mayonnaise and the juice of ½ lemon.  This was seasoned with salt and pepper left in the fridge until needed.


After about an hour the veal had reached the desired temperature of 52C and was removed from the BGE and wrapped in foil and allows to cool.  Once cool, it too was refrigerated

To serve the vitello tonnato, the veal was sliced into neat thin slices and served on a bed of green salad, dressed with local olive oil and capers.  The plate was garnished with the tonnato sauce and finished off with a drizzle of lemon juice – next time we will probably add some grated lemon zest too.  Traditionally, Vitelli tomato is usually served as a single layer of veal with the slightly more fluid tonnato sauce spread over the top and then garnished with lemon.  I know I am biased – but I think this version looks better!!

….… buon appetito!


Footnote:  the Tonnato sauce also works beautifully with pork – see Pork Loin with Tuna and Caper Sauce – Lonza di mail Tonnato  


Vitello Tonnato - with a twist!

August 9, 2017
: 6-8
: 45 min
: 1 hr
: 1 hr 45 min
: Moderately easy

Cold roasted veal with a tuna sauce dressing

By:

Ingredients
  • 750g Veal Silverside
  • Olive Oil
  • Green Salad
  • Lemon
  • For the Rub
  • Salt, pepper, sweet paprika, dried herbs
  • For the Tonnato Sauce
  • A 160g can of tuna
  • One tablespoon of capers
  • 3-4 tablespoons of mayonnaise
  • The juice of ½ lemon
Directions
  • Step 1 Remove the “silverskin” from the veal using a Sharpe knife and discarded.
  • Step 2 Lightly dust the veal all over with a rub
  • Step 3 Set up the Big Green Egg for indirect cooking with some added Hickory chips for a little smoky flavour
  • Step 4 When the temperature stabilises at 100C sit the veal on the grill and monitor the internal temperature with an indwelling probe
  • Step 5 Once the veal reaches an internal temperature of 52C remove from the grill, wrap in foil and leave to cool in the fridge
  • Step 6 To make the Tonnato Sauce – Drain a 160g can of tuna. Roughly chop one tablespoon of capers and mix the the tuna and 3-4 tablespoons of mayonnaise and the juice of ½ lemon. Season with salt and pepper left and leave in the fridge until needed.
  • Step 7 To serve the vitello tonnato – thinly slice the veal and serve on a bed of green salad dressed with olive oil and capers. Garnish with the tonnato sauce and finished off with a drizzle of lemon juice and some grated lemon zest.


Cooking Food To Temperature – The Cook’s Digest

Cooking Food To Temperature – The Cook’s Digest

Source: Cooking Food To Temperature – The Cook’s Digest

Over the past 2 years I have moved away from the idea of cooking a piece of meat for a specific length of time at a given temperature, to the idea of cooking the meat until it reaches a desired “core temperature”. The article in this link Cooking Food To Temperature – The Cook’s Digest  from Adam at “The Cook’s Digest” is an excellent introduction to the concept of cooking to specific “core temperatures”.  Sadly,as yet, most commercial cookery books still use the “time/temperature” method – but I am sure this will change – until then you can will find “core temperature cooking” methods on Smoked Fine Food – as well as in The Cook’s Digest – happy reading!

Big Green Egg – experiments with Italian veal

Big Green Egg – experiments with Italian veal

One thing we wanted to experiment with was Vitello Tonnato – a classic Italian dish served cold – this has the advantage that you can prepare in advance and is ready just when you want it.  Our version was going to have a little twist on the classical Italian version – but before that a little shopping and some experimentation was needed!  The first confession is that I have never knowingly cooked veal and certainly never on the BGE!  So the first thing was to track down the veal.  As we were approaching the Italian holiday of Ferragosto – on the 15th of August there was a good chance of finding some reasonably easily!  We were hunting for what is in effect a veal silverside – which is used to make veal escalope – but the plan was to cook it whole let it go cold and slice it very thinly!!


Well we found a piece of veal – but just one and a little large for the 2 of us at 1Kg!  but this gave the opportunity for some experimentation!  We cut off about a quarter, removed the “silverskin” then added a little “rub”. We were limited with what we had to hand, so tried simple salt and pepper, a little paprika and some dried  herbs.  The piece of veal was going to be served hot with a lightly spiced Italian sauage, with a green salad.  The BGE was set up to cook indirectly with the platesetter feet up and the cast iron grill on top and was brought up to just 130-140C.  The sausages were popped on first  as we wanted those cooked through and then was joined after about 10 mins by the veal with the temperature probe sitting in the centre of the meat.  The plan was to cook it till it just reached a core temperature of 52C which should be around medium rare.  Meanwhile a “Tonnato sauce” was made – not normally served with hot meat it did give the opportunity to experiment a little (and I have to say it does go well with hot meat!! )– for the recipe – see Vitello Tonnato.  Once the veal had reached 52C it was taken off the grill and wrapped in foil to rest for around 10 mins.  When the veal was sliced there was just a touch of pink, slightly less than I would have chosen suggesting that the core temperature of the meat continued to rise when it was resting – note to self for next time!!

However, served with the salad and the Tonnato sauce with just a little of the meat juice that collected in the aluminium foil spooned onto the veal – it was looking good!  The veal was tender, very lightly smoky and the outside of the meat had a little tang from the paprika and white pepper


– simply delicious!!


Roast Veal

August 6, 2017
: 2
: 15 min
: 30 min
: 45 min
: Easy

Roasted veal with grilled Italian Sausage

By:

Ingredients
  • 300g Veal Silverside
  • 2 lightly spiced Italian sausage
  • Salt and pepper
  • Paprika
  • Dried herbs
  • Serve with a Green salad and a Tonnato sauce
Directions
  • Step 1 Removed the “silverskin” from the veal and add a little “rub” of salt and pepper, a little paprika and some dried herbs. 
  • Step 2 Set the BGE to cook indirectly with the platesetter feet up and the cast iron grill on top. Bring the temperature up to just 130-140C. 
  • Step 3 Add the sausages to the grill
  • Step 4 After about 10 mins add the veal – cook to a core temperature of 52C (or perhaps a little less)
  • Step 5 Once the veal had reached the target temperature take off the grill and wrap in foil to rest for around 10 mins. 
  • Step 6 Serve a salad and Tonnato sauce with just a little of the meat juice spooned onto the veal


Big Green Egg on Holiday – has a day off!

Big Green Egg on Holiday – has a day off!

Today’s post is short but sweet….

We all deserve a day off and this day was the Big Green Egg’s turn to relax. Rather than firing up the grill, we made a simple salad with apple, tomatoes and cheese.

…and it was delicious!

Pork 2 Ways – Tuscan style

Pork 2 Ways – Tuscan style

When is a sausage not a sausage? When it is a Salsiccia!

Tuscan sausage looks a little like a shorter and fatter British banger – it too is made primarily of pork but the flavouring is a little different, garlic, coriander and cayenne pepper rather than onion nutmeg and sage.  Both favour a little mace but the real difference is the breadcrumbs or rusk, found in a British Banger but not in the Tuscan Salsiccia.

So, tonight we were getting a little ‘cheeky’ pork two ways – one in a Tuscan sausage and one as a small pork fillet – both very inexpensive.


The plan was to serve with a little grilled fennel and a mixed green and bean salad.  The sausage was going to be simply grilled and the pork fillet similarly but with a mustard and honey coating.  And this was where the fun starts – staying in a friend’s house we had no honey in the cupboard so time for that holiday improvisation and some apricot jam!


For the pork glaze:

  • Tablespoon mustard (this one was French)
  • Half tablespoon of apricot jam
  • Salt and pepper
  • A little olive oil

The egg was brought up to a very modest grilling temperature of around 140-150°C and some oak chips were added for a little smoke flavour.

The Tuscan sausage were popped on the grill.  The pork fillet had had any ‘silver skin’ removed with a sharp knife and had been sitting in a little olive oil with salt and pepper for about an hour.  After about five mins of gentle sausage cooking the small fillet was also added to the grill turning every few minutes so that it all took on some colour

After around another six to eight minutes the fillet was browning and it was taken off the grill and brushed with the mustard and apricot glaze (definately more of a glaze than a rub!

The fennel slices were removed from the grill and as there was plenty of mustard and apricot glaze – it too got a splash before being put back on the grill.

We were going for slightly pink pork and so when the internal reached 64°C (approx. 15-20 mins total) the fillet was taken off the grill and wrapped in foil for 10 minutes (during this time the core temperature of the Egg rose another 2°degrees).

All the vents on the BGE were closed to put out the charcoal – though the sausage and the fennel were left to finish off as we wanted the temperature of the sausage to reach at least 74°C. The pork fillet was cut into 2 portions for each plate and the sausage likewise!

If you are more comfortable with your pork cooked a little more, then the older recommended temperature for pork was 74°C so just leave on the grill a few mins more!

… buon appetito!


Pork 2 Ways - Tuscan style

August 4, 2017
: 2
: 1 hr 30 min
: 30 min
: 2 hr
: Easy

Italian Sausage and Pork Fillet served with charred salad Fennel and a green and bean salad

By:

Ingredients
  • 2 Italian Sausage
  • Small Pork Fillet
  • For the glaze
  • Tablespoon mustard (this one was French)
  • half tablespoon of apricot jam
  • salt and pepper
  • a little olive oil
Directions
  • Step 1 Remove the silver skin from the pork fillet with a sharp knife and sit in a little olive oil with salt and pepper for about an hour.
  • Step 2 Mix the glaze – mustard, apricot jam, salt and pepper and a little olive oil
  • Step 3 Bring the BGE up to a temperature of around 140-150°C (direct) and add some oak chips for a little smoke flavor.
  • Step 4 Place the sausage on the grill. 
  • Step 5 After about five mins of gentle sausage cooking add the pork fillet to the grill turning every few minutes so that it takes on some colour
  • Step 6 Add the Fennel slices to the grill
  • Step 7 After around six to eight minutes remove the Pork Fillet and the fennel slices and brush with the mustard and apricot glaze and put both back on the grill.
  • Step 8 For slightly pink pork remove from the grill when the internal reaches 64°C (approx. 15-20 mins total)
  • Step 9 Wrap the fillet in foil for 10 minutes (during this time the core temperature of the fillet will rise another 2°degrees).
  • Step 10 Close all the vents on the BGE and leave the sausage and the fennel to finish (the temperature of the sausage should reach at least 74°C.
  • Step 11 Cut the pork fillet and the sausage into 2 portions for each plate
  • Step 12 (If you are more comfortable with your pork cooked a little more, then the older recommended temperature for pork was 74°C so just leave on the grill a few mins more!)
Bruschetta al pomodoro

Bruschetta al pomodoro

What could be more amazingly simple than Bruschetta al pomodoro – and it both tastes and sounds so much better than tomatoes on toast too.  Perfect as a lunch or as a starter to get the tastebuds tingling for whatever you plan to serve up later!

These were simply prepared as the Egg was heating up to grill a main course.  The bread was sliced 1cm thick and toasted on the cast iron grill – but it would have worked just as well with the stainless steel grill (it actually works best of all with slightly stale bread too so perfect for those moments when you’re trying to use up the loaf!).

Whilst the toast was cooking it was time to chop up a couple of ripe tomatoes – if they have lots of seeds squeeze some of them out and discard and chop the tomato flesh into chunky pieces.  Take the toast off the grill and rub the “most toasted side with a clove of garlic – don’t peel it first simply cut off the base and use the toast to act like sandpaper and wear away the garlic (this is why slightly stale bread works best!)


Add the chopped tomatoes to the toast, glug a little olive oil on the top and pop back on the BGE around the edge (now with the least toasted side facing the flame) this will help to warm the tomatoes a little  – this is more important doing this in the UK than in the warmth of Italy!

After two minutes remove from the Big Green Egg and add some torn basil leaves and some fresh salt and pepper. If you are feeling very Mediterranean then add a little more oil and a touch of vinegar.

…Deliciously simple!


Bruschetta al pomodoro

July 25, 2017
: 2
: 5 min
: 5 min
: 10 min
: Easy

Fresh tomatoes on garlic infused toasted bread with olive oil

By:

Ingredients
  • Fresh ripe tomatoes
  • Bread
  • Garlic clove
  • Olive oil
  • Basil leaves
  • Salt and Pepper
  • Balsamic vinegar (optional)
Directions
  • Step 1 Heat up the Big Green Egg (this is an ideal dish to cook whilst the Egg is heating for something later
  • Step 2 Sliced the Bread into 1cm thick slices and toasted on the cast iron grill (it actually works best of all with slightly stale bread too so perfect for those moments when you’re trying to use up the loaf!)
  • Step 3 Whilst the toast was cooking chop up a couple of ripe tomatoes into chunky pieces.
  • Step 4 Take the toast off the grill and rub the “most toasted side with a clove of garlic
  • Step 5 Add the chopped tomatoes to the toast, glug a little olive oil on the top and pop back on the BGE around the edge (now with the least toasted side facing the flame) this will help to warm the tomatoes a little – this is more important doing this in the UK than in the warmth of Italy!
  • Step 6 After one or two minutes remove and add some torn basil leaves and some fresh salt and pepper. If you are feeling very Mediterranean then add a little more oil and a touch of vinegar.
Simply Porcini

Simply Porcini

One of the great pleasures of Europe is chancing on simple ingredients that you would need to search specialist shops for in the UK.  And so it was in the local tiny supermarket…

Porcini!

At €18 per kg, around the same price per kilo as a T-bone steak, in the world of edible mushrooms, it is something really special.

The Italians refer to this boletus genus of mushrooms as Porcini, meaning piglets!  The meat-like texture of porcini and their earthy and nutty flavour is unequalled and can be used in so many different ways.  But today is a day for simplicity and in Italy fresh porcini mushrooms are often enjoyed simply grilled and served with a little olive oil.   Although once known as a ‘poor man’s steak’ their price even here in Italy has changed that idea (unless you know what to look for and where to find them – though they’re so popular here that gathering them is strictly regulated).


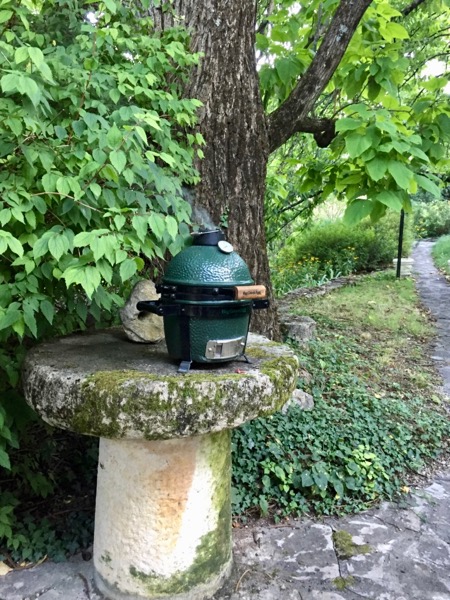
Triumphantly carrying my three porcini it was off to light the BGE. Simply set up with the cast iron grill in place and looking for a temperature around 200°C

The porcini were first brushed to remove any surface dirt, quickly washed in cold water to remove the debris and patted dry. Sliced into chunky sections, they were tossed in good olive oil before being salted and peppered.

Once the Egg was up to temperature the porcini were placed on the grill and the Egg closed.  After about two to three minutes they were beginning to produce a delightful aroma.  Each piece was flipped over revealing a golden grilled surface.

After another 2 minutes the waiting was over!  Beautiful porcini simply grilled and then just touched with a little more olive oil and some salt and pepper.  I don’t know about poor man’s steak, these were a feast in themselves. Perhaps we should think of steak as the poor man’s porcini!

Note to self – whilst porcini are not as easy to find in the UK, it made me think that a simple and delightful mushroom dish can simply be prepared using large field mushrooms, olive oil and seasoning.

Simply set the BGE to around 200°C direct heat with the cast iron grill in place.  Dip the cap of each mushroom into some olive oil, remove the excess and place “stalk up” on the grill.  Drizzle a little more oil into the cap of each mushroom and cook for 6-8 minutes until soft.  Remove carefully, not spilling any of the juice from within the cap and serve with salt and pepper on toasted bread!

Delicious!

Spatchcock in the Beechwood

Spatchcock in the Beechwood

Wandering around the local market here in Tuscany we spied a Spatchcocked chicken…  and so our plans for today’s food was sorted!

The term spatchcock refers to poultry prepared for roasting or grilling by removing the backbone and sometimes the sternum and flattening it out ready for cooking – for obvious reasons it is sometimes also called butterflying.  It is said to have two real advantages: firstly it cooks quicker, and as more skin is exposed – you have more delicious crispy skin!

We packed a picnic, some water, and a little local wine and set off up to an open Beech Wood clearing on the side of Mount Amiata close to where we are staying. Transporting the Egg between our holiday baggage driving to Tuscany had proved to be very straightforward – but driving up a winding mountain road with a largely empty boot could have left the BGE a little vulnerable.  So we simply held it in place with a stretched cargo net normally used to stop small items running around the boot.


We found a wonderfully quiet spot in the high Beech woods on the mountain. There were a series of wooden picnic tables and even some communal stone built BBQs available. I could imagine that at weekends this could be a very popular space but today, in the middle of the week, just one other couple enjoying the quiet, the dappled sunlight and a glass of wine!

The BGE was set up at the base of a Beech tree and brought up to temperature.  Once it had reached around 170C we added some snapped Beech twigs from the forest floor, and added these to the charcoal to create some Beech smoke and placed the platesetter feet up with the cast-iron grill in place.

We found a little wild rosemary which was placed on the grill and the chicken was sat on top.  There was just enough room on the Mini for a couple of potatoes too. The chicken had previously been rubbed with a little olive oil all over and then seasoned with a mix of sea salt, pepper and some mixed dried herbs.


The Egg was closed and left to work it’s magic!

After around 15 mins the chicken was cooking well but probably a little quicker on the underside than the skin side – and that would never do!  So the chicken was flipped over and just to make sure we didn’t end up overcooking it we put the in-dwelling temperature probe from the iGrill mini into the thickest part of the chicken.

This is a very neat inexpensive little battery powered bluetooth temperature probe.  It is safe to use with the platesetter in place – running the heat resistant cable over one of the legs of the platesetter to protect it from any flames.  Best of all it sends the core temperatu

re of the cooking meat to your bluetooth enabled phone, meaning you don’t even have to stand up to check – this is what being on holiday is all about!

Wanting a final core temperature of 74C once the probe indicated we were near 70C the vents of the BGE were closed and the Metal cap replaced with the snuffer cap. The final part of the cooking would be completed using the residual heat of the egg (so we burn less charcoal and the egg cools down quicker for later transport!).

Once 74C was reached the chicken was taken off the grill leaving just the potatoes to finish off.  The chicken was wrapped in foil and allowed to rest for 10 minutes.

The chicken was simply divided into 2, and served with the potatoes a green salad and local tomatoes, and of course a glass or two of the local red wine!  The skin was crispy all over and beautifully flavoured, but the big discover” was cooking the chicken simply sitting on the bed of rosemary – now that is something we will do again …Salute!


Spatchcock Chicken

July 23, 2017
: 2
: 5 min
: 30 min
: 35 min
: Easy

Spatchcock Chicken and Potatoes cooked over charcoal served with a green salad

By:

Ingredients
  • Small Spatchcock Chicken
  • Potatoes
  • Green salad
  • Olive Oil
  • Salt
  • Pepper
Directions
  • Step 1 Set up the BGE with the platesetter and bring the temperature up to around 170C. Beechwood twigs can be added for a little smoke.
  • Step 2 Rub the chicken with a little olive oil all over and then season with a mix of sea salt, pepper and some mixed dried herbs.
  • Step 3 Place a little wild rosemary on the cast-iron grill and sit the chicken on the top. Add a couple of small potatoes on to the grill.
  • Step 4 After around 15-20 mins the chicken will be largely cooked You may want to flip over the chicken just to make sure the skin is crispy
  • Step 5 Once the core temperature is 70C close the vents of the BGE and replace the Metal cap with the snuffer cap. The final part of the cooking would be completed using the residual heat of the egg .
  • Step 6 Once 74C reached take the chicken off the grill and leave the potatoes to finish off. Wrap the chicken in foil and allowed to rest for 10 minutes.
  • Step 7 Divide the chicken into 2 and served with the potatoes a green salad (and a glass or two of the local red wine!)
Bistecca alla Fiorentina

Bistecca alla Fiorentina

Steak is perhaps not the first thing you think of when you consider Italian cooking but if you are in Tuscany then think again!

Bistecca alla Fiorentina, the Florentine Steak is famous throughout the world.   Traditionally it is cut from the loin near the leg of the Scottona (a young female cow that has never been pregnant). Traditionally from the huge Chianina cattle from Tuscany’s  Val di Chiana valley, near Arezzo.  So large are these cattle that the T-bone steak that goes to make the Bistecca alla Fiorentina may way up to 3kgs.  In different parts of the world it is described as a Porterhouse Steak – but that is nowhere near as romantic!   The meat should be well marbled and hung for between 15 and 21 days before cutting.

As you would expect there is a strong “folklore” associated with cutting the Florentine steak in the first place!  It is said that the minimum thickness should be 1.5 inch but better still if 2 to 2.5 inches and they range in weight from 1.5 to around 4 lbs but can be more!

Our version of dish was a little more modest and cooked a little differently from the classic Florentina!

The cut of meat was correct, loin from near the leg of the Scottona – from the butchers counter of the local supermarket in the village we were staying.  I would normally not buy steak from a supermarket in the UK but I have to say that here in Tuscany the meat is excellent.  This piece by Florentine standards was 650gms (1lb 4oz) but still generous for two!  Being thinner than a traditional Florentina, just 3/4 inch (traditional Bistecca alla Fiorentina can be up to 3 inches thick!) a different cooking method was used; the Reverse Sear.

Traditionally the Fiorentina is cooked over a very high heat for between 5-10 mins per side and then stood on the T-bone on the grill for a further 5-10 mins to give a very crusty outside and a rare middle.  With a thinner steak such as this the chances of over cooking was high – hence the reverse sear!

The steak was seasoned with salt and pepper with internal temperature probe in place ready to go on to the grill.

The Big Green Egg was heated to 110°C with the platesetter in the legs up position and the cast iron grill on top.  Once the Big Green Egg was up to temperature the steak was added and cooked to an internal temperature of 47-50°C (you could even be a little less if you like very rare steak).

Pop the steak onto the grill and allow it to warm up to around 47-50°C – at this stage the meat will be rare all the way through – but with no delicious crispy outside!

Wrap in tin foil and set to one side.

Remove the plate setter and replace the cast iron grill – heat the egg up to 250°C.  Once there, pop the steak back on for approximately one min per side (certainly no more than two!).

Then remove from the grill and re-rap in the foil and let rest for 10 minutes at least.

Slice across the grain from either side of the T-bone and serve with a salad or some roasted peppers – or just by itself with a squeeze of lemon!

Simply delicious!


Bistecca alla Fiorentina

July 23, 2017
: 2
: 10 min
: 15 min
: 25 min
: Easy

By:

Ingredients
  • T-bone steak - The meat should be well marbled and hung for between 15 and 21 days before cutting. May weigh upto 3Kg In different parts of the world it is described as a Porterhouse Steak – but that is nowhere near as romantic!
  • Salt
  • Pepper
Directions
  • Step 1  Classically it is said that the minimum thickness should be 1.5 inch but better still if 2 to 2.5 inches and they range in weight from 1.5 to around 4 lbs but can be more! Timings here for are for a more modest 650gms (1lb 4oz).  With a thinner steak such as this the chances of over cooking was high – hence the reverse sear!
  • Step 2 Season with salt and pepper and with internal temperature probe in place it is ready to pop onto the grill.
  • Step 3 Heat The Big Green Egg to 110°C with the platesetter in the legs up position and the cast iron grill on top. 
  • Step 4 Added steak and cook to an internal temperature of 47-50°C (you could even be a little less if you like very rare steak).
  • Step 5 Wrap in tin foil and set to one side.
  • Step 6 Remove the plate setter and replace the cast iron grill. Heat the egg up to 250°C.  Pop the steak back on for approximately one min per side (certainly no more than two!).
  • Step 7 Remove from the grill and re-rap in the foil and let rest for 10 minutes at least.  Slice across the grain from either side of the T-bone and serve with a salad or some roasted peppers – or just by itself with a squeeze of lemon
The Big Green Egg goes on Holiday!!

The Big Green Egg goes on Holiday!!

Summer 2016  I simply said to my wife Jackie: Do you think it would be a silly idea to take the Big Green Egg on holiday with us? – quite expecting the “yes of course it is silly!” reply.  We were driving to Tuscany from the North of England for three weeks before coming back into France for a week with our French family then making our way home through northern France and Holland.

“No I think it would be a good idea” said Jackie.  Well, that will teach me…

The practicalities of it now needed to be thought about. I’d need to slim down the usual things I would pack, slightly less bike gear, slightly less camera stuff actually this was going to be quite do-abIe as long as we took our smallest Egg – the Mini.

No longer available in the UK it is a little smaller than the MiniMax – but as this was a travel experiment it would be a good test without much impact on the amount of other belongings we would take!

So the Mini was cleaned and loaded with charcoal so ready to go at a moment’s notice.  The Platesetter, the Cast Iron Grill and the Duel function Metal top all put inside together with a box of firelighters, some matches and the grill gripper.  The Big Green Egg was wedged between our bags and was as stable as anything.

Goodbye Northumberland – hello Tuscany!

Unpacking in Tuscany was completely uneventful. Turns out this was a very easy way to transport an Egg!  We later found out that when driving out for picnics etc with the Egg that a stretched cargo net over the Egg made driving with the Egg completely worry free. Two lessons learned already!

So the Big Green Egg goes on his holidays – welcome to Tuscany!

Now to decide what to cook first – let’s see what day 2 Tuscany brings …