
Braised chicken, haricot beans and Puy lentils
It is really quite some time since we have been cooking on a Mini Big Green Egg in mainland Europe. It was rather good taking up the challenge again! The grill size is just over 20cm but with a little ingenuity there is so much you can cook on it and it fits easily in the boot of a car!
We were cooking enough for 6 people and so we were careful (more…)


 Whilst the dish works well with fresh or dried linguine, using dried gives a little more time flexibility. Cook the pasta for 1-2 mins less than the suggested cooking time so it’s al dente. When we were 3 mins from this point we popped the sautée pan back onto the BGE and then add a good handful of washed and debearded mussels to the tomato sauce. The pan was tossed, then the lid placed on top and cooked until all the mussels opened. (As usual with mussels, if any remain closed after cooking, throw them away). On the BGE you can get away without putting the lid on the pan. In addition to the chopped parsley in the original recipe, we also added a handful of samphire which works really well. Shut down the BGE
 This allows the pasta to suck up all the lovely tomato and mussel juices. We had previously made some tarragon crouton so finished off the dish with these and a good glug of olive oil. This is a dish to serve immediately.


 The Kerridge recipe then went on to make suet pastry, which is lovely. As we had some left over puff pastry that I had made for another cook we decided to use that. The edge of the pie dish was egg washed and circles of pastry put on top to carefully seal the pie dish. Bits of excess pastry were then removed from round the edge of the dish allowing around 1cm to be stuck to the side of the dish.
 To finish some pastry leaves were shaped from the pastry offcuts. These were popped on the top and then the whole pastry top was egg washed. Finally a little salt was sprinkled on the top. We elected not to put a steam hole into the lid (which would normally be done) and this didn’t seem to cause any problem at all.
 They were left to rest for 3-4 mins before serving. It is probably easier to control the browning of the pastry in a domestic oven – but that or the Big Green Egg will both do the job well!!

 The first thing to do was unroll the piece so that we could add additional flavours to the inside of the joint. The roll had been made up from 2 separate pieces, again illustrating the versatility of this cut.
  This was followed by the dried oregano, lemon zest and anchovies. The ingredients for the dish gave it a very Provençal feel. From our experience chilli is not used to any great extent in Provence and so we omitted the chilli flakes that were suggested in the original recipe.
 We did the first part of the cook in one of our handless Tefal pans. This could be done directly on the BGE or on a conventional hob. The pan was heated and some olive oil added. The lamb was then rolled around the pan until it took on some good colours all over. As the outer layer shrinks a little as it cooks, the inside seems to squeeze out of the middle as in the picture. Don’t worry about this as it will largely correct itself in the second part of the cook. Whilst the meat browned, the onions were cut into large chunks (as it was going to be a slow cook and we don’t want them to disappear into the cooking sauce).
  The meat was set aside, a little more oil was added, and the onion put straight into the same pan to fry with the partially crushed garlic. The capers were then popped in with the onions and cooked through, followed by a little more lemon zest. The pan was then deglazed with white wine and a good squeeze of lemon juice. The final addition was the tinned tomatoes which were gently crushed and stirred into the mix. The rolled lamb was then placed on top and we were ready to go.
 We were cooking in the Big Green Egg which had been set up for indirect cooking at around 140C. Cooking in the EGG this way we usually leave the dish uncovered. Very occasionally the liquid may need to be topped up a little with some water.
 When the core was around 90C the meat was removed and allowed to rest prior to carving. At this point the final consistency of the sauce can be checked.
 When ready to serve, carefully remove the bands or butchers string and carve into generous slices. These can be served directly on the sauce. We also added some French beans from the garden – well it is a Provençal dish!!


 The BGE was left to stabilise at around 180C. The kippers were popped into one of our handleless Tefal Ingenio pans with a little butter and gently cooked over the direct heat for around 5 minutes until the backbone started to lift.
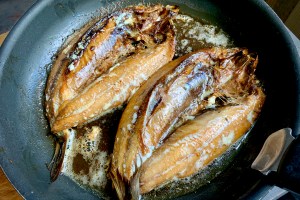 They could have simply been left for a further minute or so to finish on the BGE – but we had our Gozney Roccbox pizza oven set up next to us. We simply used it as a salamander to finish them off with some top heat for a minute or so.


 We have previously cooked

 Our core temperature after 5 minutes standing was still only in the high 20s Centigrade. Whilst the temperature would rise by a few degrees during resting we decided to give it a conventional oven finish. Our oven of choice here would clearly be the BGE. Sitting the steak on a bed of Rosemary in a cold handleless pan and putting this back on the BGE would safely allow 5 mins or so more roasting without over cooking. This was a technique we first came across on a Theo Randall cooking course.
 After around 5 mins the core temperature had risen to around 45C and was ready to rest. It was taken out of the BGE and wrapped in foil and covered with a tea towel to rest and keep warm.
  Whilst resting some parboiled potatoes were roasted off in the BGE using the residual heat.


 The BGE was set up for direct cooking. We used our handleless Tefal Ingenio frying pan and heated it over a medium heat (around 140-150C dome temperature). Once the pan was warm we added 1 tbsp butter and a drizzle of oil. The 2 wrapped escalopes were popped in the pan and fried on each side for about 2 minutes until beautifully coloured.
 As we were ready to turn over the escalopes the sage leaves were nicely fried, and were carefully lifted onto the cooked side of the escalope whilst the other side was cooked.
  The meat and accompanying sage leaves were removed to a warm plate and covered with foil to keep warm.
 The pan was put back on the heat and the remaining butter was added along with the masala. This was simmered for a minute to produce a lovely simple glossy sauce.

 This is relatively simple to remove and makes such a difference. Slide the filleting knife between the silverskin and the muscle – and then remove the silver skin in exactly the same way as you would fish skin from a fillet of fish. Just keep the blade close to the cutting board. This gave 2 lovely loin joints which just needed a little neatening to finish them. There was then around 500g of belly. The simplest thing to have done would have been to mince it and use it for sausages or burgers. This time however we chose to remove some of the more obvious connective tissues and cut it into chunks to make a simple venison ragù (more later).
 We had found some porcini mushrooms in the autumn and had dried these at home. For us porcini are a rare find on a woodland walk so we had dried and preserved every last bit of them!
  We had kept the ‘neatening trimmings’ that most people discard separate. So we took around 1tbsp of this and ground it into a powder with a pestle and morter. We added the salt we would use for seasoning the loin to the porcini powder. When ready to cook we removed the loin from the fridge. (We tend not to leave it to come to room temperature as we are trying to delay the heating of the core for long enough to colour the outside of the meat). The loin was dusted with the porcini salt mix and rolled until completely covered (the very ends were ignored as these would not be served).
 At which point it needs to be moved around in the pan so that an even browning occurs on all sides. And we are trying to do this without the heat penetrating too far into the meat. When the venison was well coloured (core temperature was less than 40C) we set the BGE back to indirect cooking adding a cold platesetter and closed off the vents. The venison was placed back into the BGE allowing the indirect heat to bring the core temperature up to around 52C. This only took a few minutes. The venison was then rested whilst the vegetables were finished.


 Making the paste for the marinade was very straightforward. The garlic, cinnamon, cumin, oregano and lemon (all the lemon minus the pips) in a blender with 1 tsp salt and 2 tsp black pepper. This was blended until smooth. As we were cooking goat which is much less fatty than lamb we also added 2tbsp of olive oil to the marinade. The paste was massaged into both sides of the shoulder which was then covered with foil and left in the roasting dish for 24 hours (you can leave if for upto 48 hours). This was left in the fridge until the morning of the cook.
 So on the day of the Coronation we lit our large Big Green Egg and set it up for indirect cooking at around 120C (the original recipe cooked the lamb at 160C for 4 hours). When there is an opportunity for long slow cooking it is very much what I would opt for. It also allowed us to disappear for a big chunk of the day to watch the coronation knowing the meat would be ready for us in the evening!
  The quartered onions were used as a trivet under the goat and 750mls of pomegranate juice was poured over the top as the cooking started. We managed to find some pure pomegranate juice (unsweetened) with a little difficulty as most are apparently sweetened with artificial sweetener – these may be OK too! The original recipe suggested covering with foil which I would definitely do in a conventional oven. We only did here for the second half of the cook after around 4 hours at the stage you can see in the picture on the left.
 These were added to a saucepan with the honey. This was allowed to bubble on the hob for around 30 minutes to reduce and thicken the glaze. Meanwhile the goat was re-covered with the foil and allowed to continue cooking.
 This was done every few minutes until all the glaze was used and the meat was left to cook for a further 30 mins, uncovered, until the glaze is bubbling and just starting to char. The meat and the sticky onion sauce was then removed. The meat was covered with foil and a couple of tea towels and left to rest (we left it for around an hour).
 The goat was shredded. mixed with the sticky onions and served on a bed of rocket and wild garlic (we should have added the rest of the pomegranate seeds to the meat at this stage but forgot until we were plating!! The whole dish worked perfectly with the home made flat bread we made as the meat was resting!

 We have been fortunate enough to be gifted roe deer haunches on more than one occasion. We have cooked them as a whole haunch, and we have


 Once the EGG was up to temperature we added the fresh mushrooms to a dry sauté pan and began to toast them until they took on a little colour and then finished them in a little olive oil and set them to oneside for later. We did the same with the dehydrated mushrooms and set those aside but kept them separate. Save the mushroom liquor.
 We added the tomato puree to the partially cooked vegetables. They were then tumbled so that all vegetables were coated with the puree. This was then left to cook for another 5 minutes or so. Once at temperature the tomato puree undergoes a Maillard reaction (the same as meat does when roasted) adding to the overall intensity of the tastes.
  The browned venison was then added followed by
 By this time the steady temperature of the BGE was at around 140C and so the Bourguignon could be left to cook for the next hour. We could then see how the meat and the vegetables were cooking. It needs to be long enough for the venison to be soft and tender whilst the vegetables still have a good and reasonably firm texture. We left it cooking for another 30 minutes, adjusted the seasoning and added the rest of the mushrooms the had been previously set aside.
 By this time the sauce had darkened and thickened but we still finished it by thickening with a very small amount of cornflour (about 1tsp).


 It was covered in a paste made from rosemary, thyme, garlic, lemon zest, paprika, sea salt and olive oil. The lamb was put into the BGE and cooked for an initial 45 minutes. After which time the lamb was gently taking on a little colour and releasing juices into the roasting dish.

 When the rest of the meal was ready, the lamb was carved and plated. Some of the lamb fat/oil was poured off the cooking liquor and the jus was served in a small jug. We could have been very Chefy and passed the jus – but the little fragments of meat, herbs and onion were far too good to discard!!


 gently cooked to release some of their fat. To this was added a simple soffritto of onion, carrot, celery and a chopped garlic clove. A little olive oil was added and the vegetables coloured.


 The sliced garlic was added to the oil and was cooked for around 1 minute. The courgettes were then added and cooked for 5 minutes, tossing them a few times until they were a light golden colour. The salmon tail had been skinned and cut into strips.
 The fish was cooked through for 2-3 minutes only and the pan was removed from the heat. If you cook any longer the fish will break up.
 At 7 minutes the fettuccini was still a little undercooked and so this is a perfect time to add it to the courgettes and the salmon and bring the whole pan back to temperature over the heat. Cooking the pasta in the sauce for he last couple of minutes infuses the sauce flavour into the pasta. Possibly even more importantly, the pasta and a little pasta water, adds a silkiness to the sauce. It may be necessary to add a little more pasta water if the sauce needs to be loosened slightly. If cooking on the BGE this last stage needs to be done with the lid open.


 So over the last 18 months we have made just a couple of small adjustments. The recipe below includes all these changes.
 The second change we made was adding the sautéed fresh mushrooms towards the end of the cook – perhaps 20 minutes before removing from the heat rather than at the start of the cook. That helps to keep the textures more varied still.


 Before we go any further – this dish is fabulous made using lamb shoulder. If you are open to some new ideas – it is every bit as good, though slightly different using lamb’s heart as in this recipe. If you are not happy with the idea of using heart (at a fraction of the price) then use shoulder!

 The Big Green Egg was then set up for indirect cooking and the casserole was left without a lid to cook for around 2-2.5 hrs at 120-30C. Initially the sauce will look very wet and a little incipid but over the period of the slow cooking it will become thicker, darker and richer. Ultimately finishing with a super rich sauce which sticks beautifully to the pasta. As this is not truly a regional dish we played with some different pasta types. It went well with pappardelle, our usual Tuscan standby as you can see above. It would work well with rigatoni reflecting the dishes Sicilian origin – but we finally settled on casarecce –
  again Sicilian in origin and a perfect pairing for the lovely dish.


 Traditionally the leek sauce would be started off by frying some pancetta/lardons in a pan and then adding the leeks. In the spirit of ‘Avanzi’ we used some sausage meat we had in the fridge after making stuffing balls to have with the turkey the day before – but equally some of those stuffing balls broken up would have done just as well. The first stage was cooked over direct heat. Once in the pan and coloured, 500g of chopped leeks were added with some thyme leaves (fresh or dried will work) and some olive oil. These were sautéed at a medium heat for a few minutes. The heat was then turned down by adding the platesetter and converting to indirect cooking. The leek mix was seasoned and covered to cook for around 30 minutes. We checked and stirred the dish every 5-10 mins to make sure nothing was sticking or taking on too much colour.
 This whole process reduces the bulk of the leeks by about two thirds. At this point we added the turkey torn into chunks, and some cooked chestnuts left over from the roast turkey dish the night before (fresh vac-pac chestnuts would be fine too if you have no left overs). As the turkey and chestnuts were warmed through in the sauté pan, a tablespoon of cornflour was stirred into some cold turkey stock. (This was made from the bones of the turkey on this occasion but a stock cube or a ‘stock pot’ would work). The stock/cornflour mix was then stirred into the pan and was kept gently moving until it began to thicken at which point the nearly cooked chilled pasta was added to the mix.
 Some breadcrumbs were added, followed immediately by the torn or sliced mozzarella. Then for a crispy top, more breadcrumbs and the parmesan.

 We used the expander system so the pork could sit on the top layer and drip quietly into a roasting pan on the second layer away from the hot platesetter.
  For the first hour the meat was placed with the skin up and then the pork was turned over with the skin down for the rest of the slow cook. It would take around 6-8 hours for the pork to reach an internal temperature of 90+C. We took the belly pork off at this stage.
 Once the meat is back up to a suitable core temp (above 70C) add some top grill heat to your oven. This crisps the skin very quickly – so don’t let it burn (yes we have learnt the hard way!).


Recent Comments